.avif)
Managing quotations, payments, and receipts usually means handling three separate steps that don’t naturally sit together in one place. Each part needs different information, different validations, and a different format, yet they all belong to the same transaction. When these steps aren’t connected, you end up repeating details, re-entering amounts, or tracking numbers manually.
A combined quotation-to-receipt flow solves this by keeping everything in one structure. It keeps quotation and payment management in one place so teams don’t have to switch tools. Instead of preparing a quotation in one tool, collecting payment details somewhere else, and then generating a receipt separately, you work inside a single app that holds the entire journey from start to finish.

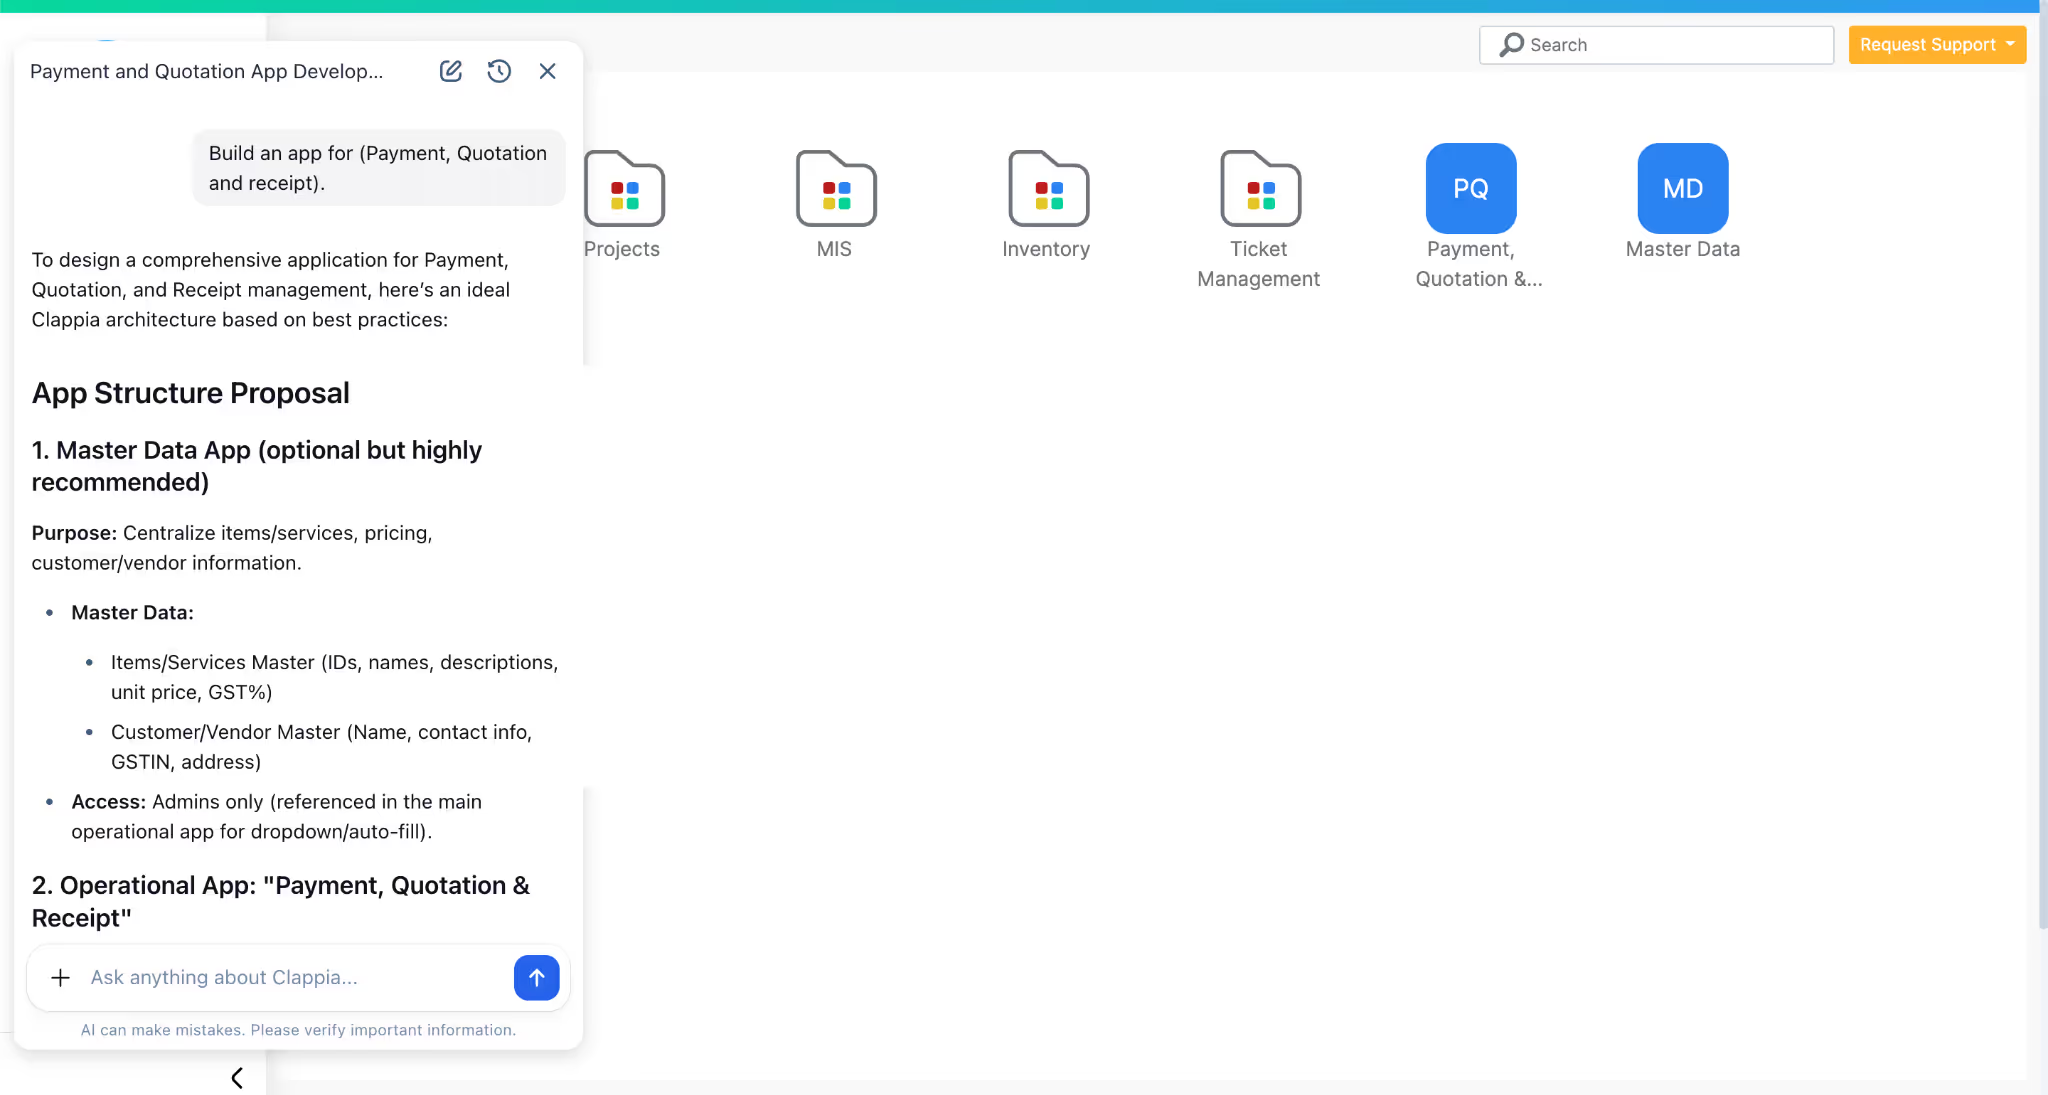
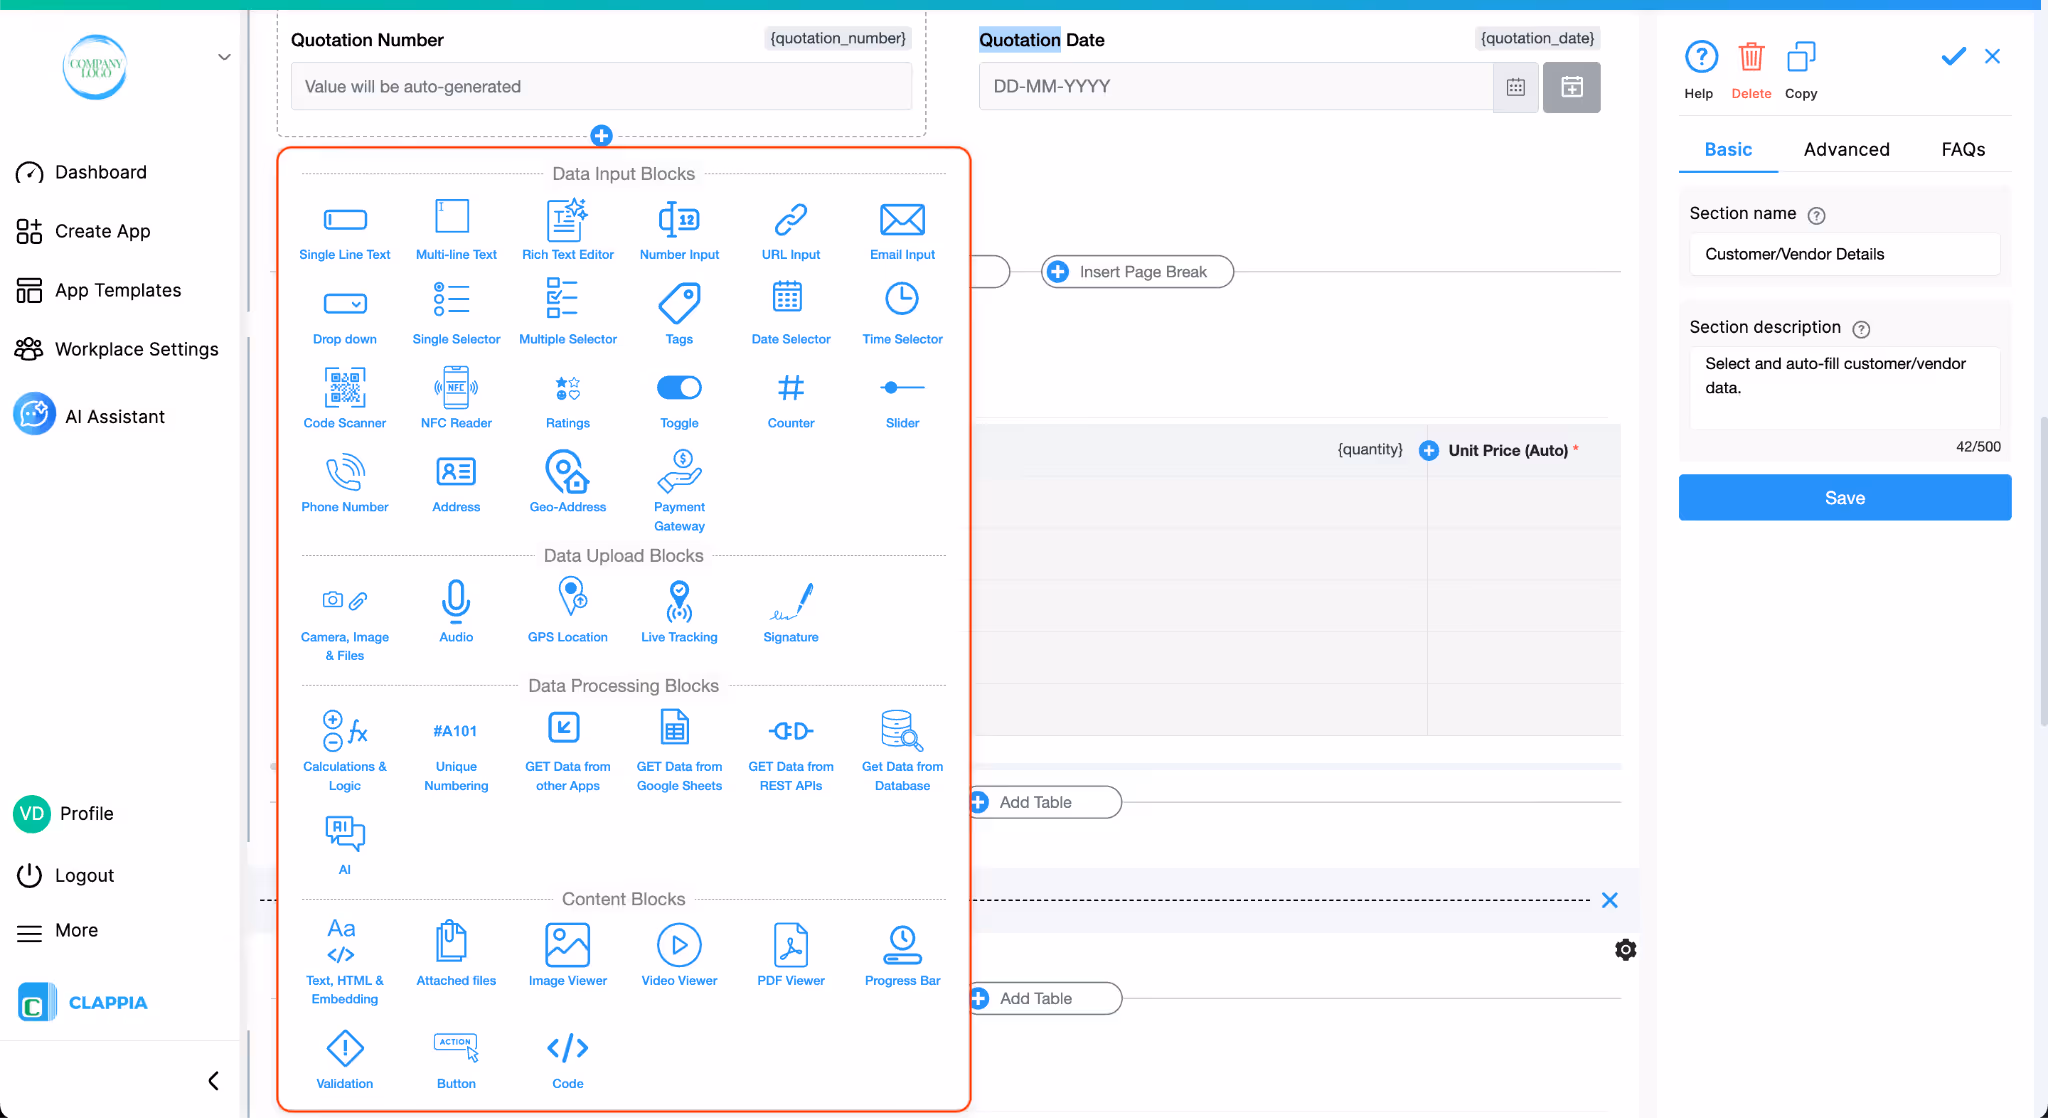
Clappia makes this possible without coding and faster with AI. You can generate the starting version of the app by simply telling Clappia’s AI assistant what you need. For example, “Create one app with three sections: quotation, payment, and receipt.” Clappia’s AI builds the structure in seconds, and you can refine every part of it using drag-and-drop blocks.
The layout stays clear, the sections stay connected, and the data moves smoothly through each stage of the quotation management system.
Before we look at the app itself, the next sections explain how you can build it, the different entry points you can use in Clappia, and the advantages of setting up this kind of system in a no-code workspace.
You can set up this Quotation–Payment–Receipt flow in multiple ways based on how you prefer to start.
Using the AI Assistant
If you want a quick starting point, you can tell the AI assistant what the app should include. It will create the initial version with all the sections, fields and basic structure that you can edit further.
Using the App Designer
If you prefer shaping the app yourself, you can add each section manually and customise it based on how your team manages quotations, payments and receipts.
Using Clappia MCP
Some teams use tools like Claude along with Clappia MCP. You can give instructions through these platforms and have them build or update apps inside Clappia automatically.
From an Excel File
If you already maintain quotation or payment records in spreadsheets, you can import that file and let Clappia convert it into an app structure.
From a Google Form
If you have been collecting customer details or service requests through Google Forms, you can migrate that form into Clappia and then extend it with payment and receipt steps.
After choosing how you want to begin, you can shape the app in the way that works best for your sales or service flow. This gives you a service quotation app that can be shaped to match how your work moves from quotation to payment and finally to receipt.
This app can be built in Clappia and can be modified to suit any industry requirements.
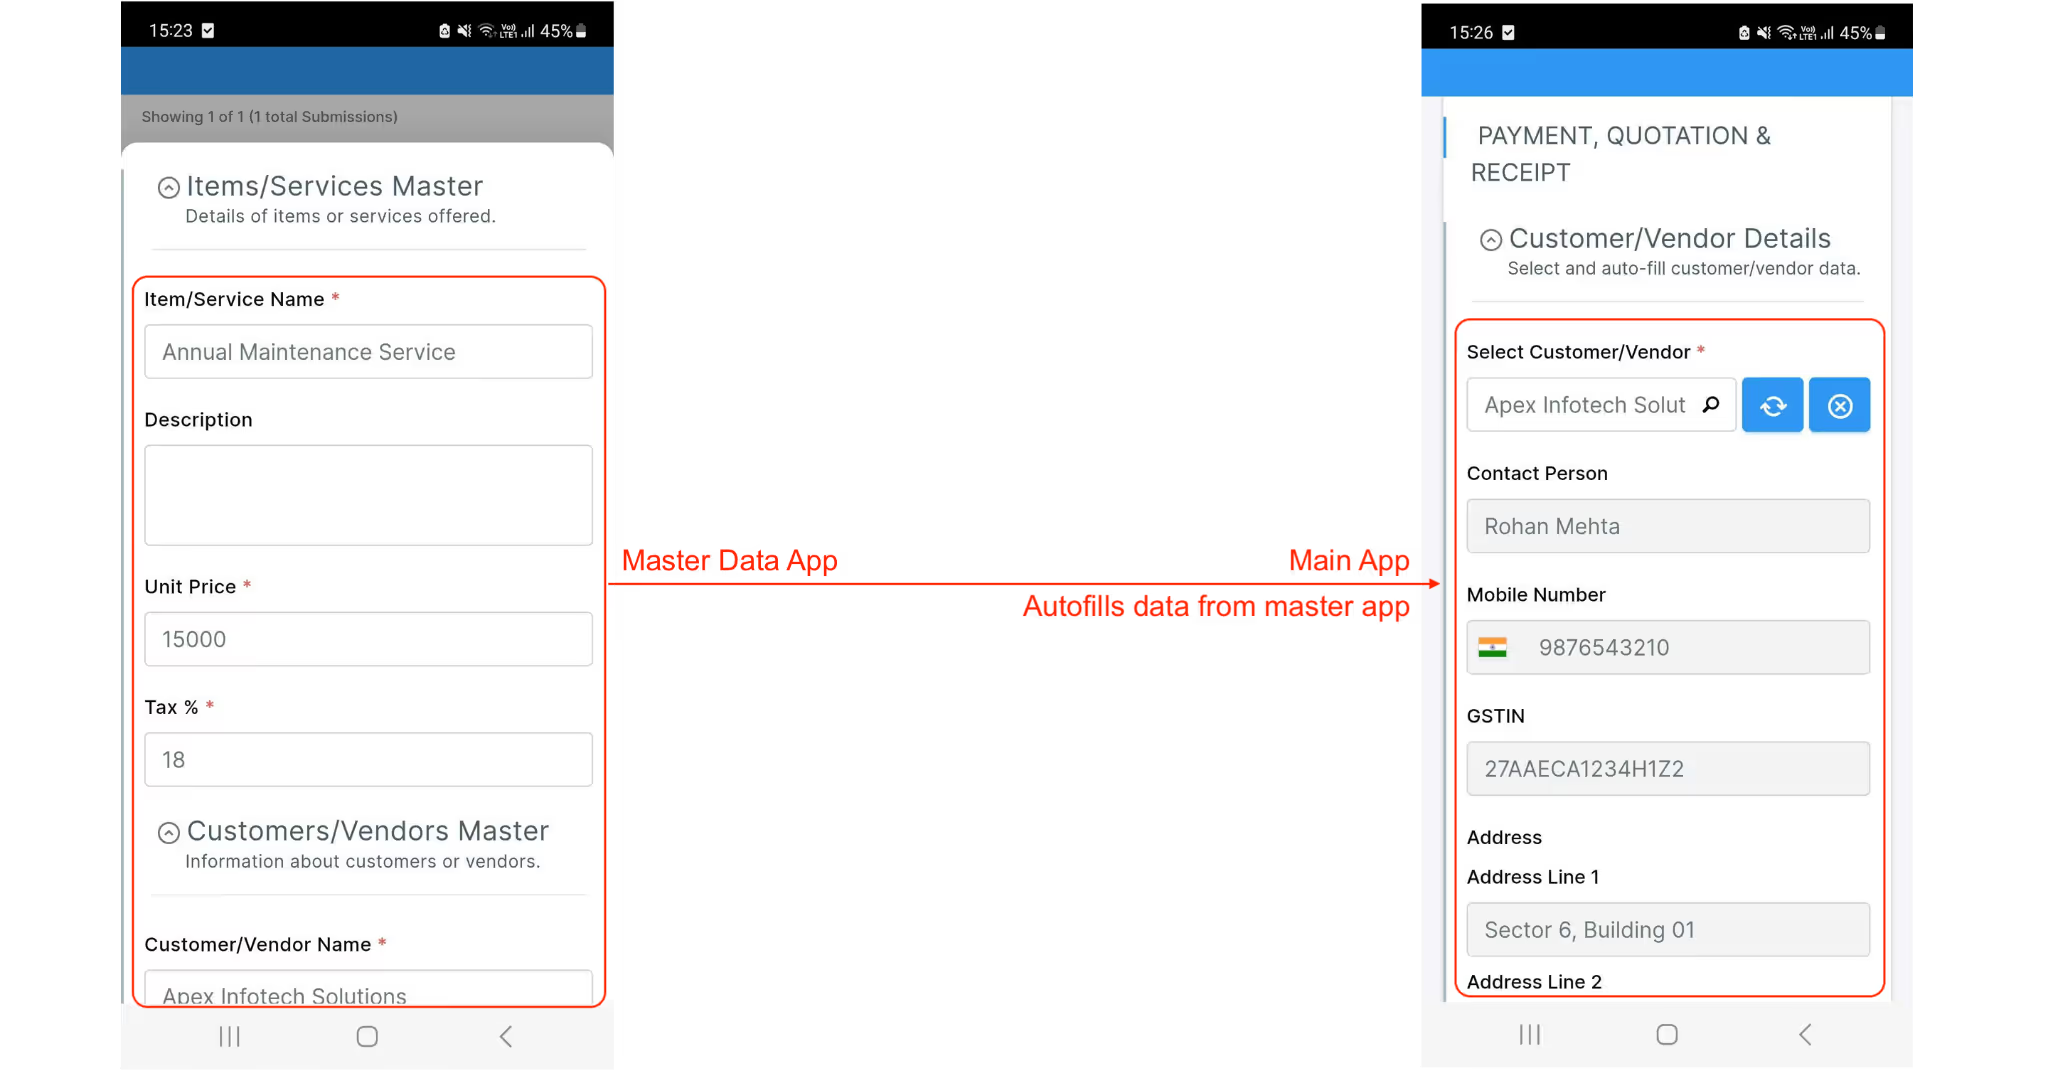
It was created using the AI assistant in Clappia and consists of two apps: A master data app and the main app.
The field lists show the fields included in the app followed by the feature used brackets.
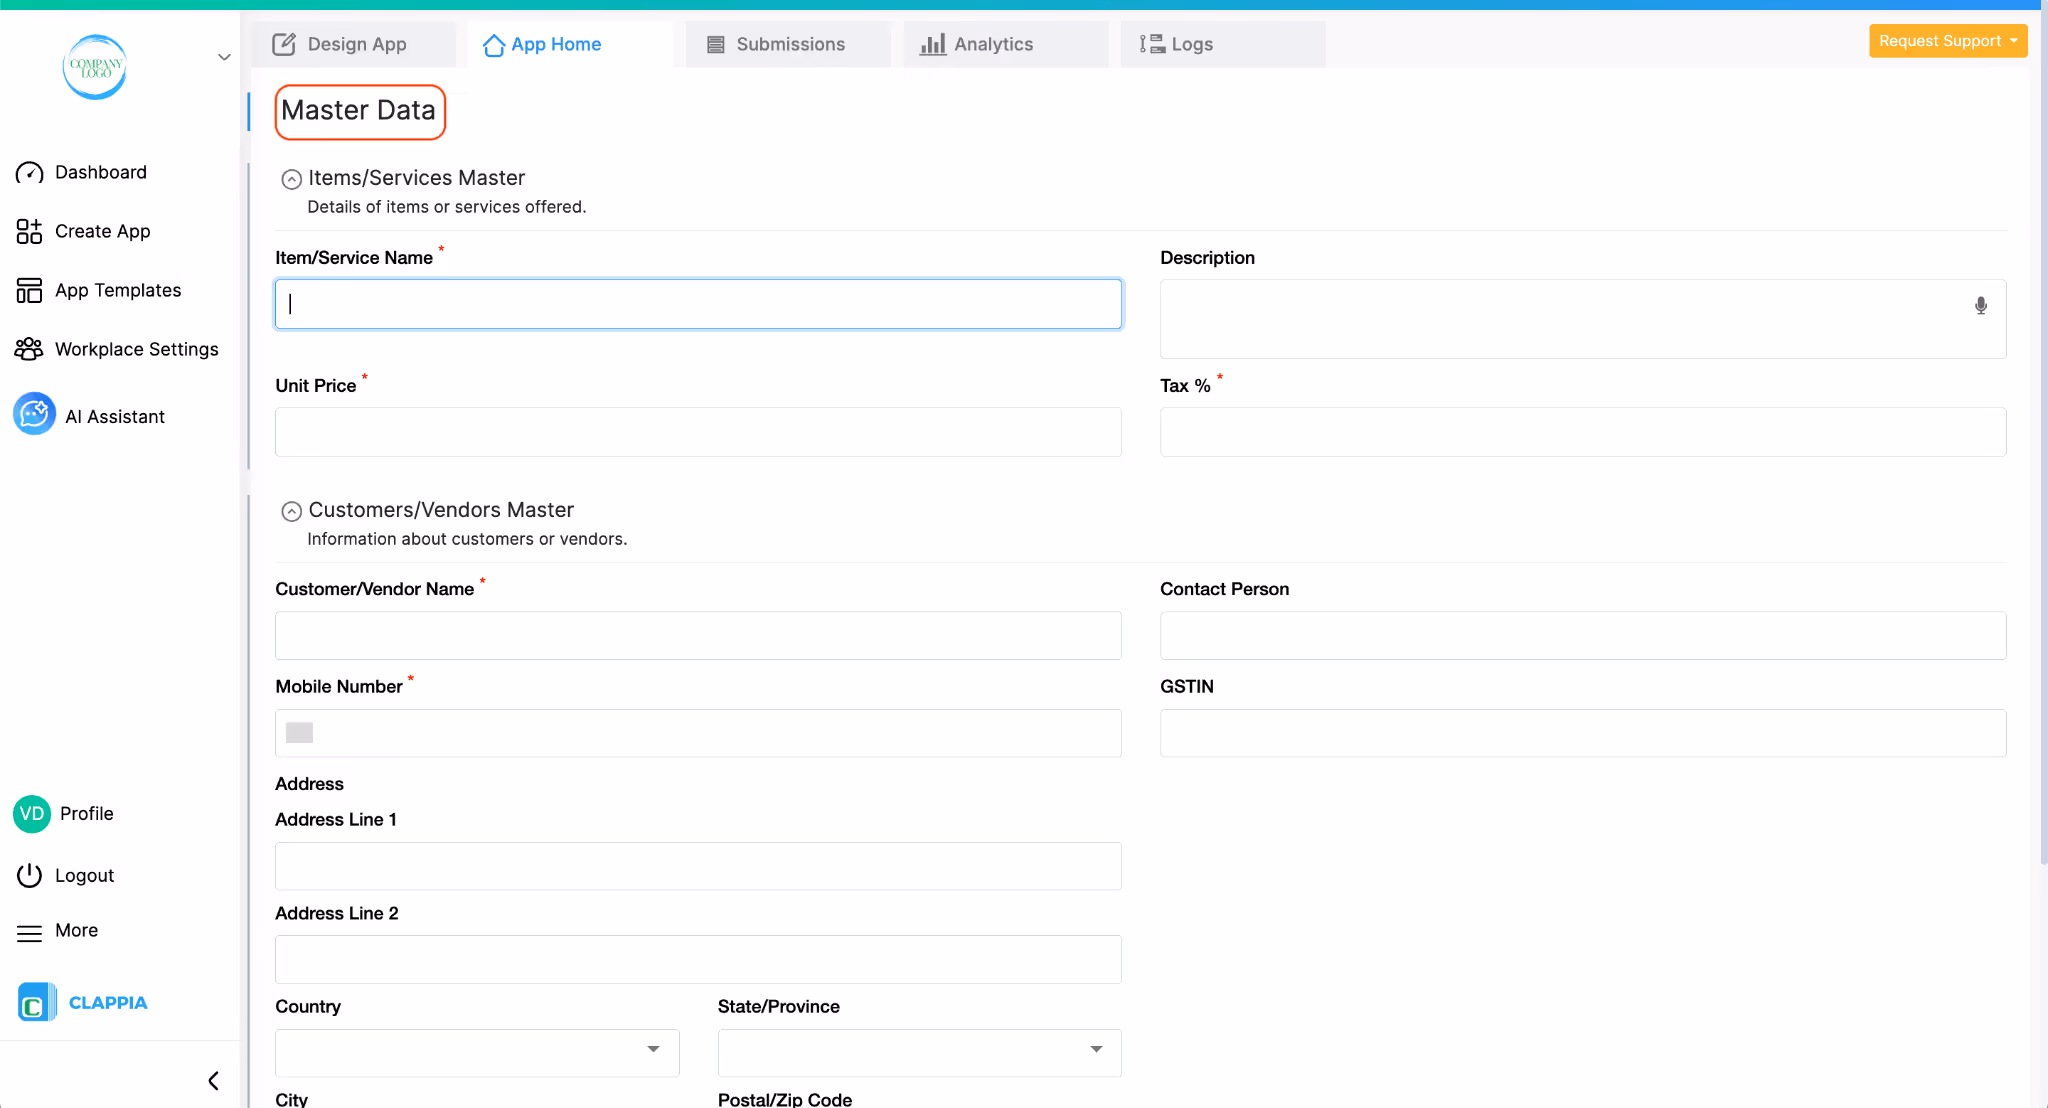
The Master Data app is the base that holds all the reference information required for the quotation, payment and receipt process. It becomes the foundation of your quotation creation tool by keeping pricing and customer details ready for every new transaction. Instead of typing customer names, addresses, item details or tax values every time, this app stores them once. Other apps can then pull this information whenever required. This keeps the entire system clean, reduces repetitive work and ensures all teams use the same data. If you have such data in spreadsheets, you can pull information from them into Clappia to remain consistent.
Section: Items and Services
This section stores the list of products or services offered. A simple structure usually includes:
Why these fields matter
The Master Data app becomes the single place where pricing and tax information is maintained. The price and tax fields are saved as number inputs so they can be used inside the calculation fields of the main app. If a price changes, it can be updated here once, and every new quotation in the main app automatically uses the latest values.
Section: Customers and Vendors
This section stores the details of the people or businesses involved in the transactions. It can include:
Why these fields matter
Storing customer information in one place removes the need to type or maintain the same details in multiple apps. When the main app pulls this data, the customer name, address, phone number and GSTIN appear exactly as saved, reducing spelling errors and differences in formatting. Updating a customer’s address or phone number becomes easier because the change only needs to be made here, and all connected apps will reflect the updated information immediately.
Additional Fields You Can Add to the Master App
Depending on how your business works, you can include additional fields such as:
These fields help you organise customers and items better. They also make the master app robust enough to support more processes in the future without redesigning the structure.
The main quotation app brings together the steps involved in generating quotations, accepting payments and creating receipts. This app is divided into pages so that each activity remains clear and easy to complete. This structure helps users move through the process in a guided way, without viewing unnecessary fields all at once in the app.
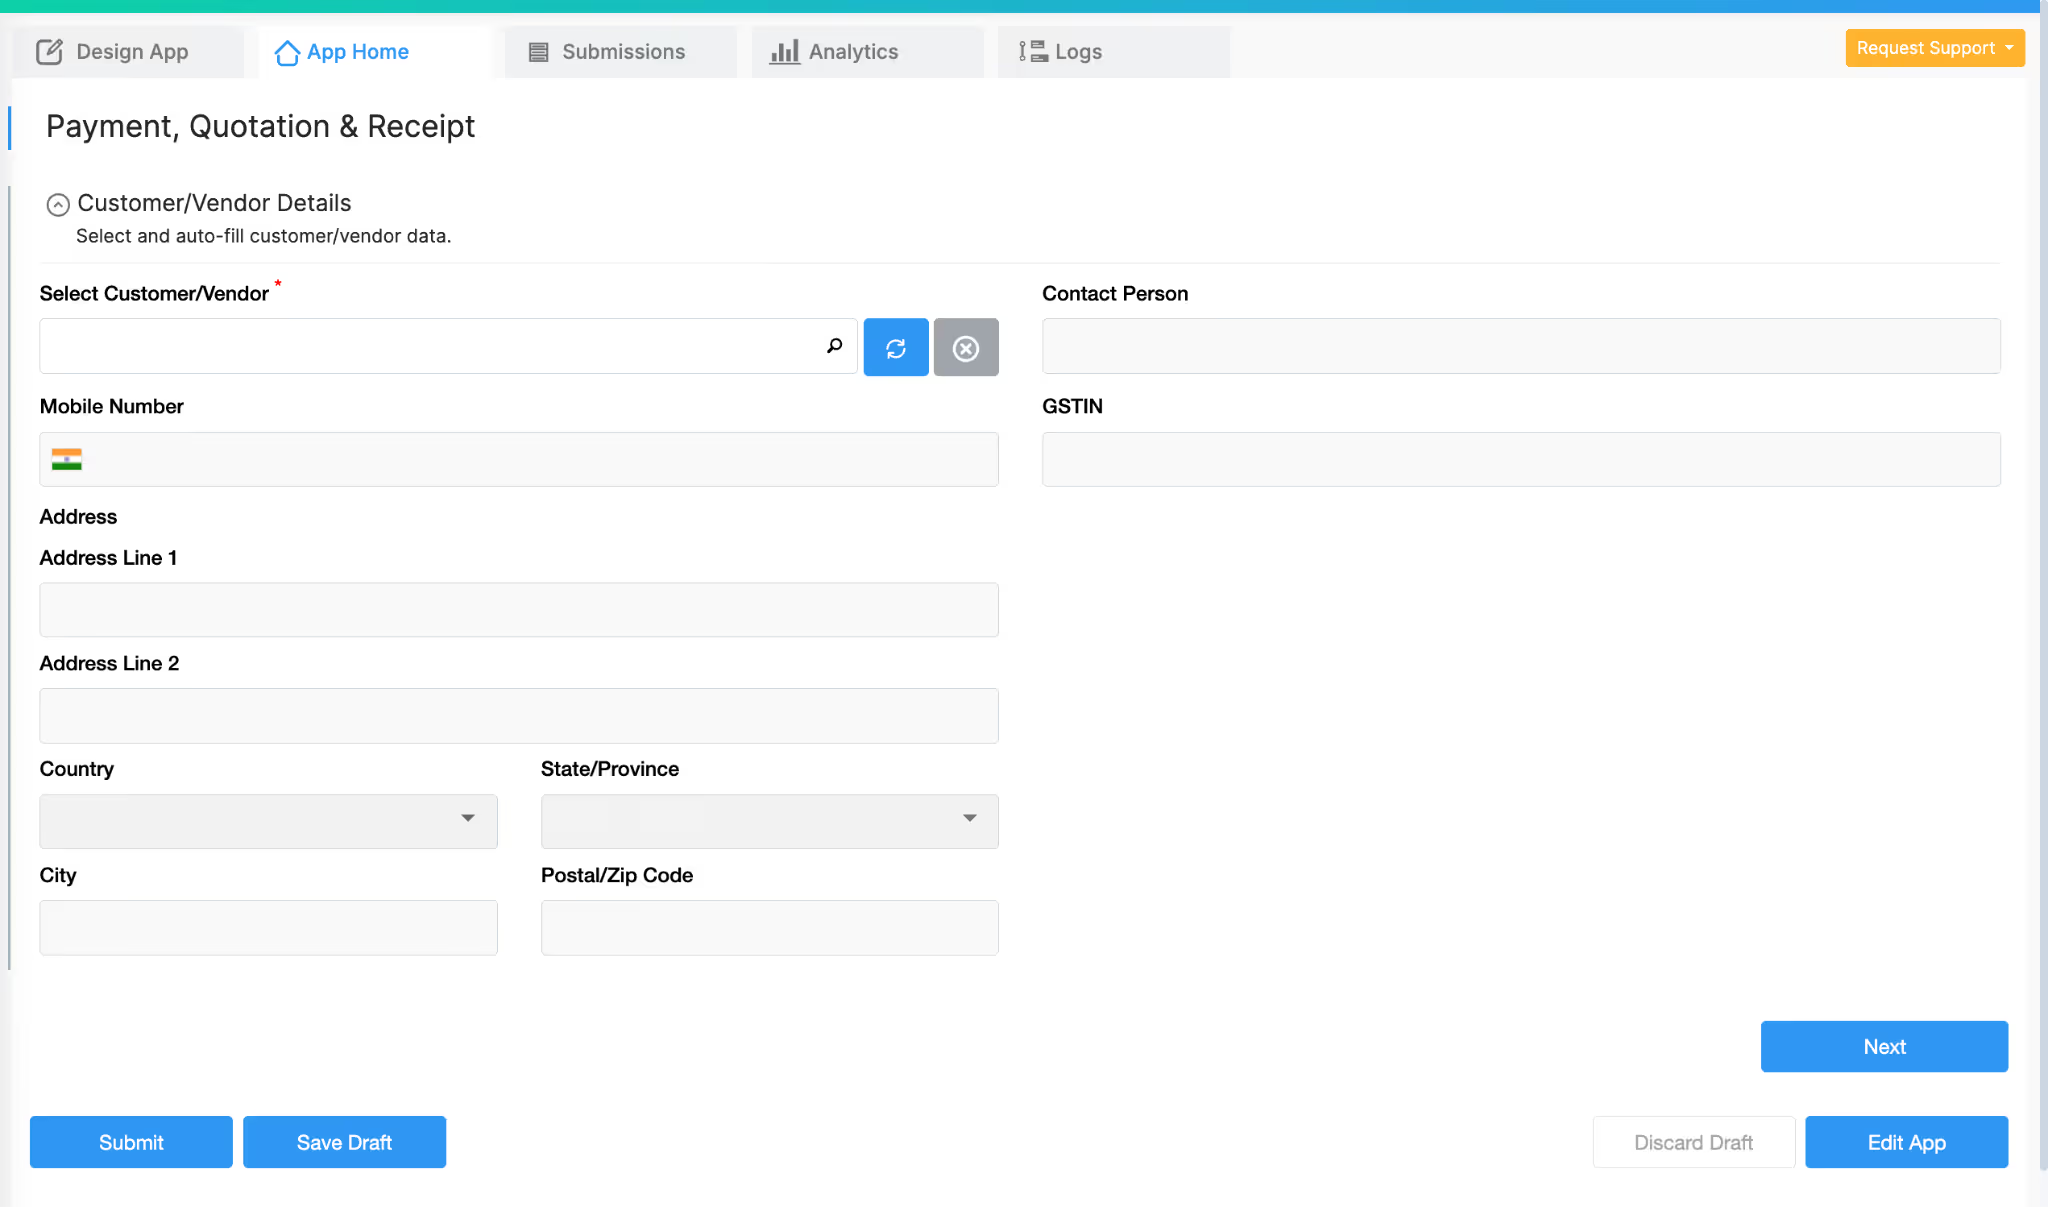
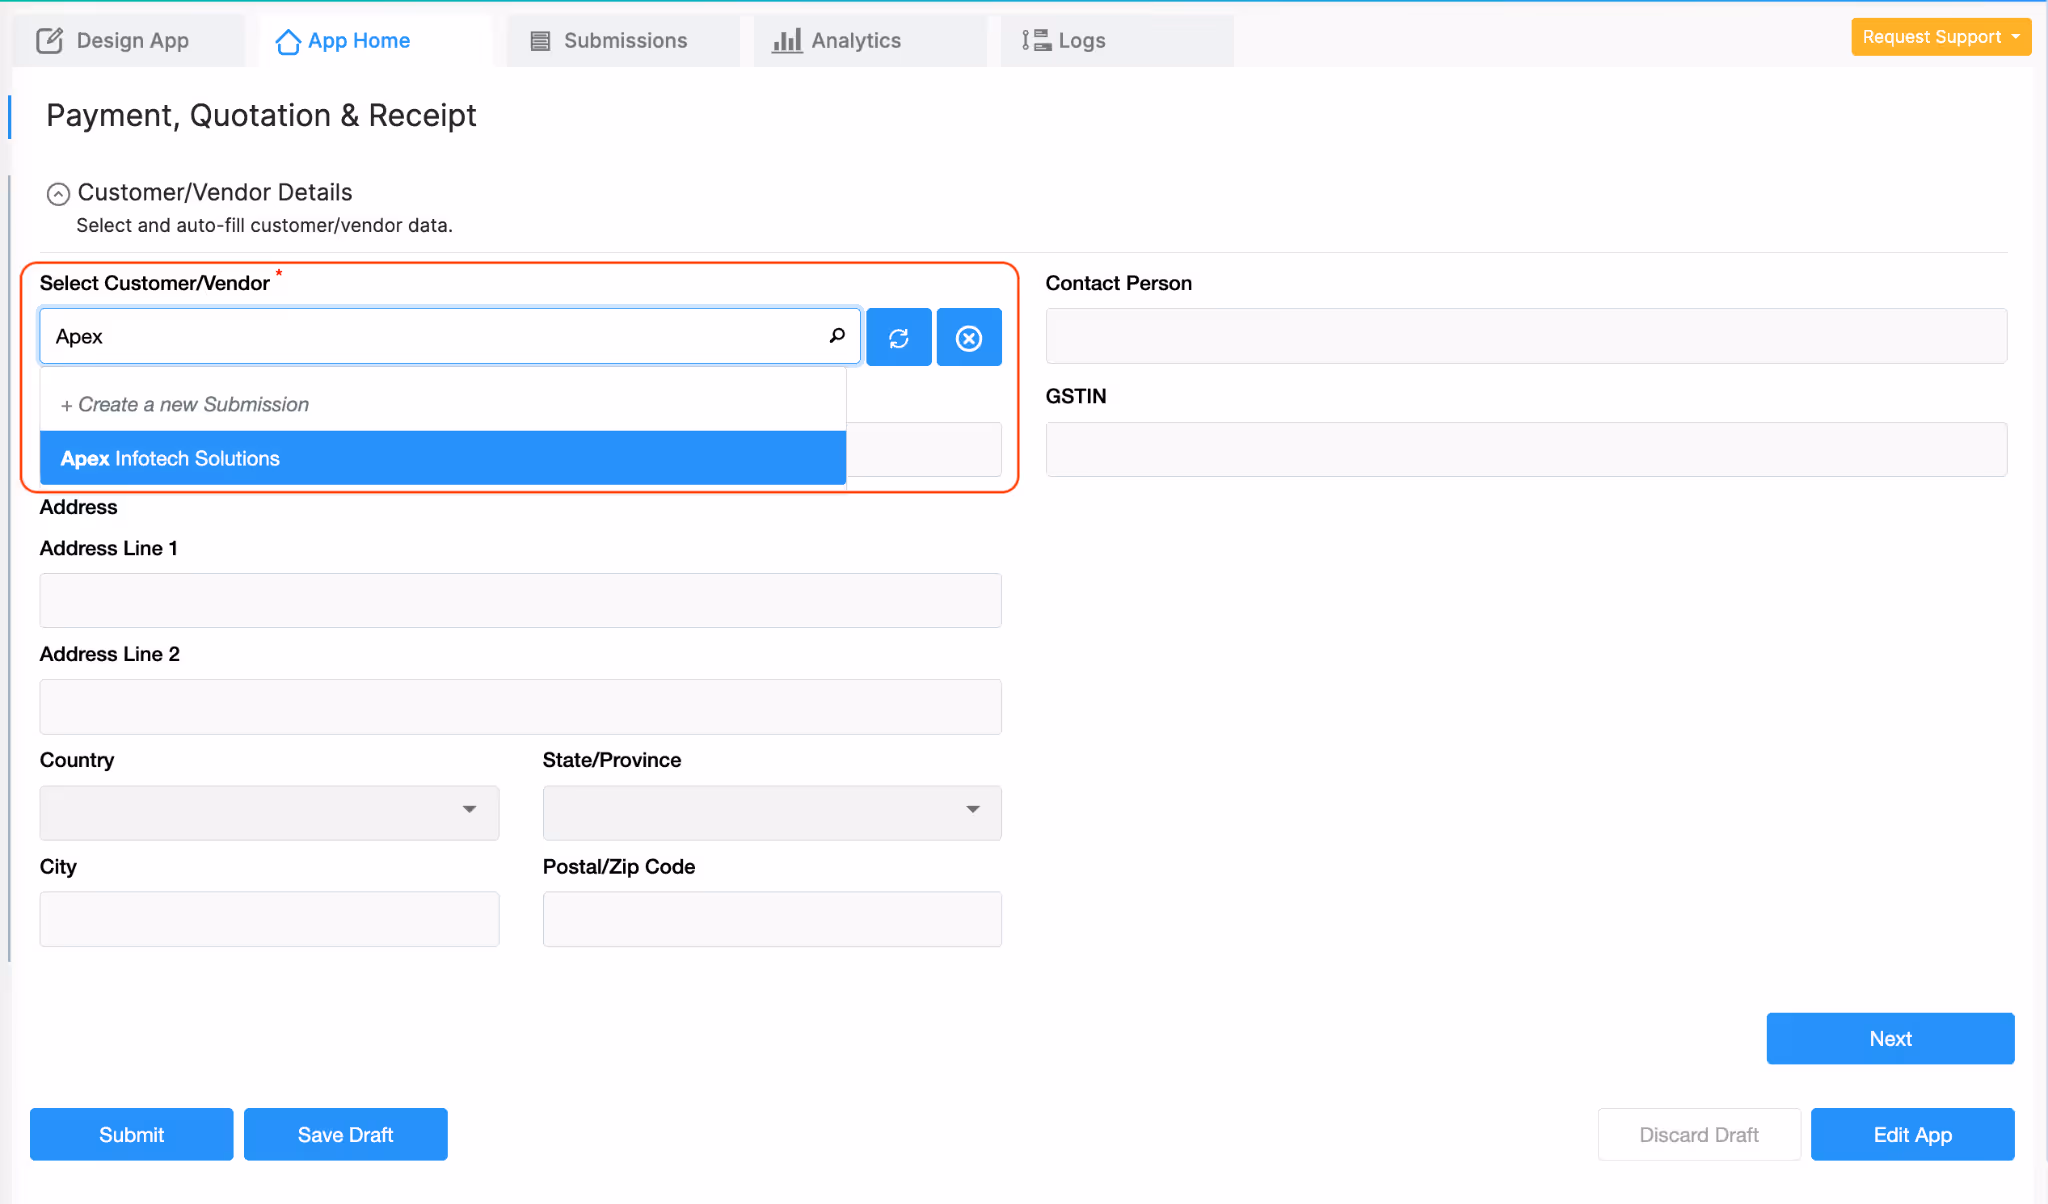
Page 1: Customer Details
The process begins by selecting an existing customer from the Master Data app. Clappia has a feature called Get data from other apps, which is used to connect two apps. When the user selects a customer, the system pulls all saved details from the Master Data app into this page. A typical setup includes:
Pulled Fields from the master app:
Why this matters
Using the “Get data from other apps” feature allows this page to fetch customer information directly from the Master Data app. This keeps the process fast and prevents users from entering details manually. It also ensures that all quotations, payments and receipts remain linked to the correct customer record. If customer information changes later, the updated details will appear here automatically the next time a user creates a quotation.
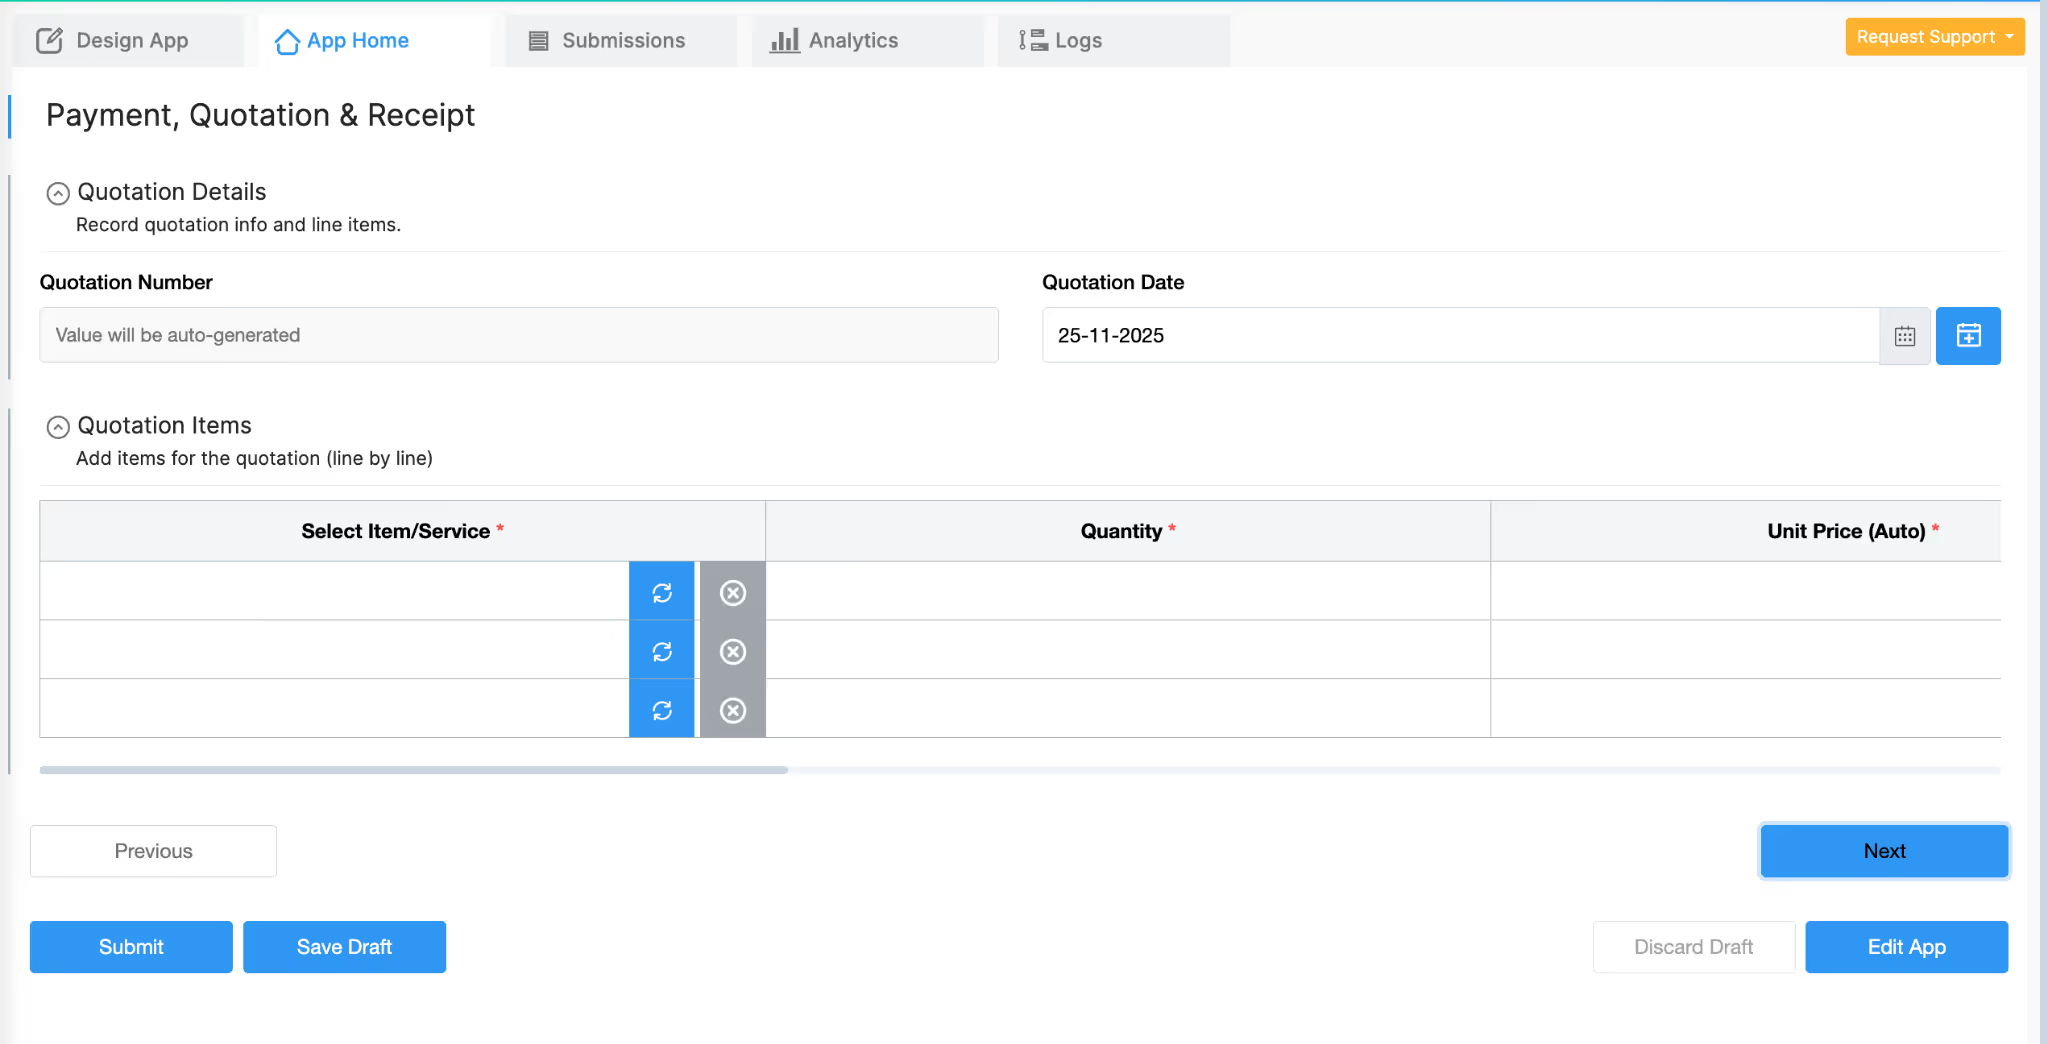
Page 2: Quotation Details
This page is used to add items, enter quantities and calculate totals. A common layout includes:
Inside the items table:
Why this matters
The Get Data block pulls the correct item, unit price and tax from the Master Data app. Calculation fields then compute the totals automatically. This removes manual calculations and keeps the quotation accurate.
A remarks or terms section can be added at the end using a Multiline Text field if your process requires it.
You can also generate PDF quotations using print templates when needed for every submission.
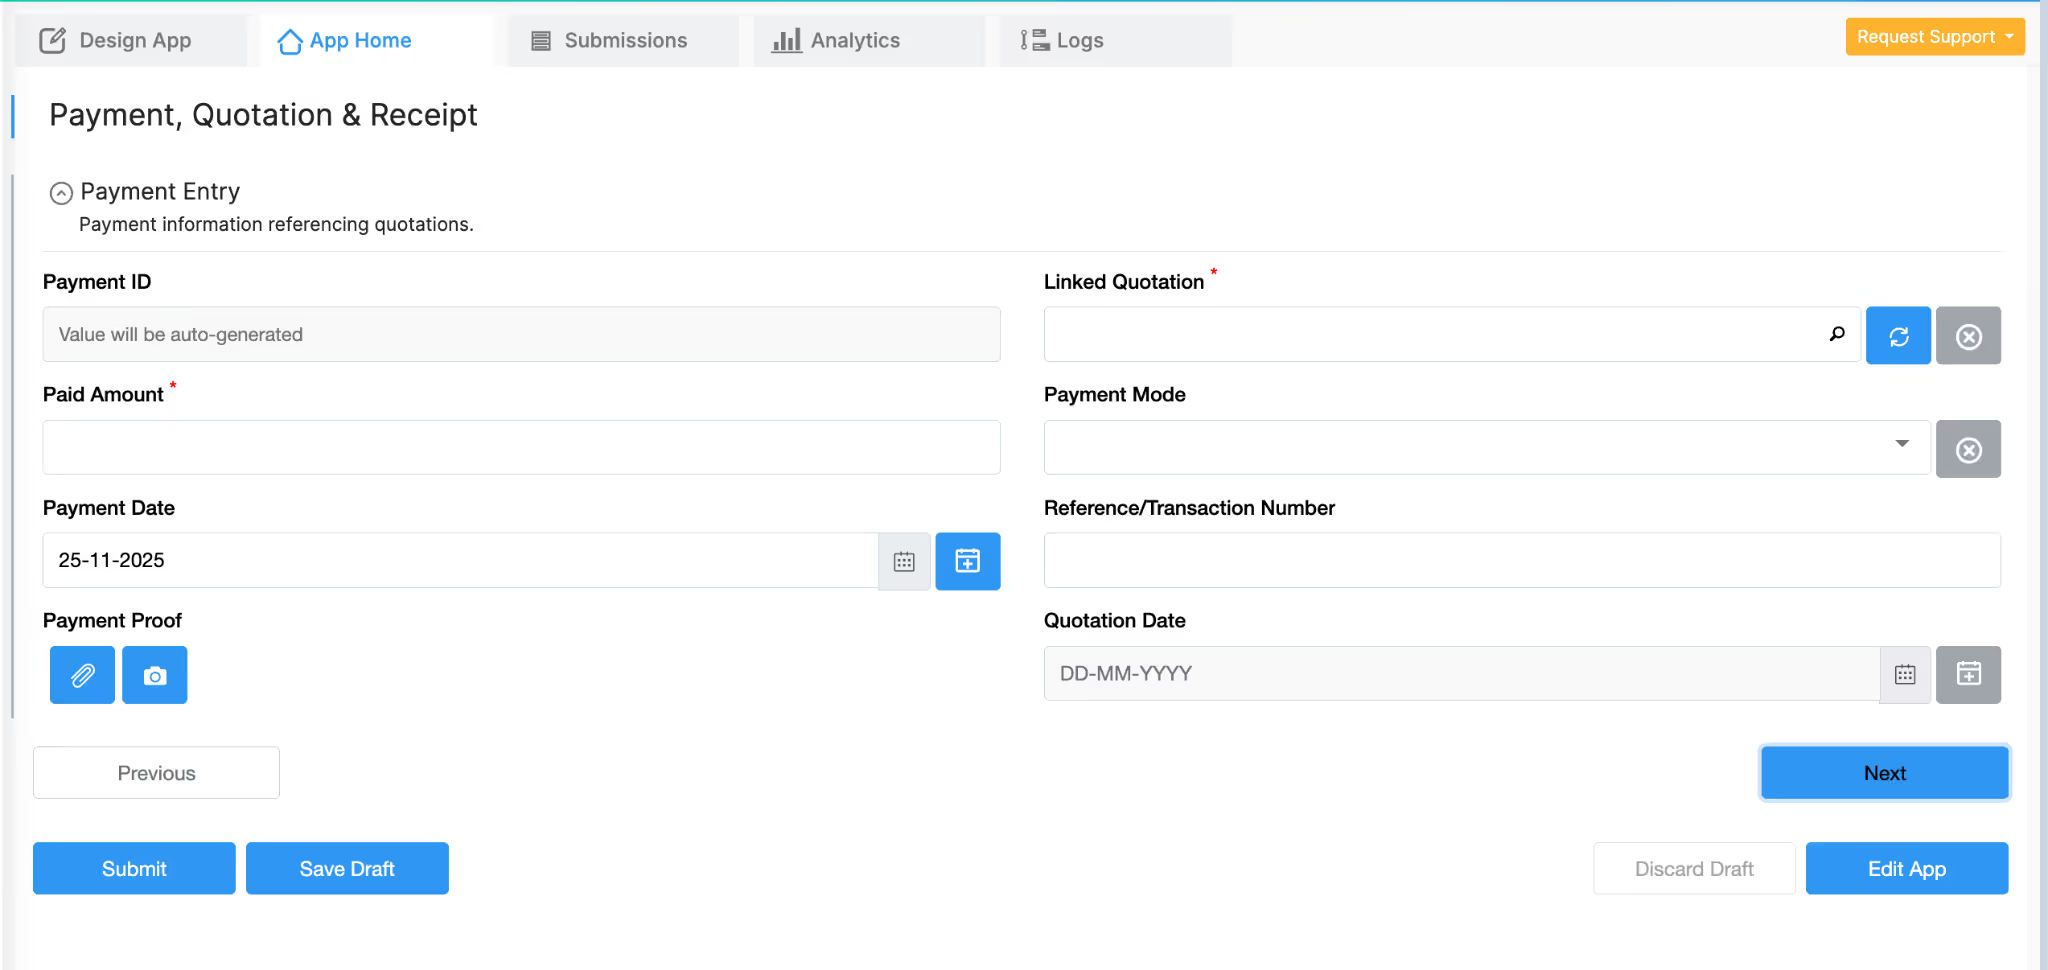
Page 3: Payment Entry
This page records payments received against a quotation and acts like a simple payment tracking system inside the app. It connects the payment to the correct quotation so that balances remain accurate.
Fields often include:
Why this matters
Attaching payment proof is useful for verification and audits. Linking the payment to a quotation ensures the balance can be updated correctly in the next step. You could also use the Payment Gateway feature to make the payments and get the transaction id once successful in the same app.
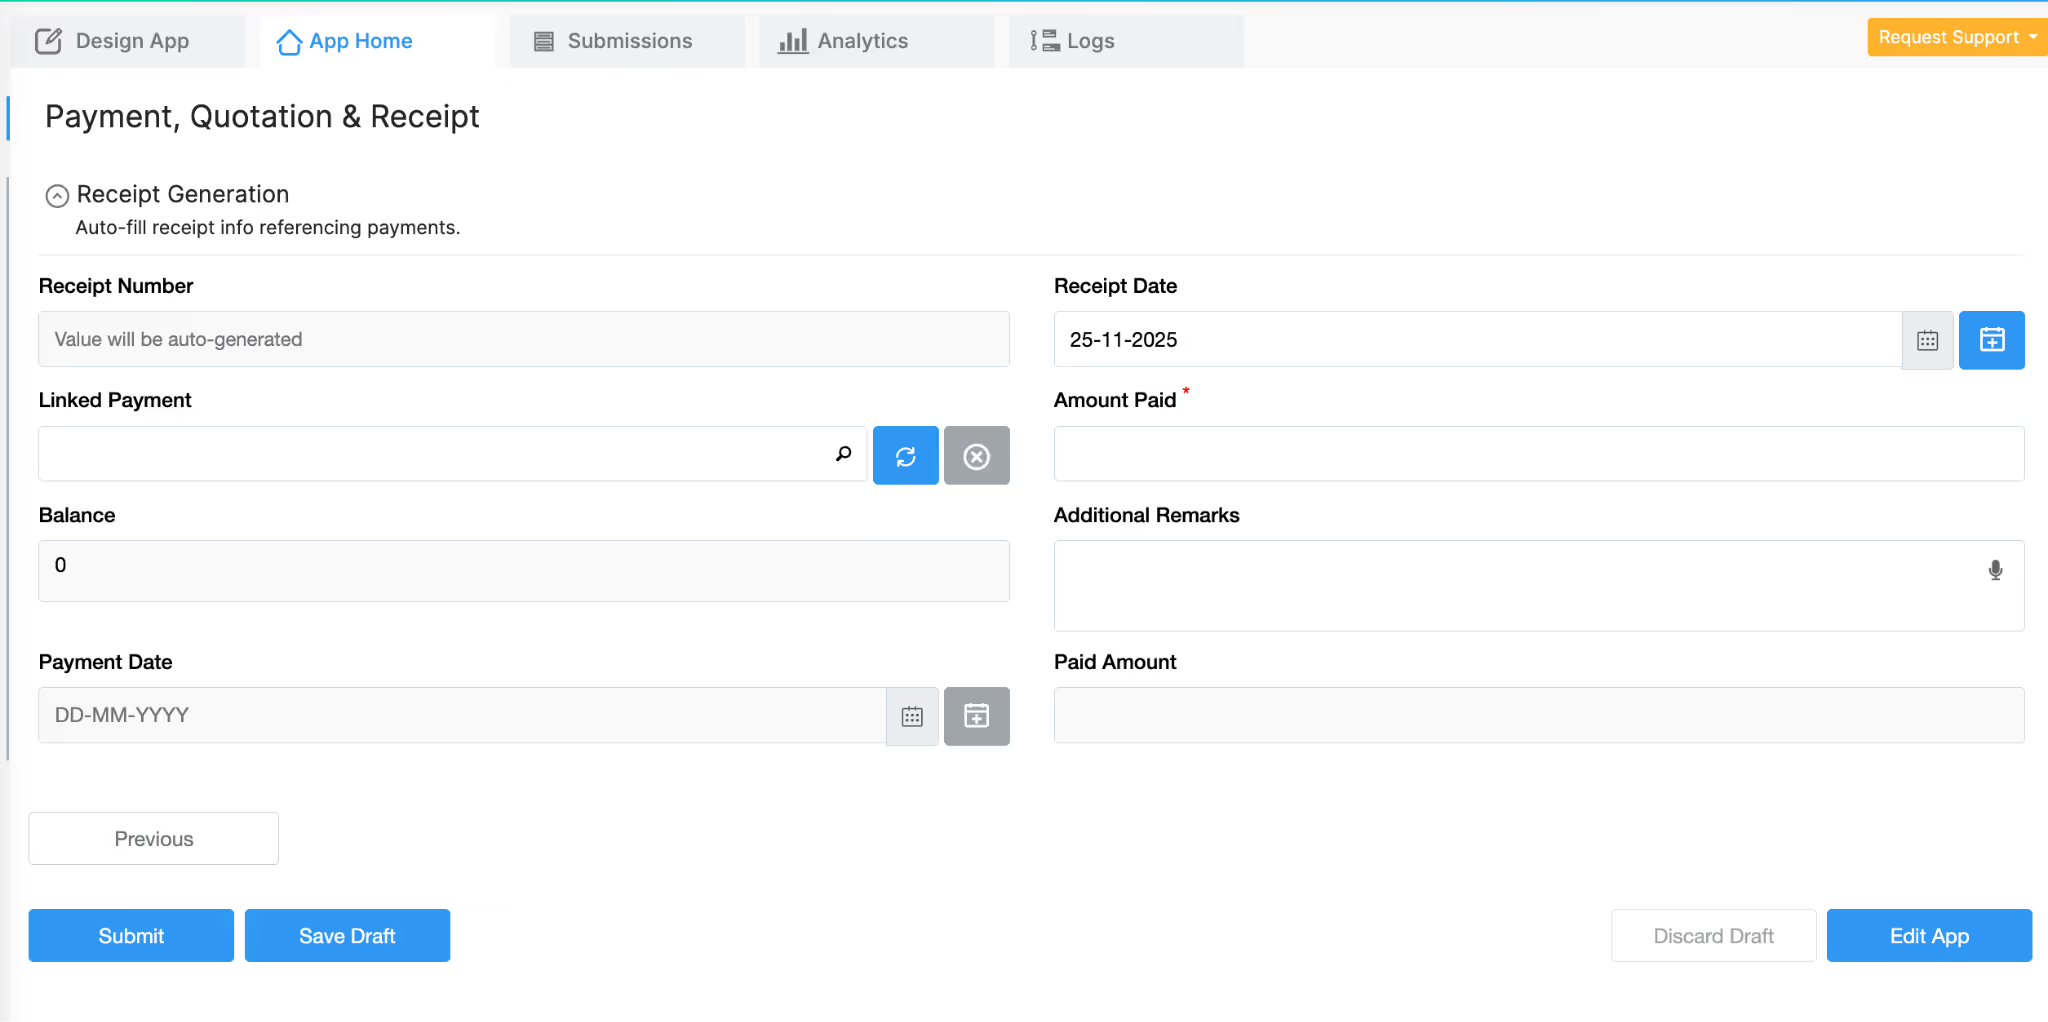
Page 4: Receipt Generation
This page prepares the final receipt, functioning as a receipt generator app that collects all details from the quotation and payment steps so the user does not have to type anything manually.
Typical fields include:
Why this matters
The balance field uses values from the quotation and payment to show how much is still pending, which is useful when customers pay in installments. This structure keeps the receipt aligned with the actual transaction history and makes it easier to review or export when needed.
Additional Fields You Can Add to the Main App
Depending on how the process operates, more fields can be added, such as:
These fields help when quotations need approvals, when payments are collected in the field or when extra documentation is required.
Once the base structure is ready, workflows can help automate different parts of the quotation and payment process. Clappia supports several workflow nodes that can run conditions, wait for a period of time, send notifications or update other apps based on the data in your submissions.
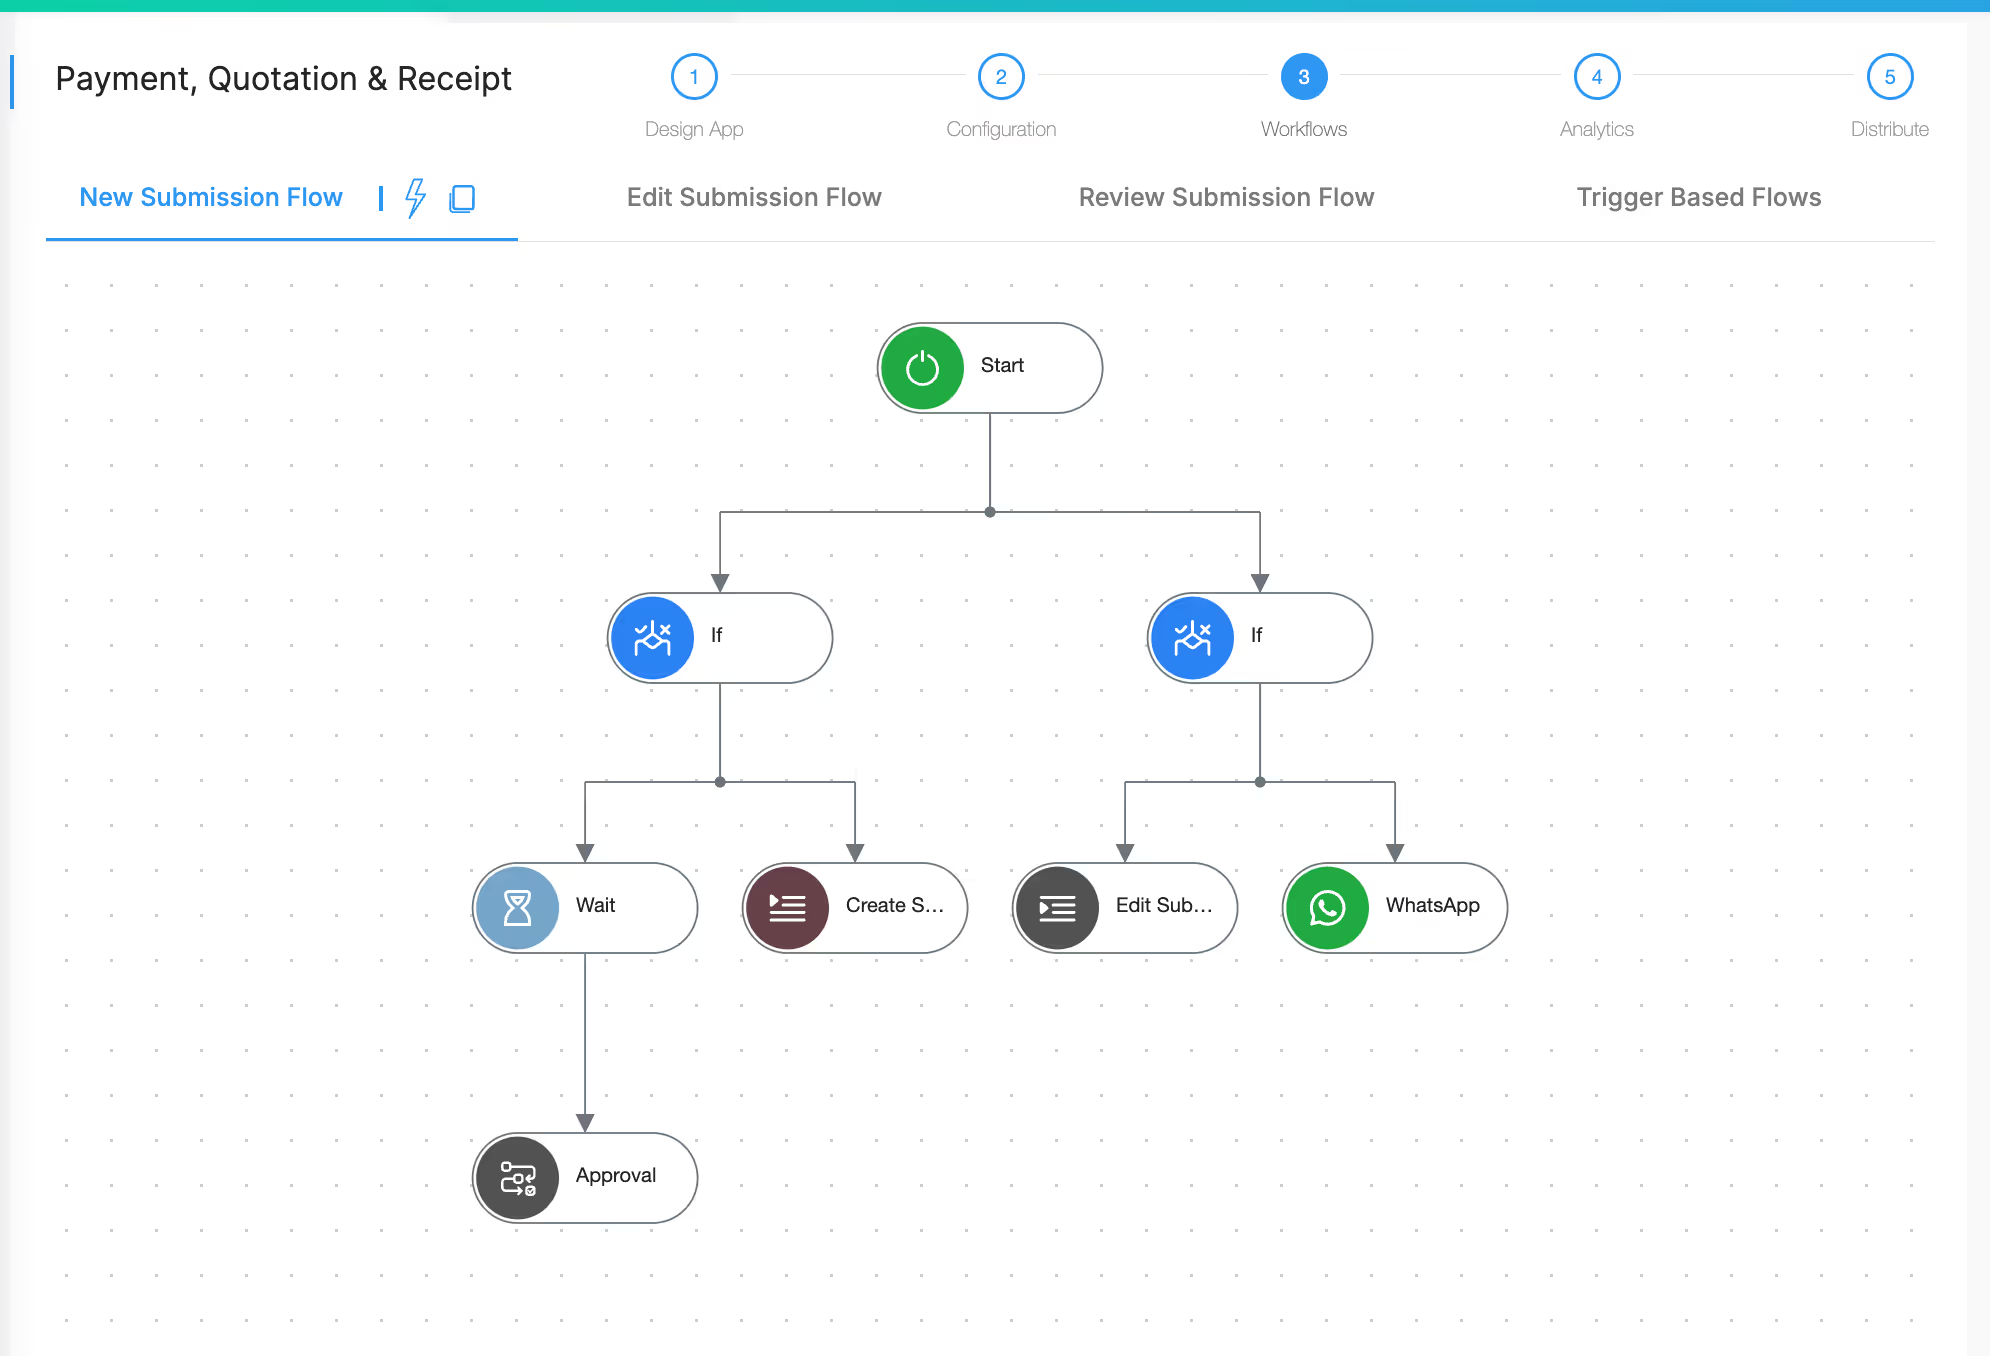
A common extension is using the IF node to check specific conditions before triggering an action. For example, the app can detect when a quotation amount crosses a certain value and route it for approval, or it can check when only a partial payment was recorded and mark the submission for follow-up. These checks run quietly in the background and help maintain consistent behaviour across all records.
Another useful option is the Wait node. This node allows the workflow to pause for the duration you choose before continuing to the next step. It becomes helpful when reminders or follow-ups need to be spaced out. For instance, if a payment is not recorded after a quotation is created, the workflow can wait a few hours or days and then send an alert to the concerned team member. This avoids immediate notifications and gives users time to complete their work. This also supports building a payment confirmation workflow when payments are recorded late or require follow-up reminders.
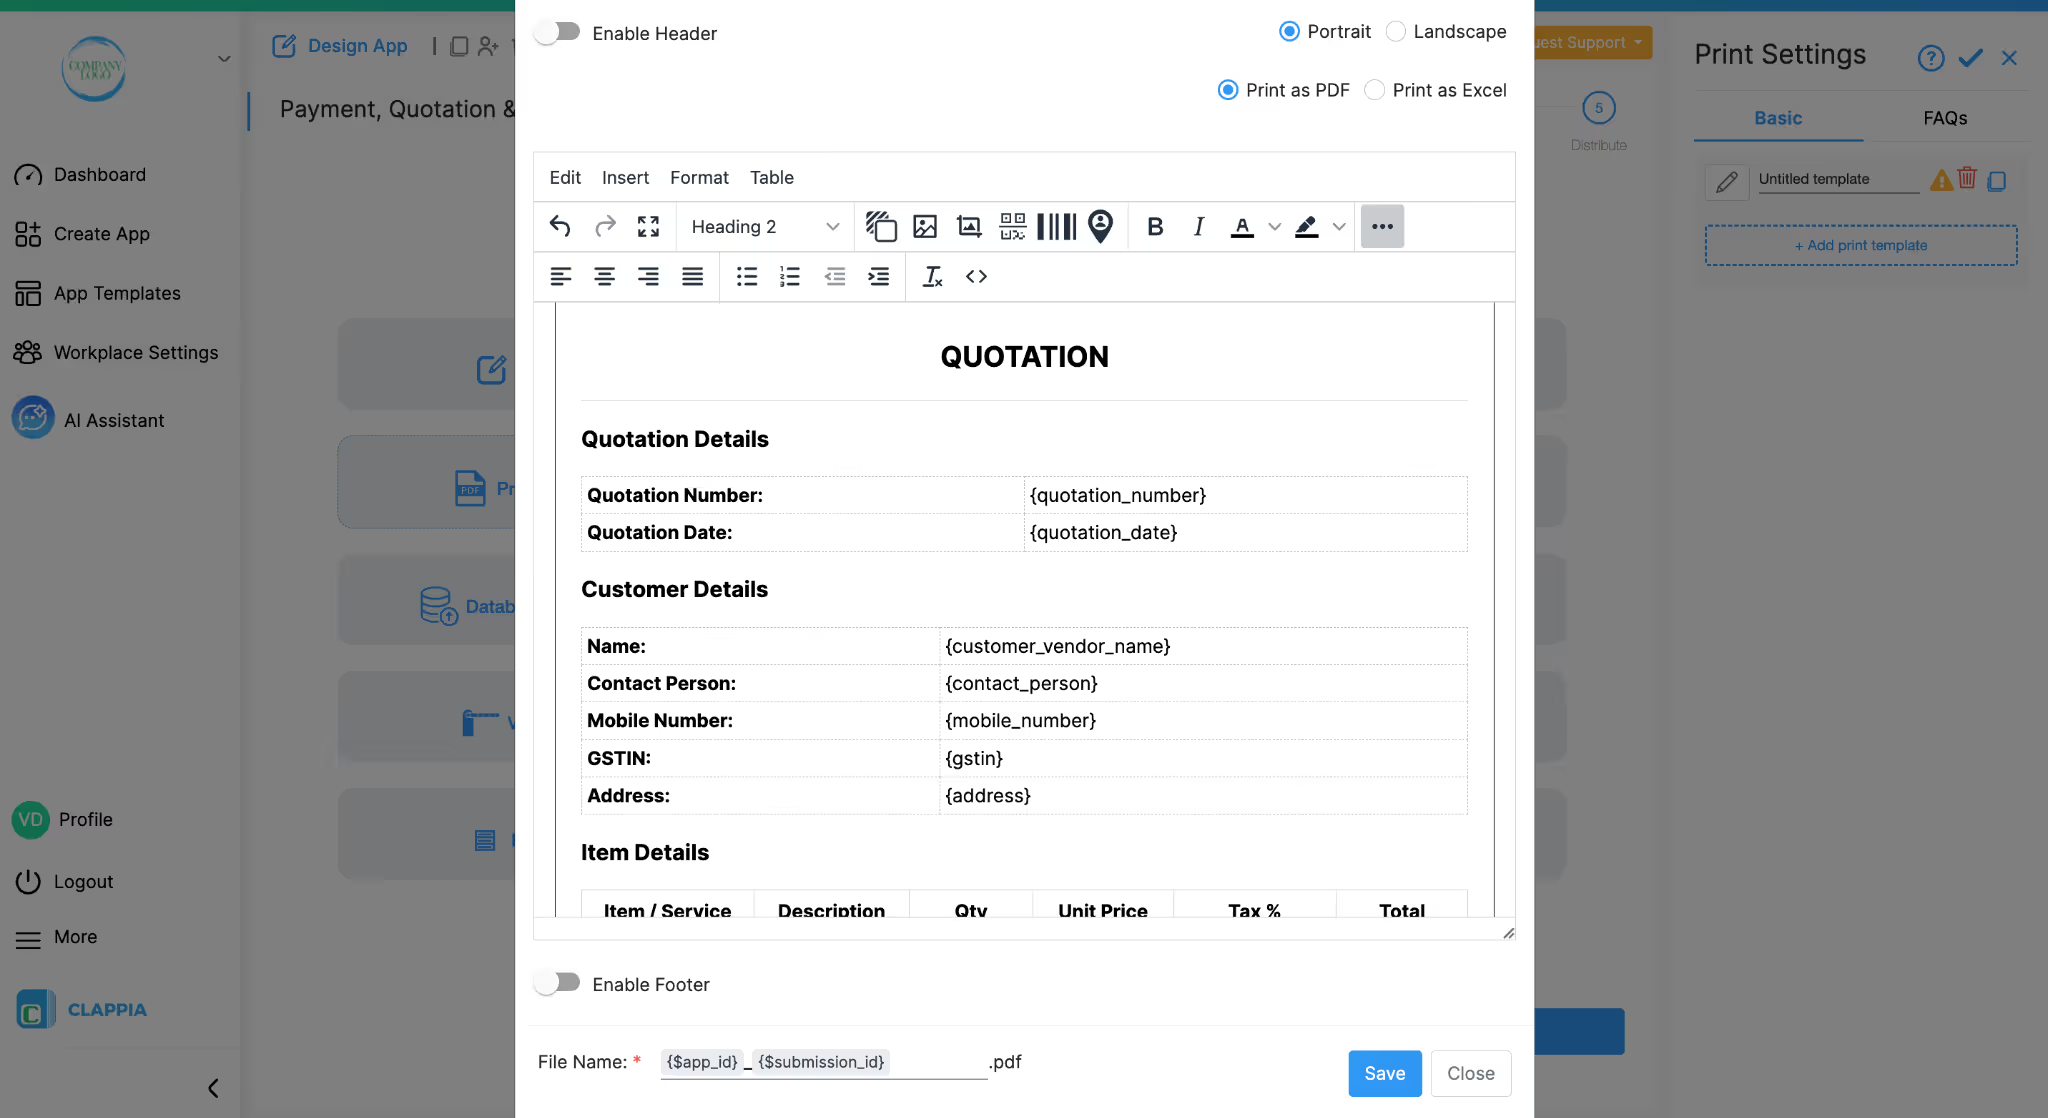
Clappia also allows sending emails with documents attached. If you want to send quotations or receipts directly to customers, you can use Print Templates to create a quotation template which generates a PDF from the form submission. These templates capture the data exactly as entered in the app. The generated PDF can then be attached automatically to an email using workflow nodes like the Approval node or the Email node. This helps maintain a consistent format for all documents and removes the need to create files manually. These steps help create a simple form of billing automation without needing external tools.
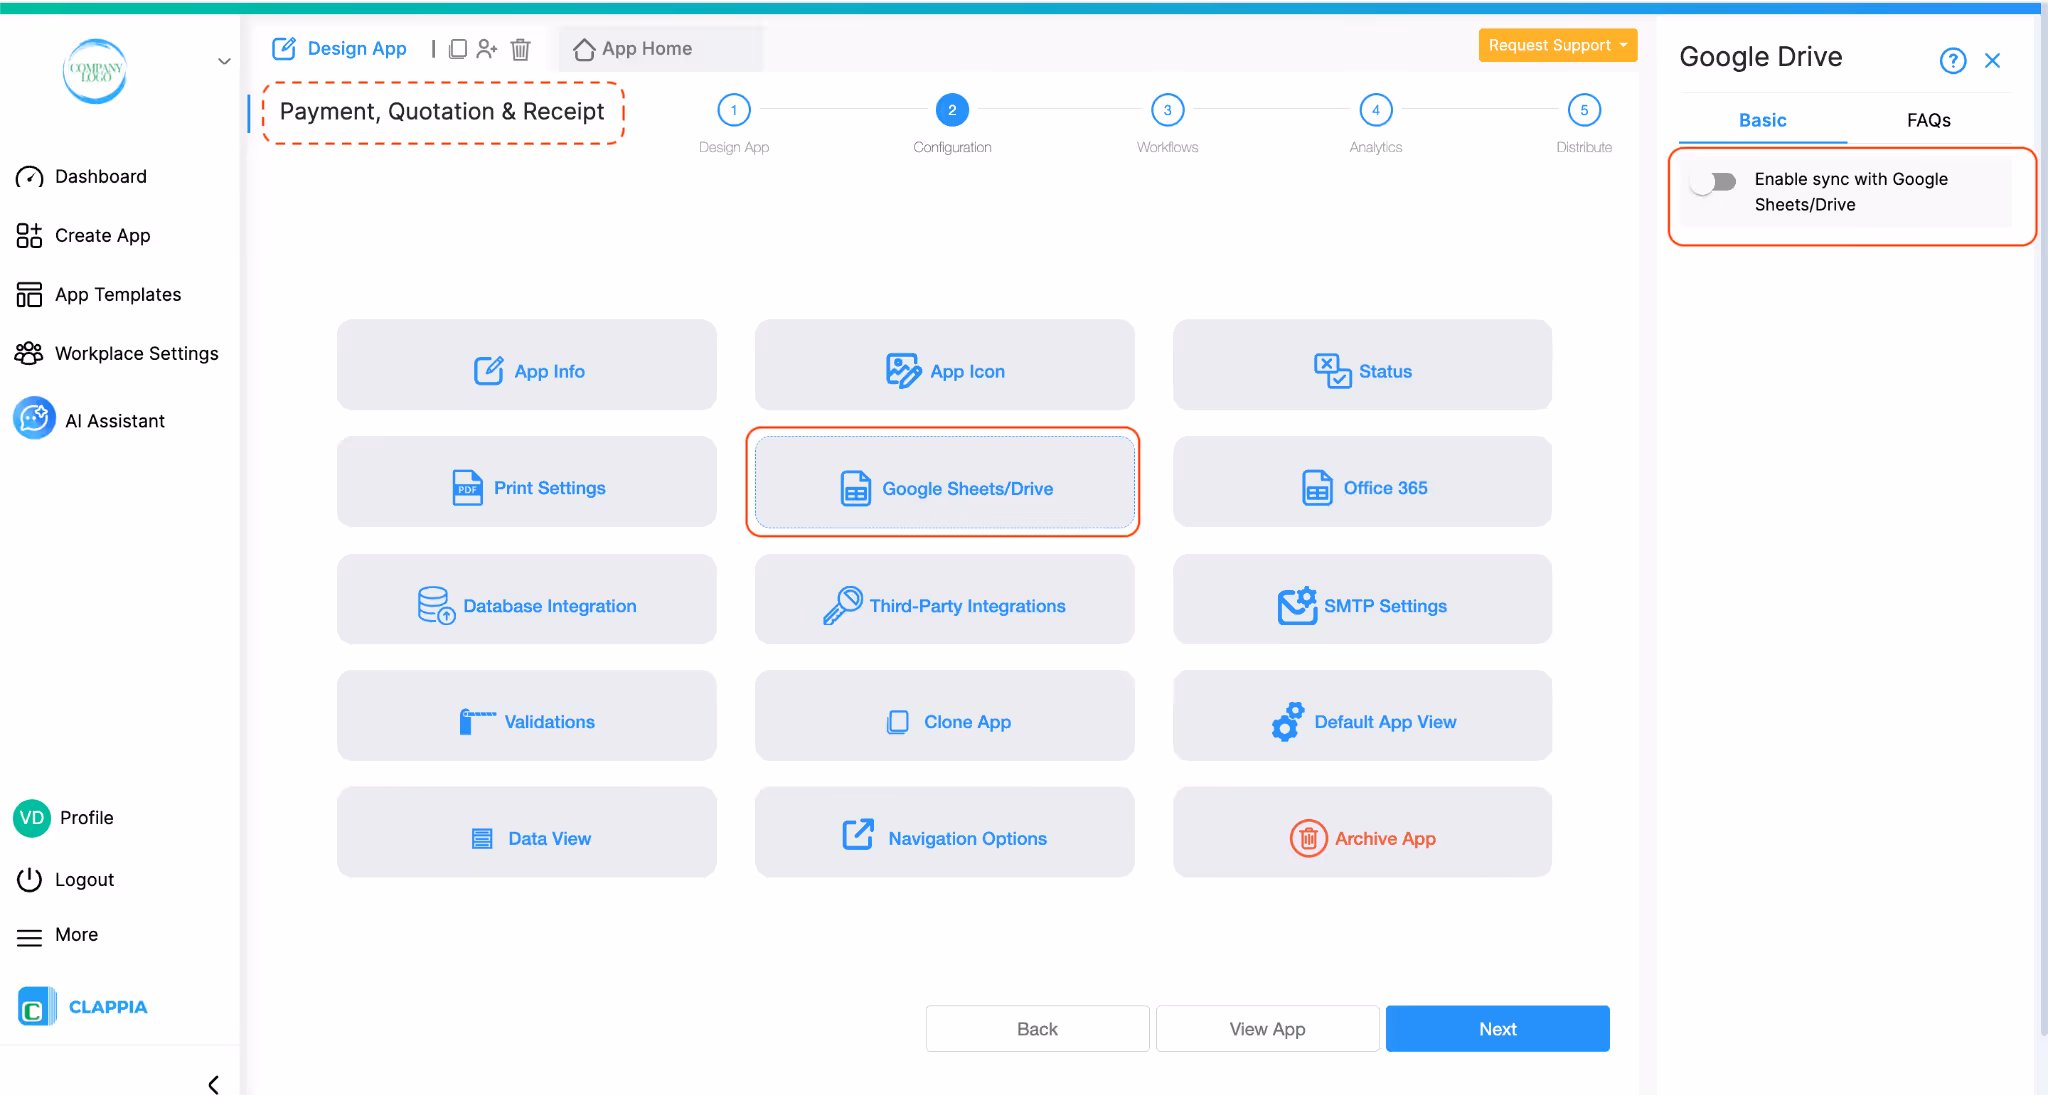
For teams that require structured reporting outside Clappia, the app can connect with Google Sheets or Google Drive. This integration lets you send form submission data to a Google Sheet or store files in Google Drive. The feature is useful when reports need to be shared with finance or management teams, or when external dashboards are maintained. Once the connection is set up, new submissions flow to the linked sheet or folder automatically, reducing manual export work.
These extensions allow the app to support more detailed processes without adding complexity to the form itself. Users continue to work the same way, while the additional automation ensures that reminders, documentation and reporting happen in a reliable and organised manner.
As the app begins collecting more quotations, payments and receipts, the Analytics section can be used to understand overall activity. You can create charts that show total quotation values over time, outstanding balances, or payment patterns for each customer. Tables can be added to filter submissions by date, amount, or status, which helps teams quickly identify pending follow-ups. These analytics update automatically as new records are created, giving a clear view of how work is progressing without needing separate reporting tools.
Over time, this becomes a clear customer transaction management view for your entire workflow.
Having a clear separation between the Master Data app and the main app makes it easier to build additional processes on top of the same foundation. Since all customer and item information already exists in a structured format, other apps can reuse this data without setting up anything from scratch. For example, the same master records can support invoice creation, purchase orders, delivery tracking or even return workflows, forming the base of a quotation and invoice system. Each new app can pull what it needs through the “Get data from other apps” feature, keeping everything connected.
As more steps get added to your overall process, this setup allows you to introduce supporting apps such as a monthly reconciliation app, an ageing summary app or a pending payment tracker. These apps work alongside the quotation and payment workflow and help teams monitor activity without maintaining separate systems.
Clappia also supports creating versions of an app, which helps when your process changes over time or when new features are introduced. You can create a new version, make the required adjustments and test the layout without affecting users who are working on the current version. Once the changes are ready, the updated version can be made live instantly, while all previous data remains intact. This makes it easy to refine the system continuously without interrupting day-to-day work.
Once the app is published, users move through the simple, page-by-page flow. They begin by selecting a customer, after which all basic details are filled automatically. They then add items to the quotation, review the totals and submit. When a payment is received, the payment entry page helps them record the amount and attach proof. The receipt page completes the process by generating the final confirmation. This keeps customer payment records neatly tied to each quotation.
All submissions are visible in the Submissions tab, where users can filter by customer, quotation number or payment status. If the app includes dashboards, these update automatically as new entries are created. The app works smoothly on mobile, allowing users to upload images or capture signatures even when working outside the office. Offline entries sync automatically when the device reconnects to the internet.
This structure keeps the entire process simple for day-to-day use while supporting detailed reporting and automation in the background.
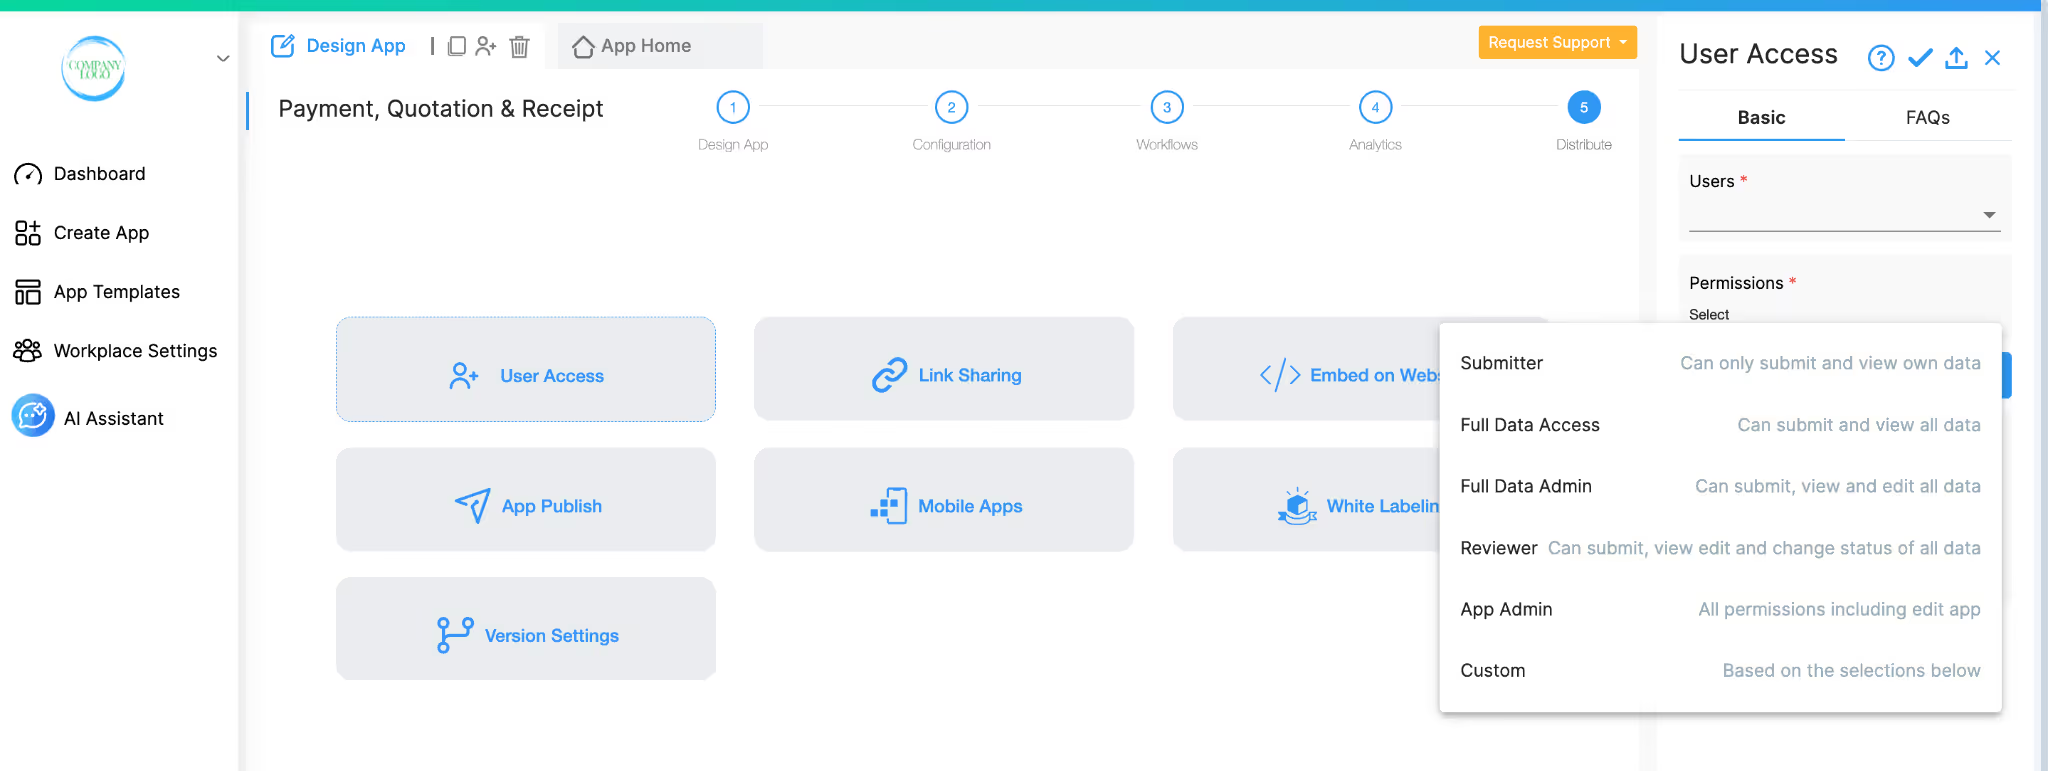
When the app is ready, you can give access to the people who will use it. Some may only need to create quotations similar to using customer quotation software. Others may handle payments or view receipts. You can assign each person the level of access they need.
If you work with external customers or partners, you can also share the app through a link so they can submit details without logging in. This is useful when you want to collect information from people outside your organisation while keeping the rest of your workplace private.
Permissions can be set for different groups as well. For example, sales teams may see the quotation section, finance teams may handle payment records, and managers may view everything in one place. Only the relevant parts are shown to each group based on how you set up access.
You can start building this setup in Clappia using any of the available creation methods. If you prefer a quick start, you can generate the base structure through the AI chat and refine each part as required. For full control, build it step by step in Clappia’s App Designer and shape every field, workflow and page based on your process, giving you a quotation app builder that adapts as your work changes.
L374, 1st Floor, 5th Main Rd, Sector 6, HSR Layout, Bengaluru, Karnataka 560102, India
3500 S DuPont Hwy, Dover,
Kent 19901, Delaware, USA


3500 S DuPont Hwy, Dover,
Kent 19901, Delaware, USA
L374, 1st Floor, 5th Main Rd, Sector 6, HSR Layout, Bengaluru, Karnataka 560102, India
.svg)