Every business uses forms to collect data. But what happens after someone clicks "submit"?
For most teams, that's where the manual work begins. Someone copies form data into a CRM. Another person updates the inventory system. The support team manually creates tickets. Every single submission requires human intervention.
Studies show businesses waste up to 30% of operational time on manual data entry. Each transfer introduces errors, delays responses, and creates inconsistencies.
REST APIs solve this problem by letting your forms communicate with any business application automatically. The moment someone submits your form, data flows instantly to your CRM, ticketing system, database, or any platform you use.
Traditional API integration requires developers, complex code, and ongoing maintenance. But what if you could connect forms to REST APIs without writing a single line of code?
Your sales team receives a lead form submission via email. They open the CRM, manually type the contact details, company information, and inquiry notes. This takes 5-10 minutes per submission.
Multiply that across dozens or hundreds of daily submissions. Your team spends hours each week on data entry instead of actual sales or support work.
The real cost isn't just time. Manual entry creates:

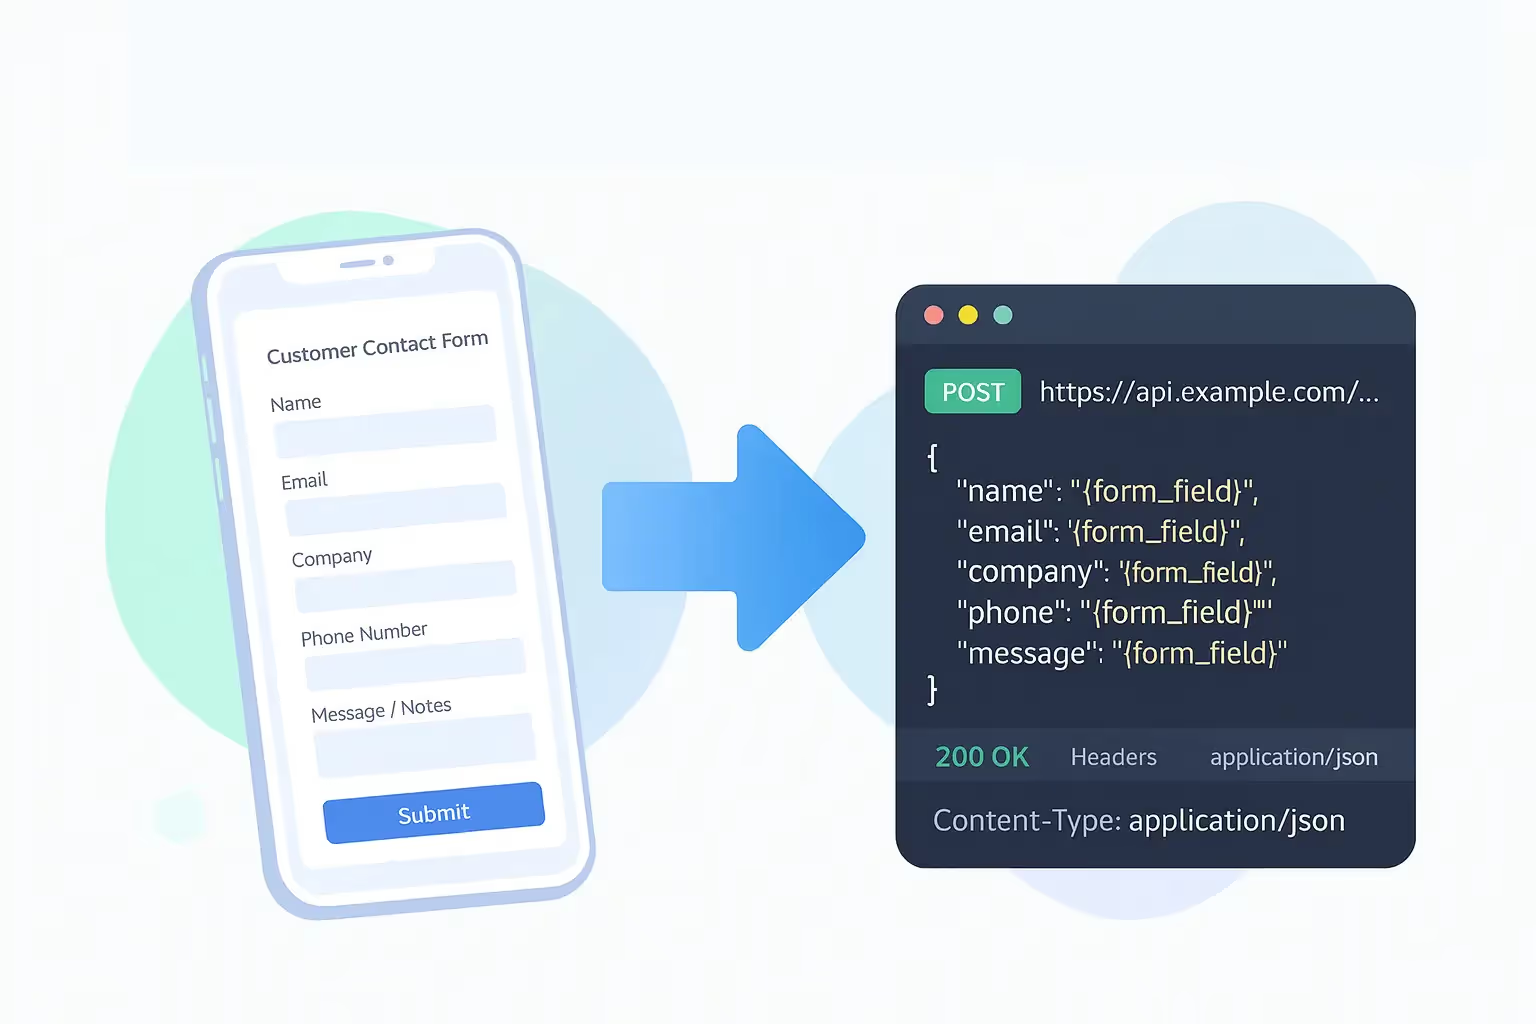
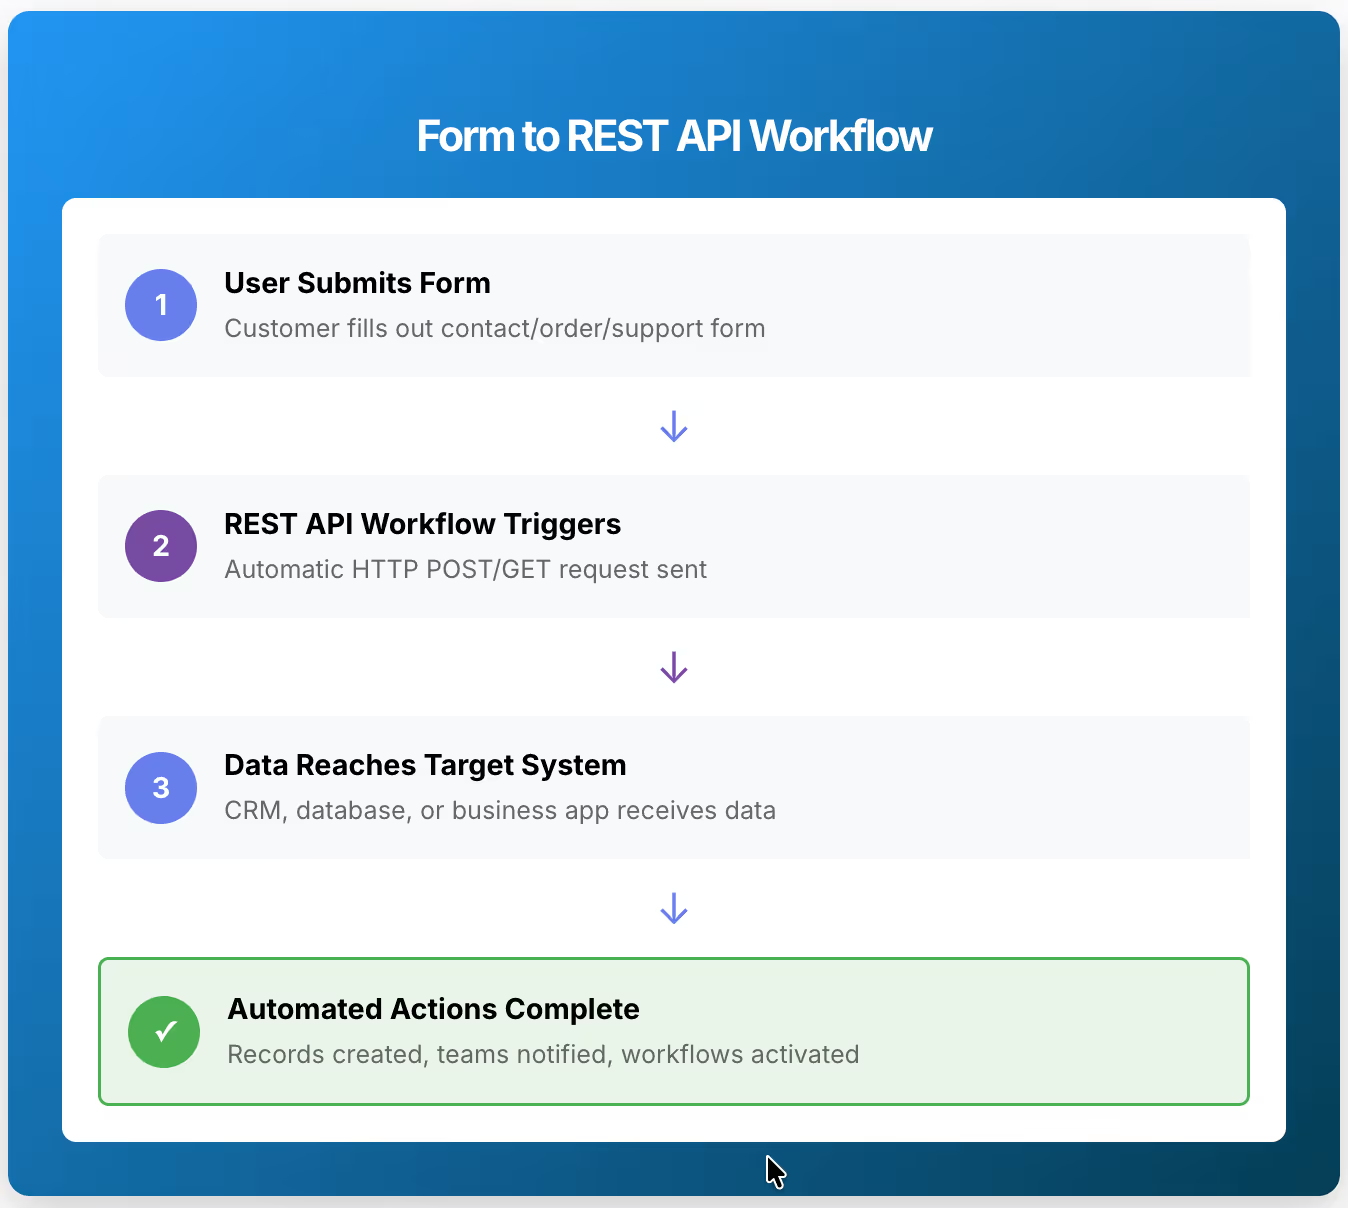
REST APIs provide a standardized way for applications to communicate. When integrated with your forms, submissions automatically trigger actions across your entire technology stack.
A customer fills out your contact form. Within seconds:
All of this happens automatically, with zero human intervention.
Your marketing team runs campaigns with lead capture forms. Traditional process: leads sit in email until someone manually adds them to Salesforce.
With REST API integration, every form submission instantly creates a CRM record. Lead scoring happens automatically. Assignment rules route high-value prospects to senior reps. Follow-up sequences start immediately.
Result: Response time drops from hours to minutes. Conversion rates improve dramatically.
Customers report issues through your support form. Without automation, support staff manually create tickets, often missing critical details or delaying responses.
REST API workflows automatically push form data to your ticketing system. Priority levels get assigned based on issue type. SLA timers start immediately. The right team member receives notification.
Result: Average response time reduced by 75%.
E-commerce orders arrive through forms. Manually updating inventory, creating invoices, and triggering fulfillment creates delays and errors.
Automated REST API workflows simultaneously update your inventory management system, create accounting records, and notify warehouse staff—all within seconds of order submission.
Result: Order processing time reduced from hours to minutes.
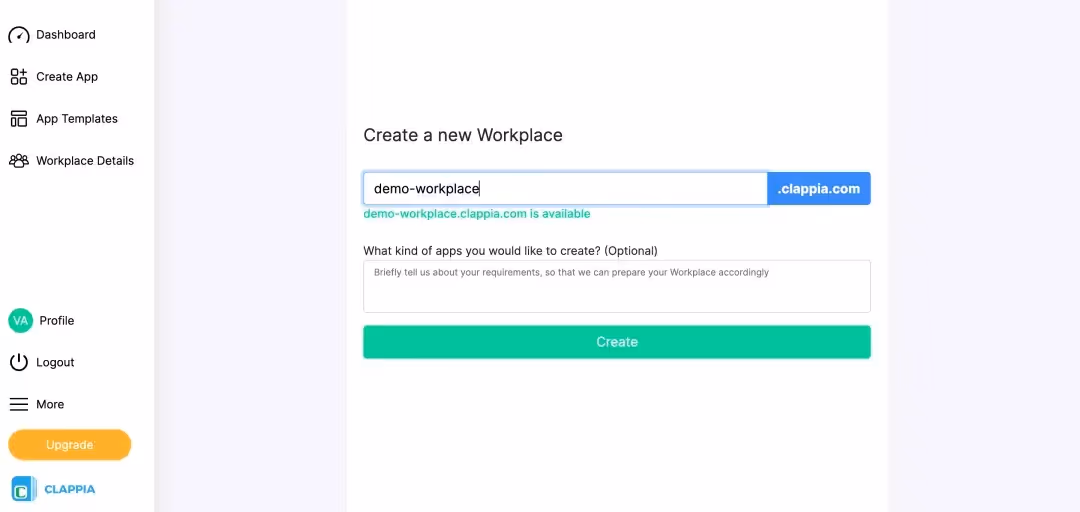
Sign up for free with Clappia—no credit card required, unlimited app creation.
Build your form by adding the fields you need:

Your form interface looks similar to Google Forms—completely visual, zero coding required.
Navigate to the Workflows section in your app. Click "Enable Workflows" to activate automation capabilities.
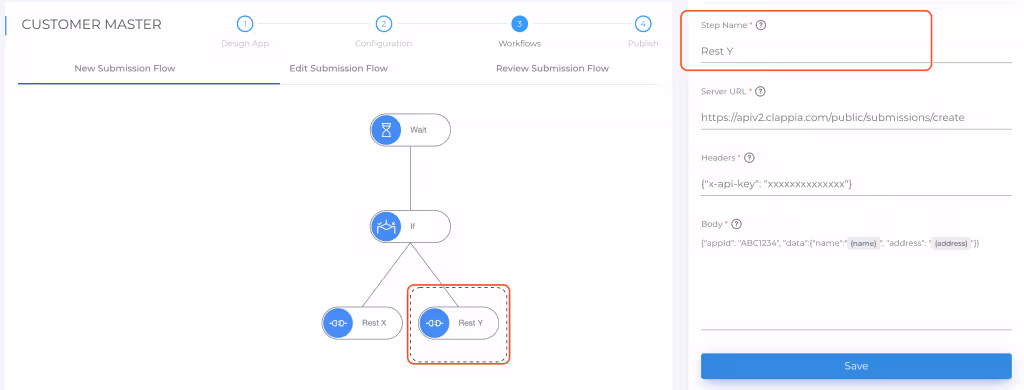
Click "Add Node" and select "REST API" from available options. This creates a new workflow node that triggers when someone submits your form.
Set a descriptive name like "Send to CRM" or "Create Support Ticket" so your team understands what the workflow does.

Enter your REST API endpoint URL where Clappia will send form data. This could be:
https://api.yourcrm.com/v1/contactshttps://yourapp.com/api/tickets/createhttps://api.inventory.com/ordersSelect the HTTP method your API requires:
Add query string parameters if needed. Use form field variables in your query string like:?customer_id={customer_field}&type=new_lead
Configure request headers your REST API expects. Enter them as JSON:
json
{
  "Content-Type": "application/json",
  "Authorization": "Bearer your-api-token",
  "x-api-key": "your-key-here"
}
Common authentication methods include:
Clappia securely stores credentials so they never appear in form submissions or logs. Learn more about secure integrations.

Select whether your API accepts JSON or XML format. Most modern APIs use JSON.
Construct your request payload using form field variables. Reference fields by wrapping names in curly braces:
json
{ "contact": {
"first_name": "{first_name_field}",
"last_name": "{last_name_field}",
"email": "{email_field}",
"company": "{company_field}",
"phone": "{phone_field}"
},
"lead_source": "website_form",
"status": "new",
"created_date": "{submission_date}"
}
Mix form variables with static values to match your API's exact requirements. The REST API workflow node handles all formatting automatically.
<div style="background: #fff3cd; border-left: 4px solid #ffc107; padding: 20px; margin: 30px 0; border-radius: 4px;"> <h4 style="margin-top: 0; color: #856404;">💡 Pro Tip: Test with Sample Data First</h4> <p style="margin-bottom: 0; color: #856404;">Always perform a test submission with sample data before deploying your form. Use Clappia's workflow logs to verify the exact request sent and response received. This prevents issues in production.</p></div>
Specify which fields from the API response you want to capture. Many REST APIs return confirmation IDs, status codes, or additional data.
For example, your CRM might return:
json
{
  "lead_id": "LEAD-12345",
  "status": "created",
  "assigned_to": "sales@company.com"
}
Capture the lead_id so follow-up workflows can reference it. Store confirmation codes for tracking. Save generated IDs for record-keeping.
Enhance your workflow with conditional nodes that route data differently based on form responses.
Examples:
Configure error handling that triggers when API calls fail. Set up email notifications to alert your team about integration problems.
Submit a test form with sample data. Check workflow logs to verify:
Once testing confirms everything works, deploy your form. Share it via:
Build REST API endpoint URLs dynamically using form field values. Instead of fixed endpoints, include variables directly in the URL:
https://api.yourcrm.com/customers/{customer_id}/update
This enables CRUD operations on specific resources. Update individual inventory items by SKU, modify customer profiles by account number, or append transactions to specific order IDs.
Complex integrations often require calling multiple APIs in sequence. Clappia workflows support this by letting you reference response data from previous API nodes in subsequent nodes.
Example workflow:
Each step executes automatically in the correct sequence. Learn more about workflow automation.
Many REST APIs impose rate limits. Monitor your form submission volume against these restrictions.
For high-volume forms approaching limits, implement batching strategies that group multiple submissions into single API requests where supported. This reduces API call counts while maintaining real-time synchronization.
Traditional REST API integration requires:
Third-party automation platforms like Zapier charge $20-$100+ monthly with technical knowledge still required for complex workflows.
Clappia's approach eliminates these costs entirely:
The free plan includes unlimited app creation, 400 monthly submissions, full workflow automation, and enough API calls for most small to medium businesses—permanently.
As your needs grow, paid plans start from just $6 per user monthly, scaling affordably based on actual usage without expensive enterprise licenses.
Mistake #1: Not validating data before sendingAlways use validation blocks in your forms. Ensure email formats are correct, phone numbers are valid, and required fields are filled before data reaches your APIs.
Mistake #2: Ignoring error handlingNetwork issues and service outages happen. Configure fallback workflows that capture form data locally when API calls fail. Set up alerts so your team knows immediately when integrations break.
Mistake #3: Sending unnecessary dataOnly transmit fields your target API actually needs. This improves performance, reduces bandwidth, and maintains compliance with data protection regulations.
Mistake #4: Hardcoding credentials in payloadsNever include API keys or tokens directly in your payload. Use Clappia's secure header configuration to protect authentication details.
Connecting forms to REST APIs doesn't require technical expertise or expensive developers. With Clappia's visual workflow builder, you configure API connections through simple forms, test with real submissions, and deploy automation in minutes.
The platform handles all backend infrastructure, security updates, and maintenance automatically. Focus entirely on business process automation while professional engineers manage the technical complexity.
Ready to eliminate manual data entry? Sign up for free and create your first form-to-REST-API integration in under 15 minutes.
No coding needed.
Explore Clappia's complete set of automation features or browse ready-to-use templates to get started even faster.
L374, 1st Floor, 5th Main Rd, Sector 6, HSR Layout, Bengaluru, Karnataka 560102, India
3500 S DuPont Hwy, Dover,
Kent 19901, Delaware, USA


3500 S DuPont Hwy, Dover,
Kent 19901, Delaware, USA
L374, 1st Floor, 5th Main Rd, Sector 6, HSR Layout, Bengaluru, Karnataka 560102, India
.svg)


.jpg)

.jpg)