
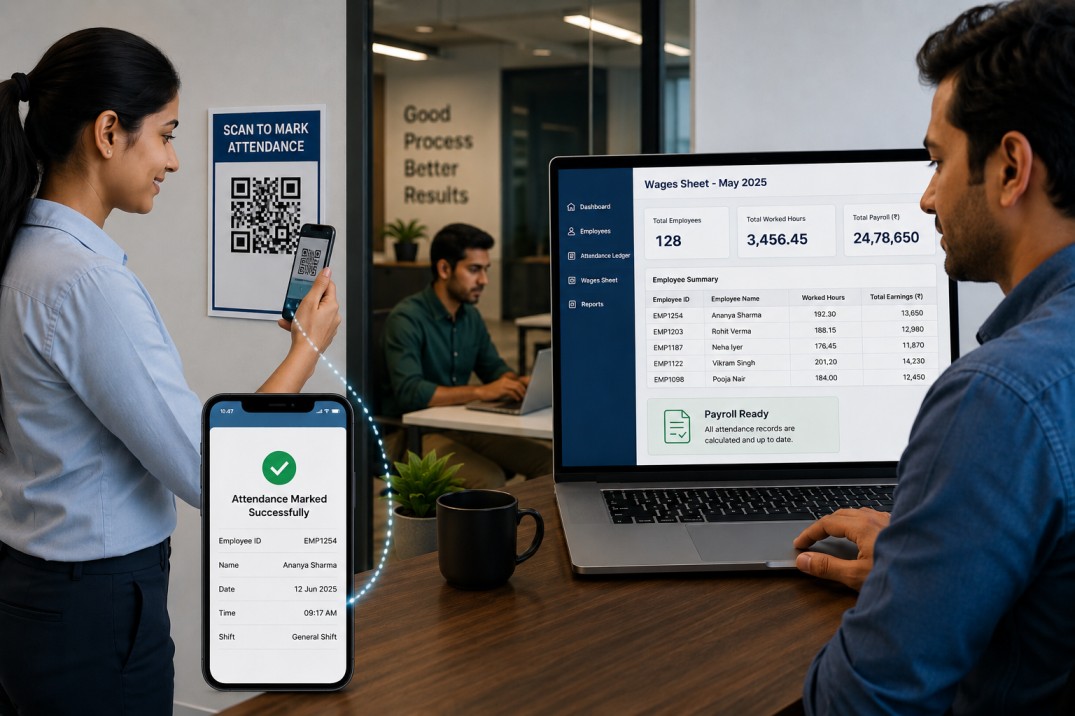
Tracking attendance and calculating wages for shift workers involves more moving parts than most payroll tools are built to handle. You need a reliable way to record each punch, correctly attribute post-midnight entries to the right shift date, calculate worked hours across multiple time segments, and accumulate monthly totals in a format that feeds directly into payroll. Most organisations doing this manually spend significant time every month fixing the gaps between what was recorded and what was actually worked.
This guide walks through building the entire system from scratch in Clappia, a no-code platform for field and operational apps. The finished system consists of four connected apps: an employee master that generates unique QR codes, a scanner app that records each punch and pulls pay parameters automatically, a daily ledger that calculates worked hours per segment, and a wages sheet that accumulates monthly totals without manual aggregation. No coding is required at any step.
The build described here reflects a specific working configuration. Treat it as a practical starting point rather than a rigid blueprint. You can adapt field names, add or remove fields, adjust the section structure, modify automation logic, or skip components that do not apply to your operation. The core architecture remains the same; the details are yours to shape.
Before building, it helps to understand how the four apps connect and what role each one plays.
| App | Role | Who Uses It |
|---|---|---|
| Employee Master | Central database of employee records. Generates a unique QR code per employee. Source of all pay parameters pulled on each scan. | HR or admin team; maintained before deployment |
| Attendance Scanner | Mobile app used to record each punch. QR scan auto-fills employee details and pay parameters. Records date, time, and the After Midnight flag. | Supervisors or gate operators at each scan point |
| Attendance Ledger | Per-day record for each employee. Stores up to six timestamps across three shift segments. Calculates hours per segment and daily totals automatically. | Built automatically by the scanner; reviewed and corrected by HR |
| Wages Sheet | Monthly rollup of worked hours per employee. Accumulates daily totals automatically. Recalculates correctly when historical records are corrected. | Payroll team; built automatically by the ledger |
The build sequence follows the dependency order: Employee Master first, then Scanner, then Ledger, then Wages Sheet, then automations. The automations are configured last because they reference fields across all four apps.
Create a new Clappia app and name it something like Employee Records or Staff Master. This app holds one record per employee and is the source that every QR scan reads from. Use Single Line Text blocks for most fields and Dropdown blocks for fields with defined options.
Which Fields Does the Employee Master Need?
Add the following fields to the form. These establish the employee's identity and employment record:
How to Configure Pay Type, Wages, and Bank Details
These fields define the employee's pay parameters. They are pulled automatically on every QR scan, so accuracy here matters for every downstream record.
The Hourly Rate Formula
Add a Formula block labelled Hourly Rate. In Clappia, formula fields reference other fields using curly brace notation. This formula divides the daily wage by the daily hours to produce the hourly rate:
Formula: {Daily Wages} / {Daily Hours}
The formula uses two fields: {Daily Wages} and {Daily Hours}. When an admin enters the wage and selects a daily hours option, the hourly rate populates automatically as a read-only calculated value. This rate carries into every scan and into the attendance ledger as payroll context. Set this field to read-only so it cannot be manually overwritten.
How to Add Shift Assignment to the Employee Record
Once all fields are in place, populate the master by adding one record per employee. Each record automatically generates a unique QR code based on the Employee ID. This is the code employees carry on their ID badge or card and scan at each punch point.
Create a second Clappia app named Attendance Scanner or similar. This is the mobile-first form operators use at each punch point. It needs to be fast: a scan should take seconds, not minutes.
Add a Barcode Scanner block as the first and primary field. Configure it to look up the scanned code against the Employee Master. When a valid QR code is scanned, the following fields auto-fill from the matched employee record. Add each as a read-only Single Line Text or Number block:
All auto-filled fields should be read-only. They confirm to the operator that the right employee was scanned and carry forward into the ledger record without any additional input.
Add a Date block labelled Attendance Date with a default value of today. Add a Time block labelled Attendance Time with a default value of the current time. Both fields are editable to allow corrections, but the defaults mean operators simply accept them for standard punches.
The After Midnight Flag
Add a Yes/No block labelled After Midnight. When the operator answers Yes, the automation attributes this punch to the previous calendar day. This is essential for night shifts: a clock-out at 02:00 Tuesday belongs to Monday's shift, not Tuesday's. The Yes answer on this single field tells the system to make that attribution automatically.
Fields That Can be Hidden in the App
Add three hidden fields that the automation uses as internal keys. These should never be visible to operators; hide them using a Display Condition set to an impossible value such as Date equals 99999:
These three fields are never shown to users. They exist purely for the automation logic to reference when creating and updating ledger records.
Create a third app named Attendance Ledger or Daily Time Record. This app is populated entirely by the scanner's automation; operators do not fill it in manually. Add the following fields:
Adding Identity and Date Fields
Add six time fields across three segments. Each segment represents one in/out period. The second, fourth, and sixth time fields each need a companion date field and an After Midnight flag because those are the clock-out or return times that can cross midnight:
| Segment | Time In Field | Time Out Field | After Midnight Flag | Companion Date |
|---|---|---|---|---|
| Segment 1 | Time In 1 (Time block) | Time Out 1 (Time block) | After Midnight 1 (Yes/No) | Date 1 (Date block) |
| Segment 2 | Time In 2 (Time block) | Time Out 2 (Time block) | After Midnight 2 (Yes/No) | Date 2 (Date block) |
| Segment 3 | Time In 3 (Time block) | Time Out 3 (Time block) | After Midnight 3 (Yes/No) | Date 3 (Date block) |
Also add two summary fields that the automation keeps updated:
Add a Formula block pair for each segment to calculate worked hours and minutes. Each formula calculates the time difference between the segment's time-in and time-out, adjusted using the companion date when the time-out is after midnight:
Segment 1 Hours: calculated from {Time In 1} and {Time Out 1}, adjusted using {After Midnight 1} and {Date 1}
Segment 2 Hours: calculated from {Time In 2} and {Time Out 2}, adjusted using {After Midnight 2} and {Date 2}
Segment 3 Hours: calculated from {Time In 3} and {Time Out 3}, adjusted using {After Midnight 3} and {Date 3}
Add two daily total Formula blocks:
Daily Hours Total: sum of Segment 1 Hours + Segment 2 Hours + Segment 3 Hours (with minutes rolling into hours when they exceed 59)
Daily Minutes Total: remaining minutes after full hours are extracted
Each pair of formula blocks outputs a hours value and a minutes value separately. The daily totals aggregate all three segments, carrying minutes over into hours correctly.
Which Payroll Fields Should Be Stored in the Ledger?
Add the following fields to store payroll context from the scan. These are populated by the automation when the ledger record is created and are used for downstream payroll processing:
Hidden Helper Fields
Add three hidden fields using the same Display Condition approach as the scanner (Date equals 99999):
Create a fourth app named Monthly Wages Summary or similar. This app holds one record per employee per month and accumulates worked hours as each day's ledger record closes. Add the following fields:
The 9th and 10th day fields exist because when a historical record for those dates is corrected, the monthly total needs to recalculate accurately rather than adding the corrected value on top of the original. The stored day-specific values enable the correction formula described in the automation section below.
The automations are what connect the four apps and make the system work without manual data transfer. Open the workflow settings in the Attendance Scanner app and create a workflow triggered On Save. This workflow runs two parallel processes every time a scan is saved.
Process A: How the Scanner Automation Creates and Updates Daily Ledger Records
After a brief wait to ensure the saved data is ready, the automation:
Based on what it finds:
For every update, also set the ledger's Date field to the resolved attendance date (accounting for the After Midnight flag).
Process B: How the System Detects Duplicate or Suspicious Scans
Running in parallel with Process A, this immediate check retrieves the earliest scan recorded for the same employee and date combination and compares the time gap between that scan and the current one. If the gap is less than ten time units, the current scan is flagged as a potential duplicate. This check is read-only: it does not block or reject the scan. It creates a flag that supervisors can monitor for patterns of rapid re-scans.
How the Ledger Automation Updates Exit Time and Monthly Totals
In the Attendance Ledger app, create a workflow triggered On Edit with three condition chains:
Monthly Hours Total = previous Monthly Hours Total + today's hours - previous 9th Day Hours
Monthly Hours Total = previous Monthly Hours Total + today's hours - previous 10th Day Hours
This recalculation pattern ensures that correcting a historical ledger entry on the 9th or 10th automatically updates the monthly total to reflect the corrected value rather than adding to the previous one.
Configure user permissions in Clappia's user management settings. The recommended access structure for this system is:
| Role | App | Access Level |
|---|---|---|
| Gate Supervisor or Operator | Attendance Scanner | Submit Only: record punches; view own scan history |
| HR Officer | Attendance Ledger | View and Edit: review and correct daily records |
| Payroll Team | Wages Sheet | View Only: access monthly totals for payroll processing |
| Admin | All four apps | Full Access: manage employee master, configure settings, manage all records |
The Clappia mobile app, available on Android and iOS, supports offline mode. Scans can be recorded and queued locally when there is no network connection. The automations fire after the submission syncs when connectivity returns. For offline lookups to work, the Employee Master data needs to be cached on the scanning device. Open the Clappia app on Wi-Fi before each shift to ensure the employee data is available for offline QR scans throughout the shift.
Before using the system with your full workforce, run the following test scenarios to confirm each component is working correctly:
Building this system from scratch involves four apps and a set of automations that connect them. The Employee Master holds all employee and pay data and generates QR codes. The Attendance Scanner records each punch in seconds with automatic data pull. The Attendance Ledger builds a complete daily time record with per-segment hour calculations and correct midnight handling. The Wages Sheet accumulates monthly totals automatically with correction-safe recalculation.
The configuration described here is one working implementation. Your version may have different field names, additional fields for your industry context, different dropdown values for shift types or pay structures, or different automation timing. The structure of four connected apps with the After Midnight flag, hidden helper keys, and day-specific monthly buckets is what makes the system accurate. Those design decisions are worth keeping; everything else is configurable to your needs.
To start building, create your Employee Master first in Clappia. Once it is populated with your workforce and QR codes are generated, the remaining three apps and automations follow in sequence. The complete system can be built and tested in a single session without writing any code.
L374, 1st Floor, 5th Main Rd, Sector 6, HSR Layout, Bengaluru, Karnataka 560102, India
3500 S DuPont Hwy, Dover,
Kent 19901, Delaware, USA


3500 S DuPont Hwy, Dover,
Kent 19901, Delaware, USA
L374, 1st Floor, 5th Main Rd, Sector 6, HSR Layout, Bengaluru, Karnataka 560102, India
.svg)


.avif)


