
Still need help?

We can connect our Clappia apps to Google Drive so that all submissions get synced to Google Sheets and all images and files get synced to Google Drive in real-time. The connected Google Drive gets updated on the following events:
1. New Submissions
2. Submission edits
3. Status change
4. Submission deletes
5. Bulk upload of data
Here are the steps to connect Clappia apps to Google Drive:
1. Sign in to Clappia and select the app you wish to connect with to Google Drive. Go to the ‘Design App’ tab and click on ‘Configuration’.
Then click on the ‘Google Sheets/Drive’ button.

2. On the right panel, enable the option and click on the button Connect with Google Sheets/Drive. This will take you to Google Account authentication.


3. You will get a Google Sign In prompt. Select your Google Account or and Sign-in to your Google Account.

Click on allow. This will authorize Clappia to write data to the Google Drive and you are done.

Note: In case you get an error message while connecting to Google Drive, try checking your browser settings or updating your browser.
4. Once connected successfully, the right panel will be updated with syncing options. You can click on Show Google Sheets and Show Google Drive Folders option to view the connected Sheet and Folder.
Existing submissions of the app will get synced to Google Sheets and all submission events after this step will also update the Sheet in real-time. Any images or files data will be synced only for new submissions. Old image data cannot be back-filled.

After connecting your app to Google Sheets or Drive, you have the flexibility to control which fields from your submissions are synced.

In the right panel, under Columns Selected, click the dropdown. You will see a list of all fields currently available in your app's submissions.

Deselect any fields you do not want to sync to your Google Sheet.
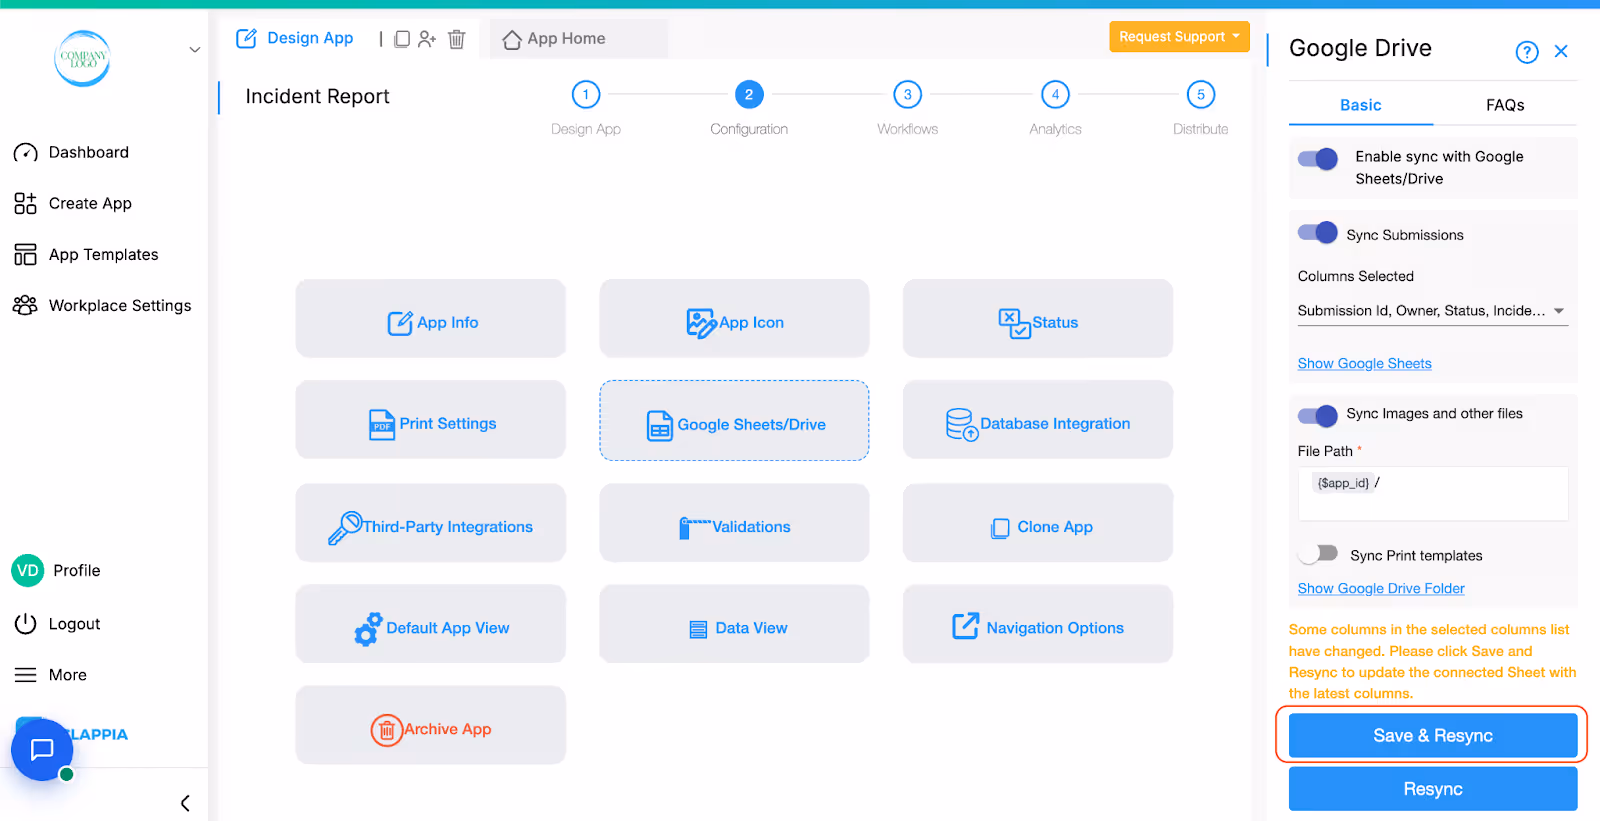
Once you make your selections, click Save & Resync. A success message will appear confirming the changes.

Only the selected fields will be visible in your connected Google Sheet.
Note:

When your app submissions include files such as images, videos, or documents, Clappia can automatically upload these files to the connected Google Drive. This ensures that all file attachments from submissions are stored securely and are easy to access later.
After enabling Google Sheets/Drive integration, you can enable the “Sync Images and Other Files” option from the right panel. Once this option is turned on:
Note:
Files (images, videos, documents) are only pushed to Google Drive for new submissions made after the integration is enabled.
Submissions created before enabling this feature or during periods when the feature is disabled will not automatically sync their files to Google Drive.
Workaround:
You can manually download these files from the Submissions tab. Use filters (e.g., by submission date) to find the files corresponding to the time when Drive integration was disabled, then upload them manually to your Google Drive.

If your app generates PDF documents using print templates, you can enable Clappia to automatically save these PDFs to your connected Google Drive folder.
By enabling the “Sync Print Templates” option in the right panel:
Note:
PDFs from print templates are only pushed to Google Drive for new submissions made after enabling this feature. Older submissions will not sync their PDFs automatically. You can download them manually from the Submissions tab and upload them to Google Drive if needed.

When submissions in your Clappia app include files (such as images, videos or PDFs from print template), these files are automatically stored in a Google Drive folder named after your app’s ID (e.g., AppID).
With the File Path setting, you can create a custom folder structure within this main AppID folder. This helps you organise files based on submission data instead of having all files stored in a single location.
How it works:
How to set it up:
Example Scenario:

If your app contains dropdown fields named Country and State, having same variable names, and you set the File Path as:
{$app_id}/{country}/{state}


Then, a file uploaded by a user in the submission, selecting the dropdown named country as ‘India’ and state as ‘Karnataka’, will be saved like this:
AppID/India/Karnataka/


This approach is especially useful for apps that manage data from multiple regions, projects, or categories, as it keeps files neatly separated and easy to find.
Note on Subfolder Retention:
If you define a folder path using field variables (e.g., {$app_id}/{country}/{state}), Clappia creates subfolders inside the main AppID folder based on those field values.
If you later delete that field (e.g., state) from the app or remove it from the File Path, the corresponding subfolders and files will not be deleted automatically. These subfolders will remain in your Google Drive.
You can manually delete these subfolders if needed, but ensure you download or back up their files first to avoid data loss.

Here are some additional important cases and how to resolve them.
1. Why have my recent submissions stopped syncing to Google Sheets?
Possibility: Reached Google Sheet’s Cell Limit
Google Sheets supports a maximum of 10 million filled cells per sheet. When Clappia syncs submission data, each submission adds one row, and each field in the app adds one column. For example, if your app has 100 fields, each new submission fills 100 cells in the Google Sheet.
Once the 10 million cell limit is reached, Clappia will stop syncing new submissions, and the Google Sheets integration will be automatically disabled.
What you can do:
Then, click on Save & Resync to re-enable syncing.
2. Why doesn’t the Resync button update my Google Sheet?
Possibility: Resync Failure Due to Google Sheet Protection
If your connected Google Sheet is protected (i.e., editing access is restricted to specific users or only to the admin), then other users—even those with permissions in Clappia—will not be able to trigger a resync. Clicking Resync in this case will not update the sheet.
What you can do:
3. I added new fields to my app, why are they not showing up in the Google Sheet?
If new fields are added to your Clappia app after the Google Sheets integration is already enabled, these fields will not automatically show up as new columns in the connected Google Sheet. This is done intentionally to give admins control, so if they accidentally added unnecessary fields or were just testing a few things, those fields won’t instantly show up in the Google Sheet and disrupt its structure.
You may also see a message like this in the side panel:
“Some columns in the selected columns list have changed. Please click Save and Resync to update the connected Sheet with the latest columns.”
What you can do:
This behaviour gives you more control, especially if you’ve added fields for testing or temporary use and do not want them to sync immediately.
4. The Google sign-in window does not appear when connecting to Google Sheets/Drive
Possibility: Browser Pop-ups are Blocked
When you click the button to connect your Google account for Sheets/Drive integration, usually the browser opens a new tab and shows a Google sign-in pop-up window. If this pop-up does not appear, your browser may be blocking pop-ups for Clappia (or other sites).
What you can do:
If you are still unable to connect your Google account to Clappia;
Possibility: Third-party Cookies DisabledEven if pop-ups are allowed, sometimes the connection fails because third-party cookies are blocked in your browser. Google account authentication for Clappia requires cookies to be enabled.
What you can do:
1. Google Sheets can support up to a maximum of 10,000,000 cells. So if a Clappia App has 10 fields, then every app submission will occupy 10 cells and so up to 1000,000 submissions will be accommodated in the Google Sheets. The number of supported submissions will keep reducing as the number of fields in the app increase.
2. What happens if I disable the connected Google Sheet?
If the Google Sheets/Drive feature is disabled or the “Sync Submissions” toggle is turned off, the Google Sheet that was previously created remains intact in your Google Drive. Any data already synced will continue to exist in the sheet. When the integration is re-enabled, new submissions will resume syncing to the same sheet, and you can also use the Resync button to push any data that was missed during the disabled period.
3. If new fields are added to the app, go to the “Columns Selected” section in the configuration panel, select the new fields, and click Save & Resync. This allows admins to control exactly which fields are added to the sheet without affecting the existing data structure.
4. If you want to create more sheets that have dependencies on the connected Sheet, it is advisable to do so in a separate Google Sheet, not as a sub-sheet of the connected Sheet. You can use the IMPORTRANGE function to do this. Otherwise you run into the risk of the entire sheet getting deleted if an App Admin disconnects the Google Sheet from the App.
5. If you are having multiple print templates then only the first one will be synced to the Google Drive folder, as of now.
The error typically means there’s a permissions or pop-up blockage issue. You should:
Confirm you’re signed into the correct Google account.
Ensure pop-ups and third-party cookies are enabled in your browser.
If you still have issues, disconnect and reconnect the integration or contact Clappia support.
See how to configure PDFs:
<iframe width=\"200\" height=\"100\" src=\"https://www.youtube.com/embed/4bvRWQbfR-0\" title=\"Form to PDF ● Clappia App Building ● No-Code Low-Code Platform\" frameborder=\"0\" allow=\"accelerometer; autoplay; clipboard-write; encrypted-media; gyroscope; picture-in-picture; web-share\" allowfullscreen></iframe>
The message appears when no print template (PDF) is configured in the app and the “Sync Print Templates” option is enabled in the Google Sheets/Drive integration.
To resolve it:
If you don’t need PDFs pushed to Drive yet, simply disable “Sync Print Templates” in the Google Sheets/Drive integration settings.
If you do need PDFs synced, go to Design App → Configuration → Print Settings, create and save a print template, then re-enable “Sync Print Templates.”
Once a print template exists and syncing is enabled, new submissions will automatically generate PDFs and push them to Google Drive.
Yes. By default, all files are saved in one folder named after the app’s ID. To separate them, use the File Path setting in your Google Drive integration. You can use a single selector for defining types (folder names) and use that field variable in the file path.
In the File Path field, type @ and select the field that stores the type (e.g., type).
For example: GOD872950/{type}
Files for Type A submissions will then go into AppID/Type A/, and files for Type B into AppID/Type B/.
L374, 1st Floor, 5th Main Rd, Sector 6, HSR Layout, Bengaluru, Karnataka 560102, India
3500 S DuPont Hwy, Dover,
Kent 19901, Delaware, USA


3500 S DuPont Hwy, Dover,
Kent 19901, Delaware, USA
L374, 1st Floor, 5th Main Rd, Sector 6, HSR Layout, Bengaluru, Karnataka 560102, India
.svg)
