

How long does your team spend raising an invoice after a release order comes in?

For most businesses, the answer is longer than it should be. Someone receives the release order, opens it, manually copies the client name, amounts, line items, and due date into an invoice template, formats it, double-checks it, and sends it out. Handle ten release orders a week and that is hours of repetitive, error-prone work.
With Clappia's no-code platform, you can build an app where your team uploads a release order, submits the form, and everything else runs automatically. The AI Workflow Node reads the document, extracts every key field, a Code Workflow Node parses the response into clean individual values, an Edit Submission Node writes those values back into the submission, and Print Settings generates a properly formatted, branded invoice PDF automatically. No template editing, no copy-pasting, no formatting work.
This guide covers exactly how to build it, step by step.
A release order and an invoice are two sides of the same transaction. The client sends an RO confirming what they have approved. Your business raises a corresponding invoice based on those exact details: client name, RO number, description of goods or services, amounts, taxes, and payment due date.
When done manually, data travels from one document to another through a person. Every time a person bridges two documents, there is room for delay, error, and inconsistency. Different team members format invoices differently. Fields get skipped. Amounts get transposed.
What you want instead is a process where the release order goes in and a properly formatted, branded invoice comes out automatically, with your company's fixed details already on it and the client's details extracted precisely from the uploaded document.
Here is the complete flow once built:
Your team uploads a release order (PDF or image) and submits. The submission shows a Submitted status. In the background, the AI Workflow Node reads the document and returns a JSON response with all extracted fields. The Code Workflow Node parses that JSON and outputs each field as a separate clean variable. The Edit Submission Node writes those variables back into the submission's fields. About a minute after submission, all the extracted fields are populated and visible on the submission record. The Print Settings template merges those values with your branded invoice layout and generates the final invoice PDF. Your company name, address, and tax details are hardcoded as static text inside the template and never need to be entered by anyone. The client's details come entirely from what the AI extracted. Once the accounts team has reviewed and confirmed everything is correct, they change the status to Verified, and the downstream automation fires.
Sign up for a free Clappia account. The free plan lets you build unlimited apps and explore most of Clappia's features, which is more than enough to build and test this complete invoice generation workflow. For details on what is available at each plan level, check the pricing page.
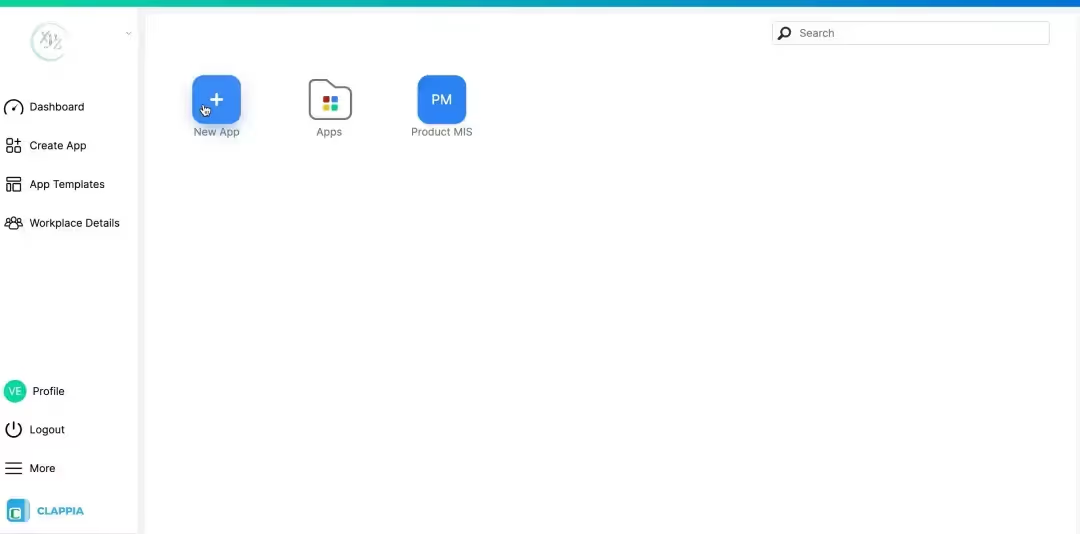
From your dashboard, click "New App" and name it "Invoice Generator" or "RO to Invoice." Use the app configuration guide if this is your first Clappia build.
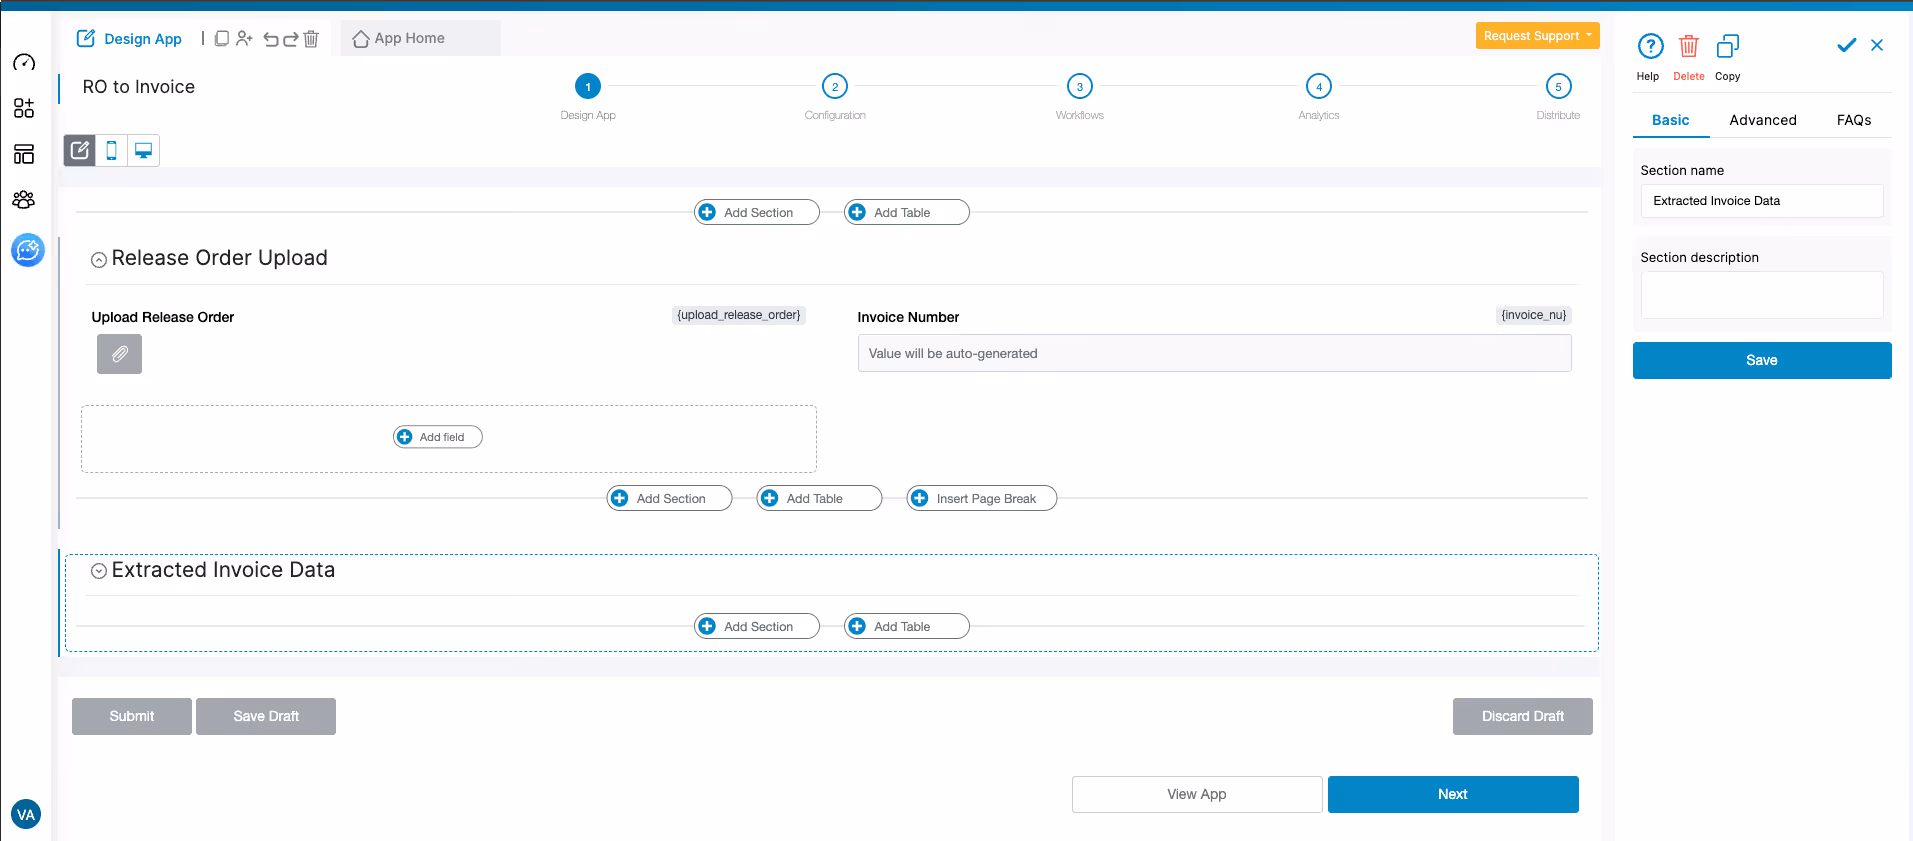
All blocks in Clappia live inside sections. Before adding any fields, click "Add Section" on the canvas and give it a name. Then add your blocks inside it. To add another group of fields, click "Add Section" again and name it accordingly. Sections keep the form organised and allow you to apply conditional display logic at the group level.
Name this section "Release Order Upload."
Add a Camera, Images and Files block.
Drag the Camera, Images and Files block into this section. Label it "Upload Release Order."
In the right panel under Allowed File Types, enable the options that fit your team's workflow: Images (Gallery Uploads) and Documents for uploading PDFs and files from a device, and Images (Camera Uploads) if your team will photograph paper release orders in the field.
Now look at the auto-generated variable name for this field. Clappia truncates the label and joins words with underscores, so "Upload Release Order" becomes something like upload_rel. You can edit this directly in the right panel to something more readable, like upload_ro or upload_release_order. A clear variable name is useful because you will type it inside the AI Workflow Node prompt in Step 4. The Labels and Variables guide explains this in detail.
Add a Unique Numbering block.
Label it "Invoice Number." Configure it with your preferred prefix and starting number, for example INV-2025-001. This auto-increments on every new submission so each generated invoice gets a unique reference with no manual tracking. The variable name for this block (for example invoice_num) is what you will use for the conditional display logic in the next section.
Click "Add Section" and name it "Extracted Invoice Data."
Enable the Display this section if option and set the condition to:
{invoice_num}<>""
This is the correct logic. The Invoice Number block generates its value only after the form is submitted. So this section stays hidden while the user is filling the form and only becomes visible after submission, once the invoice number has been assigned and the workflow has populated the extracted fields. This prevents the user from seeing empty boxes during form filling, which would be confusing.
Add the following blocks inside this section. They will all be empty at submission time and populated automatically by the workflow within about a minute.
You can mark all fields in this section as read-only to prevent accidental edits, or leave them editable so the accounts team can correct any extraction errors before marking the submission as Verified.
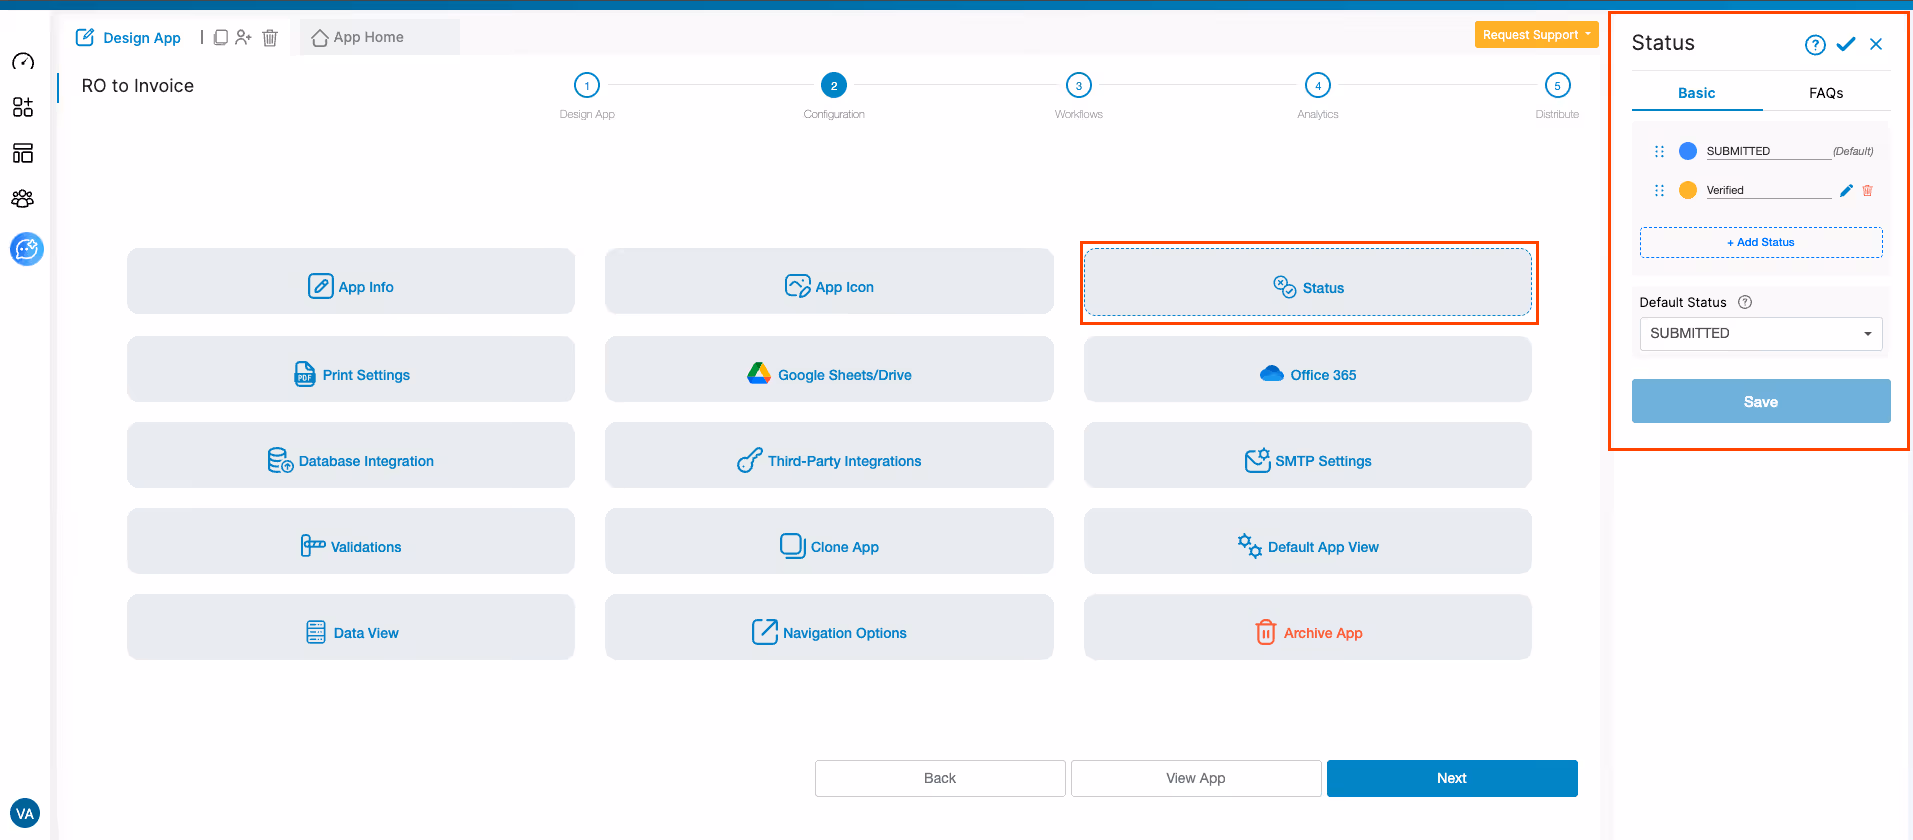
Go to Design App > Configurations > Status and add one custom status: "Verified".
When a user submits the form, the submission gets the default "Submitted" status automatically. About a minute later, the workflow runs in the background and populates all the extracted fields. The accounts team then opens the submission, compares the extracted values against the original uploaded release order, and if everything is correct, changes the status to Verified.
Changing the status to Verified triggers the Review Submission Flow workflow (configured in Step 7 below), which fires all the downstream actions: sending the invoice PDF to the client, notifying the team, and syncing the record to your tracker. If any extracted value is wrong, the team corrects it in the field first, then sets the status to Verified.
The submission status guide covers the full setup.
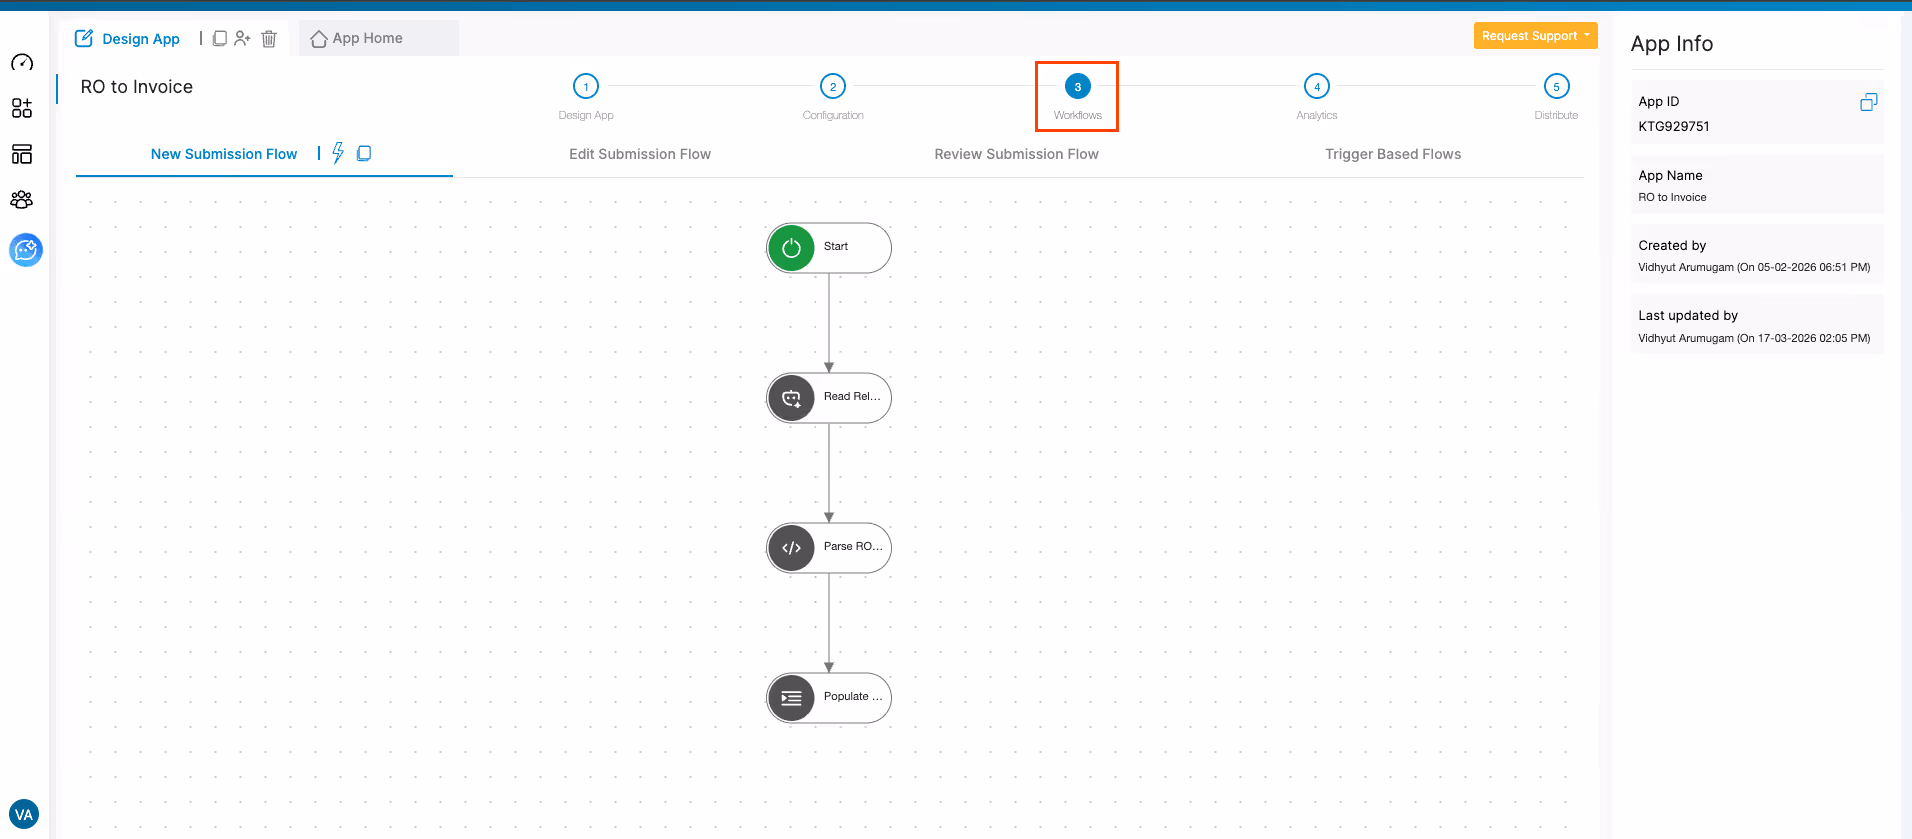
Open the Workflows tab and go to New Submission Flow. This sequence fires automatically every time a new submission is made. Add three nodes in sequence.
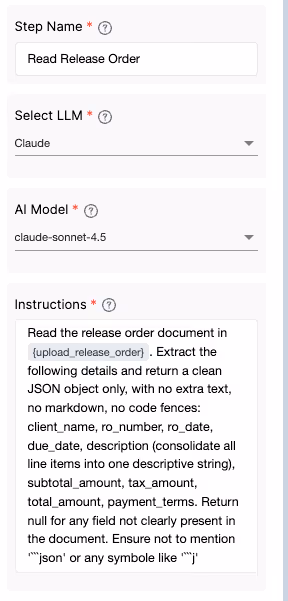
Add the AI Workflow Node. Name it "Read Release Order."
Select your LLM. OpenAI GPT-4o, Anthropic Claude, and Google Gemini are all supported. Clappia provides built-in AI usage credits to get started. For high volumes, you can connect your own API key through Design App > Configurations > Third Party Integrations.
Write the prompt. Type @ in the Instructions box and begin typing your upload field's variable name. Clappia shows a dropdown of all available variables. After you select it, the reference appears inside curly braces, for example {upload_release_order}. Use this in your prompt:
"Read the release order document in {upload_release_order}. Extract the following details and return a clean JSON object only, with no extra text, no markdown, no code fences: client_name, ro_number, ro_date, due_date, description (consolidate all line items into one descriptive string), subtotal_amount, tax_amount, total_amount, payment_terms. Return null for any field not clearly present in the document."
Once saved, the AI Workflow Node generates its own variable name. Note this down as you will reference it inside the code in the next step.
Add the Code Workflow Node immediately after. Name it "Parse RO Data."
This node handles any formatting the AI may have added (markdown fences, wrapping quotes, currency symbols with commas) and outputs each field as a clean individual variable. Paste the following code into the editor. Replace {ai_node} in the template literal on line 4 with the actual variable name your AI Workflow Node generated:
javascript
function main() {
    let output = {};

    let jsonStringRaw = `{ai_read_release_order}`.trim();

    let jsonString = jsonStringRaw;

    // FIX: remove ```json WITH newline properly
    jsonString = jsonString
        .replace(/^```json\s*/i, "")   // remove start + newline
        .replace(/\s*```$/, "")       // remove end
        .trim();

    let data = {};

    try {
        data = JSON.parse(jsonString);
    } catch (e) {
        output["error"] = jsonString; // debug
        return output;
    }

    function cleanAmount(val) {
        if (!val) return "";
        return val.toString().replace(/[^0-9.]/g, "");
    }

    output["client_name"]     = data.client_name || "";
    output["ro_number"]       = data.ro_number || "";
    output["ro_date"]         = data.ro_date || "";
    output["due_date"]        = data.due_date || "";
    output["description"]     = data.description || "";
    output["subtotal_amount"] = cleanAmount(data.subtotal_amount);
    output["tax_amount"]      = cleanAmount(data.tax_amount);
    output["total_amount"]    = cleanAmount(data.total_amount);
    output["payment_terms"]   = data.payment_terms ? data.payment_terms.toString() : "";

    return output;
}
You can give this entire block to ChatGPT, Gemini, or Claude and ask it to adjust the field names to match your release order fields.
In the Output Fields section of the Code Node, add each field name exactly as defined in the output object above, one per row using "+ Add another field": client_name, ro_number, ro_date, due_date, subtotal_amount, tax_amount, total_amount, payment_terms, description.
Once saved, the Code Node generates its own variable name (for example code). Each output is then referenceable as {code#client_name}, {code#total_amount}, and so on.
Add the Edit Submission Node. Name it "Populate Invoice Fields."
Select App: Choose your current app, "Invoice Generator."
Filters: Set the filter field to Submission Id and the value to {$submission_id}. This ensures the node always updates the exact submission that triggered the workflow.
Set Field Values: For each field, type @ in the value box, start typing the field name, and select the matching code node output from the dropdown. The full mapping:
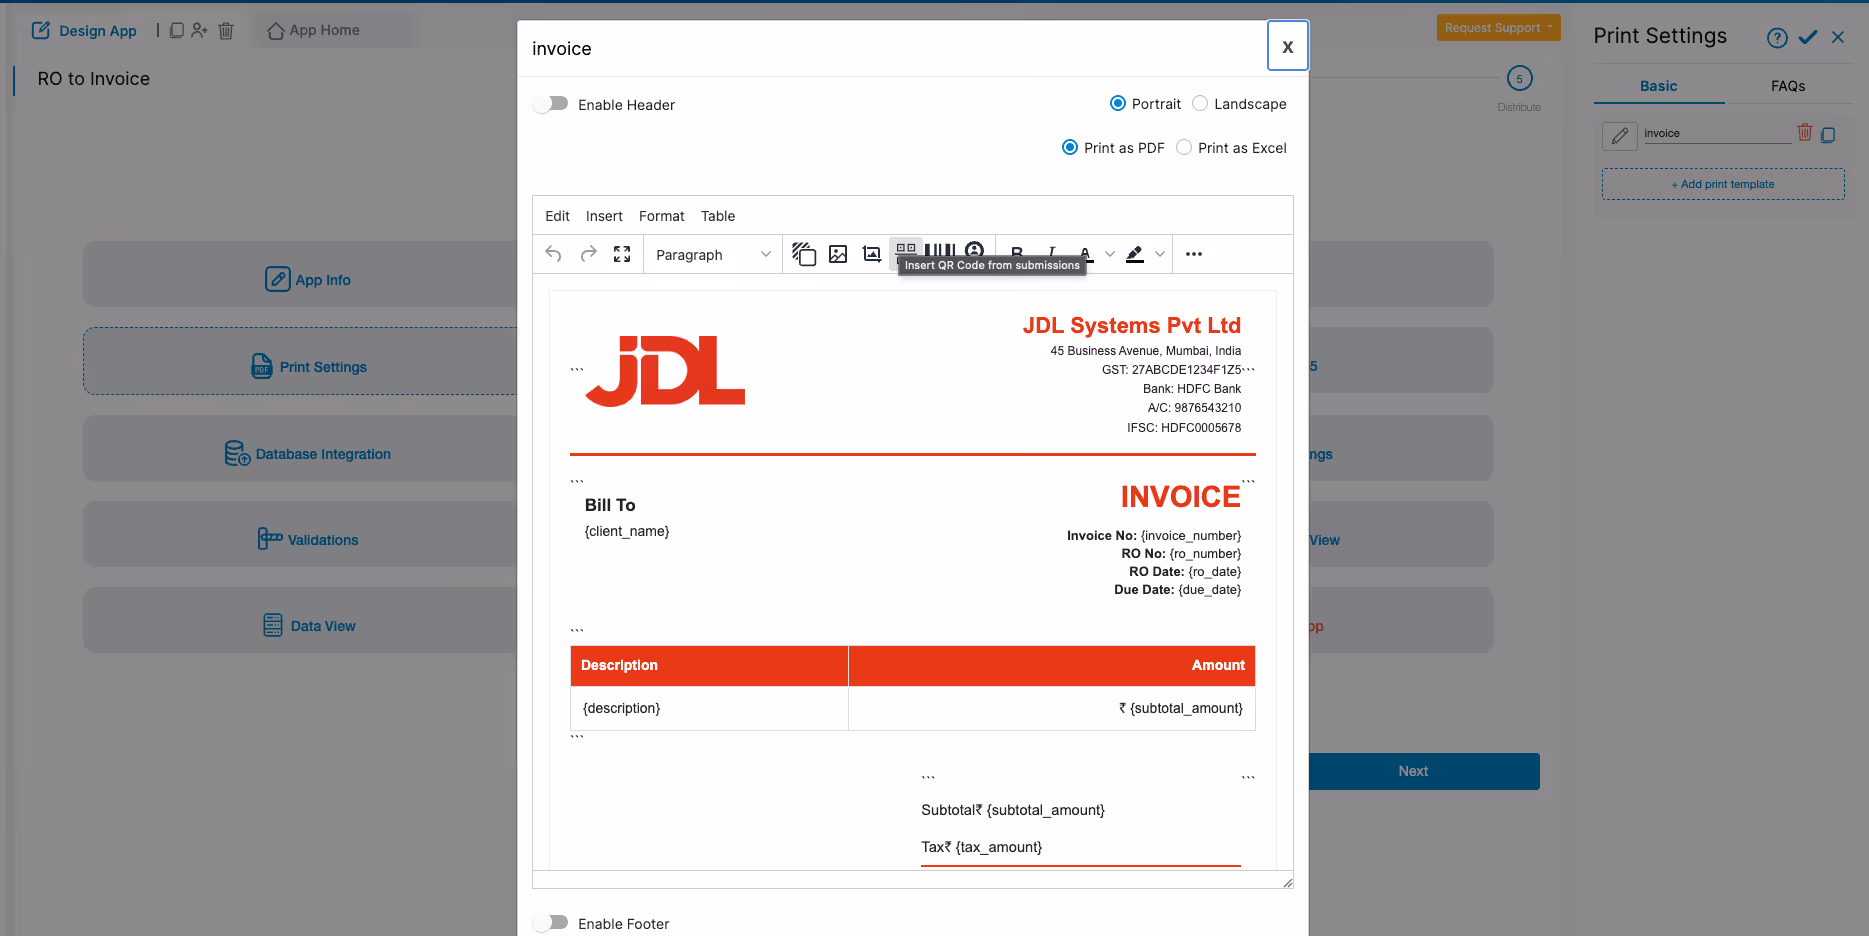
Go to Design App > Configurations > Print Settings. Click "Add Print Template", then click the pencil icon to open the template editor.
Inside the editor, you can set the page orientation (Portrait or Landscape), output format (Print as PDF or Print as Excel), and optionally enable a header or footer. The canvas in the centre is where you build the invoice layout.
Your company details (name, address, GST number, logo, bank details) go into the template as fixed static values. They never come from a form field and never need to be entered by your team. The extracted client and order fields use Clappia's {variable_name} syntax as dynamic placeholders that get filled with live submission data at PDF generation time.
You have two ways to build the template.
The template editor includes a full rich text toolbar with formatting options including bold, italic, underline, alignment, bullet and numbered lists, tables, image insertion, QR codes, barcodes, and more.
Type your company name, address, GST number, bank details, and any other fixed business information directly as plain text at the top of the template. Then type @ anywhere in the editor to pull up the variable dropdown and insert your dynamic field references: {client_name}, {invoice_number}, {ro_number}, {ro_date}, {due_date}, {description}, {subtotal_amount}, {tax_amount}, {total_amount}, and {payment_terms}.
Use the Table option in the toolbar to structure your line-item section, and use headers and bold text to separate invoice sections clearly. This is the fastest approach and requires no code at all.
For full control over the invoice design with pixel-perfect branding, click the <> icon in the toolbar to switch to the HTML source view. Write your layout as HTML, hardcode your company details as plain static text in the markup, and use {variable_name} placeholders for all dynamic fields.
The fastest way to build this is to use an AI assistant. Give ChatGPT, Gemini, or Claude a screenshot or description of your desired invoice layout and this prompt:
"I need a responsive invoice layout in HTML and CSS for use inside Clappia's PDF print template. Refer to the attached invoice design as a layout and style reference. My company details are static, hardcode them directly in the HTML: [your company name, address, GST number, bank details, logo URL]. The following are dynamic Clappia field variables, use them exactly inside curly braces: {client_name}, {invoice_number}, {ro_number}, {ro_date}, {due_date}, {description}, {subtotal_amount}, {tax_amount}, {total_amount}, {payment_terms}. Important: start the output from a div block, not an HTML or body tag, since I am embedding this in the source code block. Make it fully responsive across desktop, tablet, and mobile."
Paste the generated HTML into the source editor, preview it against a real submission, and refine as needed.
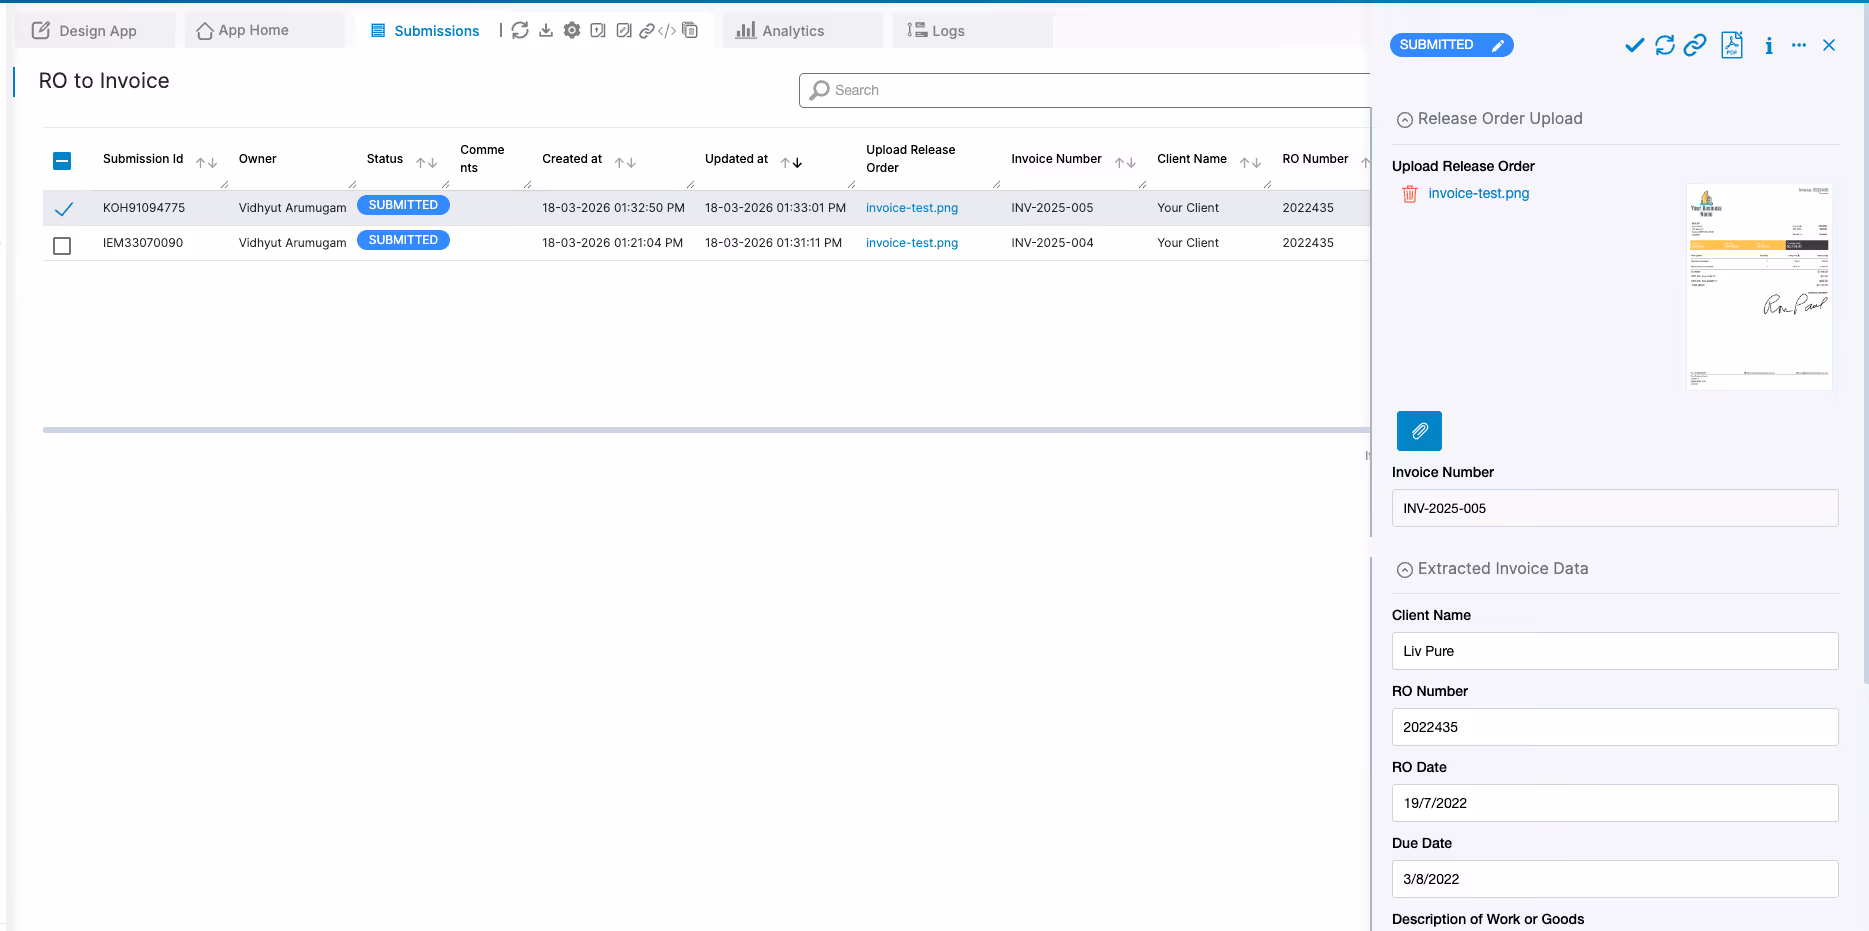
About one minute after submission, all the extracted fields populate automatically. The accounts team opens the submission, reviews the values against the original uploaded release order, and previews the generated invoice PDF.
If everything is correct, they change the status from Submitted to Verified. If any value was read incorrectly by the AI, they correct the field directly, then set the status to Verified. This review step ensures no incorrect invoice ever reaches a client.
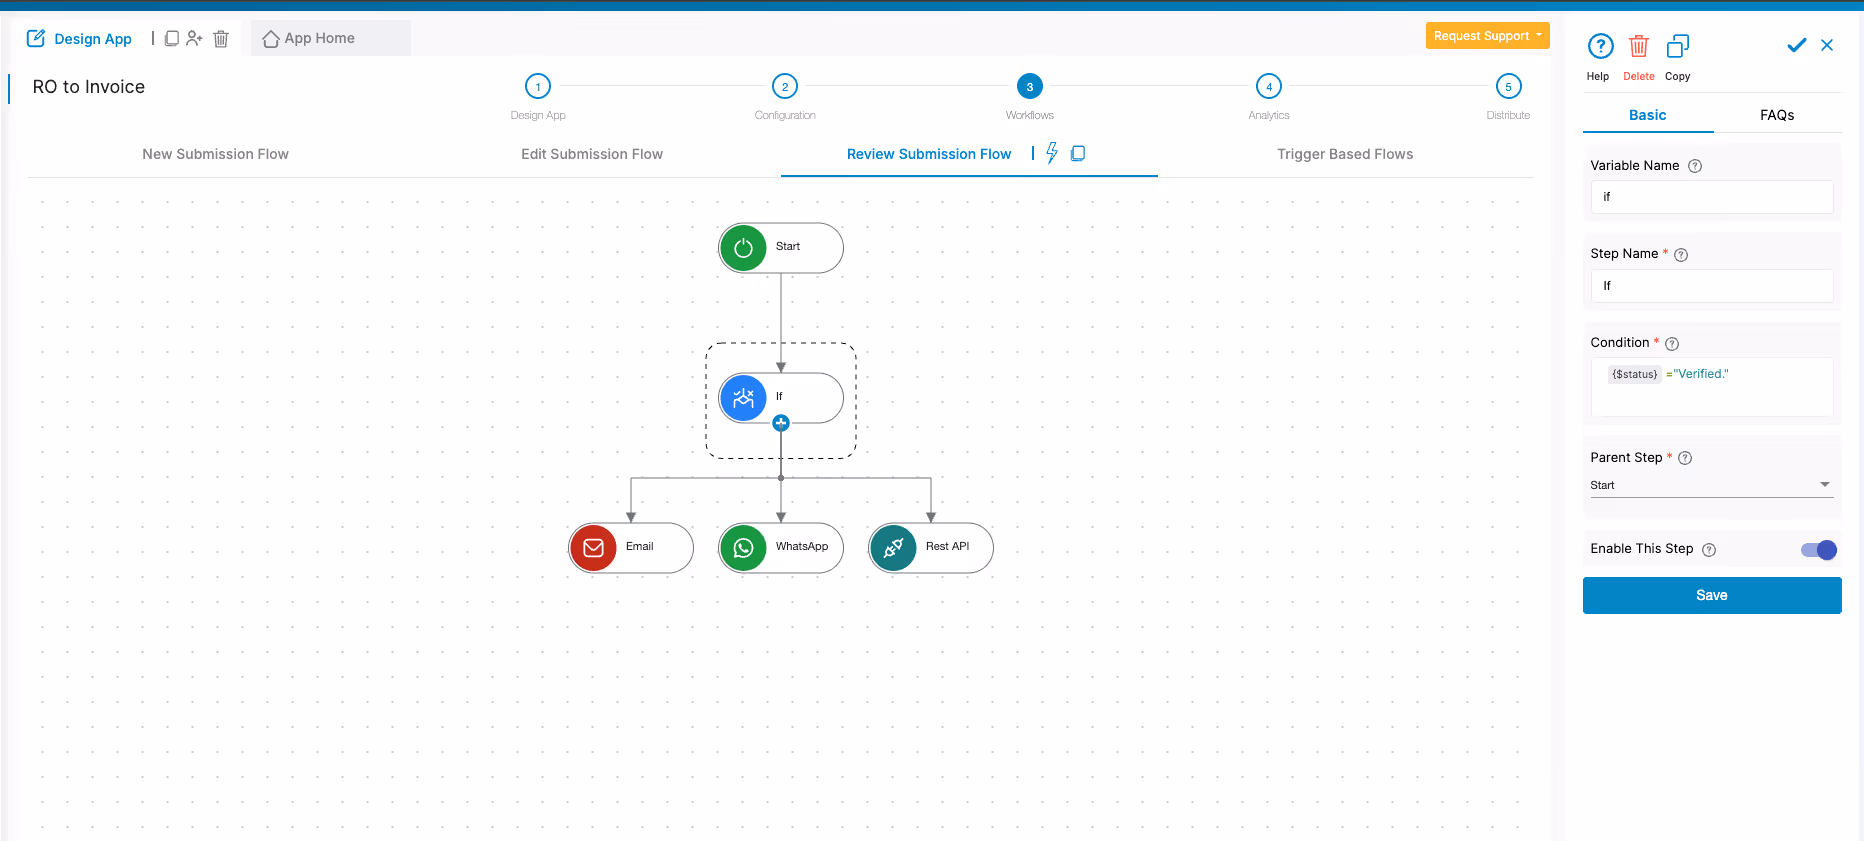
Open the Workflows tab and go to Review Submission Flow. This triggers whenever a submission's status changes. Add an If node checking whether the status equals "Verified." When true, run the following actions.
Email the invoice to the client. Use the Email Workflow Node to send the invoice PDF directly to the client. Reference {client_name}, {invoice_number}, {total_amount}, and {due_date} dynamically in the subject and body. Attach the generated invoice PDF automatically from Print Settings.
Send via WhatsApp. Use the WhatsApp Workflow Node to notify the client or your internal finance team. Within the WhatsApp node configuration, you can attach the dynamic PDF directly so the recipient receives the invoice document on WhatsApp as well. You can also add an SMS node for text alerts, a Slack node to post to a finance channel, or a Mobile Notification node for in-app push alerts, as all these options are visible in the workflow node picker.
Sync to Google Sheets/Drive. Use Clappia's Google Sheets/Drive integration to sync each verified invoice as a new row in your AR tracker. Client name, invoice number, RO reference, amounts, due date, and payment terms all flow in automatically, giving you a live invoice register without anyone entering anything manually.
Push to external systems. If your ERP or accounting software accepts API calls, use the REST API Workflow Node to post the structured invoice data directly after the Verified status is confirmed.
Any business that receives release orders and raises invoices against them benefits from this setup. Construction companies billing clients against subcontract release notes. IT service firms invoicing based on procurement release orders. Manufacturing suppliers generating sales invoices from buyer purchase orders. Logistics companies issuing freight invoices from cargo release documents. Agencies billing against approved project scopes.
The common thread is simple: a document comes in with all the billing details already written in it, and someone has to manually reformat those details into an outgoing invoice. This app replaces that manual step entirely with a consistent, automated process.
The same platform handles related workflows too. If you are building out the wider procurement and payment cycle, the guide on custom invoice processing with approvals is a useful companion. For field teams managing vendor payments from remote sites, field expense tracking and vendor management automation cover complementary workflows on the same platform.
Why must I reference the upload field using @ in the AI Workflow Node prompt?
The AI Workflow Node does not automatically scan all form fields for uploaded files. You must tell it explicitly which field contains the document. Type @ in the Instructions box and begin typing the field name. Clappia shows a dropdown of all available variables. After selecting, the reference appears in curly braces inside your prompt, for example {upload_release_order}. Without this reference, the AI has no file to read.
Why does the Extracted Invoice Data section only appear after submission?
The section is configured to show only when {invoice_num}<>"". The Invoice Number block generates its value only after the form is submitted. So while the user is filling the form, the section stays hidden and they do not see empty boxes. After submission, once the invoice number is assigned and the workflow populates the fields, the section becomes visible when they open the submission.
Why is there about a one-minute delay before the invoice fields populate?
The workflow runs in the background after submission. The AI Node sends the document to the language model, waits for the response, the Code Node parses it, and the Edit Submission Node writes the values back. This typically completes within about a minute. Submit, wait briefly, then open the submission to review.
What if the AI misreads a value from the release order?
The Verified status step handles this. The accounts team reviews the extracted values alongside the original uploaded release order within the same submission view. If anything is wrong, they correct the field directly, then change the status to Verified. The downstream actions only fire after that status change, so no incorrect invoice reaches the client.
Can the WhatsApp node send the invoice PDF as an attachment?
Yes. Within the WhatsApp Workflow Node configuration, you can attach the dynamically generated PDF directly so the recipient receives the invoice document on WhatsApp.
Can field teams submit release orders on mobile?
Yes. The Clappia mobile app on Android and iOS supports camera capture and file uploads from the same block. A team member can photograph a paper release order on site and submit it. The workflow runs in the background. If connectivity is limited at the location, Clappia's offline mode holds the submission and syncs once a connection is available.
Can the AI handle release orders from different clients with different layouts?
Yes. Because the AI Workflow Node uses a large language model rather than template matching, it reads documents contextually regardless of format or layout. Release orders from different clients are all processed accurately with the same prompt configuration, with no per-client adjustments required.
Turning a release order into a finished, client-ready invoice should take your team seconds of effort, not minutes of repetitive manual work. With Clappia, the full build takes a few hours and runs automatically from that point forward on every release order your business receives.
Sign up for a free account and build the app today. Test it against real release orders, refine the invoice template until it matches your branding exactly, and go live. When you are ready to scale, check out Clappia's pricing plans to find the right fit for your team size and submission volume.
Start building for free on Clappia. Your next release order could have a finished invoice generated and delivered before you close the browser tab.
Want to go further? See how Clappia teams are building complete invoice processing workflows with approvals, or explore how the AI Workflow Node powers intelligent document processing across industries, from field inspections and quality audits to procurement and financial automation.
L374, 1st Floor, 5th Main Rd, Sector 6, HSR Layout, Bengaluru, Karnataka 560102, India
3500 S DuPont Hwy, Dover,
Kent 19901, Delaware, USA


3500 S DuPont Hwy, Dover,
Kent 19901, Delaware, USA
L374, 1st Floor, 5th Main Rd, Sector 6, HSR Layout, Bengaluru, Karnataka 560102, India
.svg)


.jpg)
.avif)
%20(1).png)
.jpg)