
Still need help?

This option lets you control whether a specific block/field or section should be visible to the user when they’re filling out a form. It appears under the Advanced tab of most blocks in the Design App section, and allows you to define logic-based conditions similar to spreadsheet formulas to dynamically show or hide the selected block.

This option is found only in the Advanced tab of blocks added in the Design App section. It is not available in the right-hand configuration panel of other areas like Workflow or App Configuration. It is used specifically to show or hide blocks inside the app interface that users interact with, based on set conditions.
Note:
When you're configuring a block in the app, go to the Advanced tab in the right panel and you'll find the Display this field if setting. This allows you to control the visibility of the selected block using a logical condition.
For example, suppose you've added a Single Selector block in your app called “Payment Required? with options like Yes and No and a Payment block to appear only when the user selects Yes. In this case, you'll set a condition for the Payment Gateway block using this option.


Since the logic already works like an “if” condition, you only need to define what the condition is. You’ll reference the block using @ followed by its name. This brings up a dropdown of available blocks. When selected, the block appears in the logic as {paymentneeded} and you can complete the formula like this:
{paymentneeded} = "Yes"

The block will now appear only when the user selects Yes in the Single Selector.
You can use a wide range of spreadsheet-like functions such as IF, AND, OR, NOT, etc. and even nested conditions to define your logic.
To create a condition based on another block’s input:

Example:
If you have a Single Selector block named Approval Required, and you want a Multi-line text block called Remarks to appear only when the user selects "Yes", the logic would be:
{approval} = "Yes"
Field values are case-sensitive. “yes” is not the same as “Yes”, so always match the exact spelling and case of the option as it appears in the field.
You can combine multiple conditions using logical functions like AND and OR.
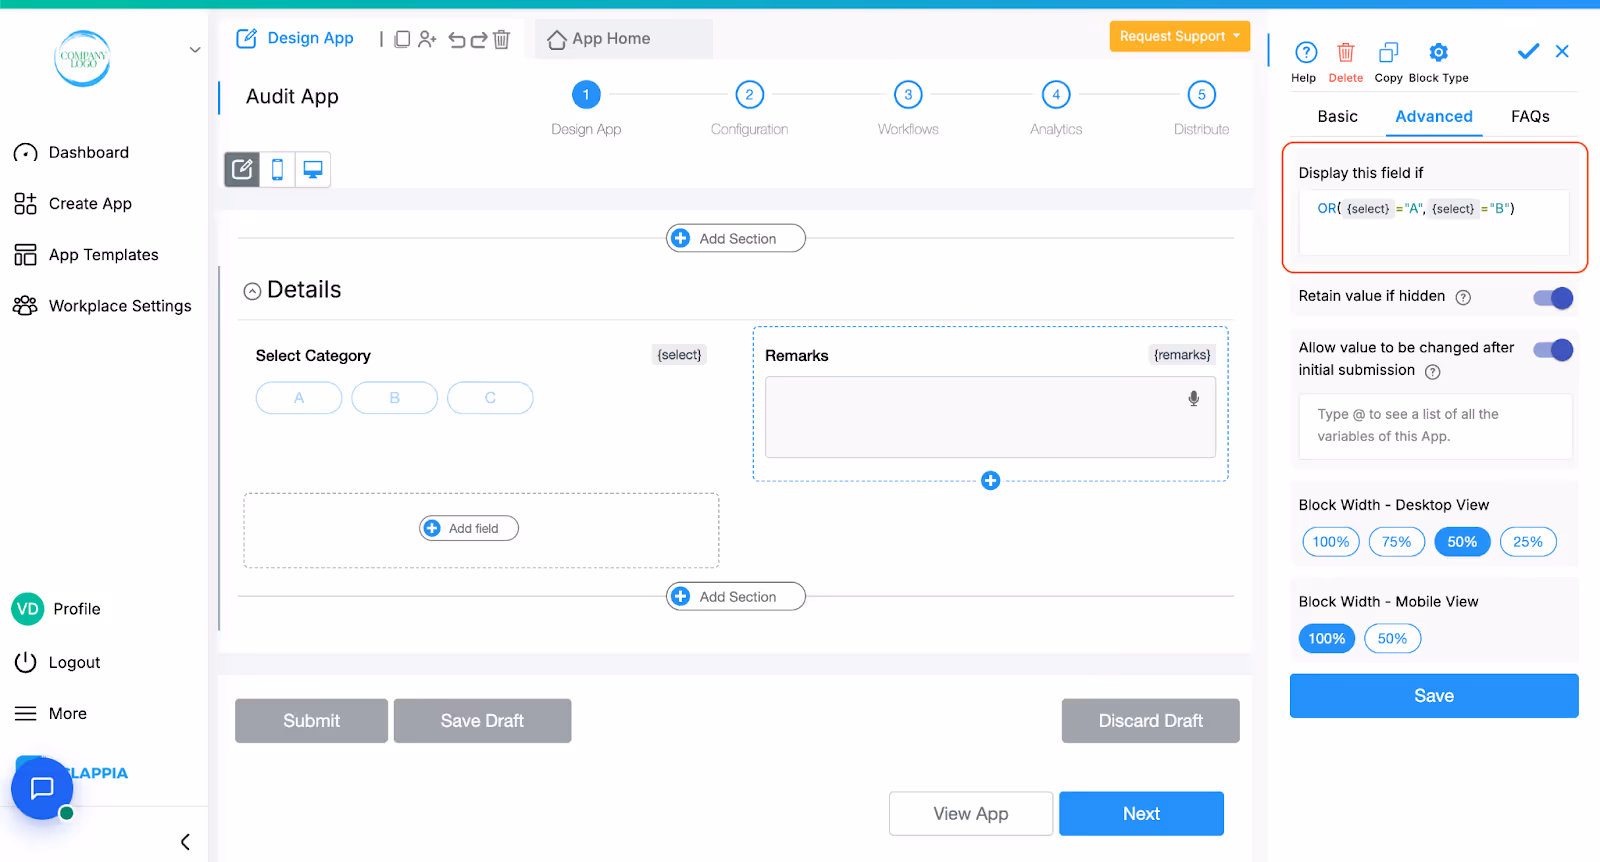
For example, if a Single Selector block named “Select Category” has options A, B, and C, and you want a block to appear only when either A or B is selected, the condition would be:
OR({Select Category} = "A", {Select Category} = "B")

You can also use multiple functions together for more specific conditions. For instance, if an app is used for quality checks and should behave differently depending on the user’s designation and response:
Let’s say a QC Manager is reviewing a submission and has to approve or reject it using a Single Selector with options Yes and No. If No is selected, a Multiline Text block named “Corrective Actions” should appear to capture the reason.
In that case, the display condition for the multiline text block would be:
AND({designation} = "QC Manager", {approved} = "No")

This ensures the text block appears only if the person logged in is a QC Manager and they’ve selected No.
Clappia automatically generates default variables from Workplace Settings as well as system-level details, which can be used in display conditions without creating a separate data management app.

In Workplace Settings, under the ‘Users’ tab, you have a list of all users added to your workplace with other details such as Email, Phone Number, etc. These are attributes that can be used directly in display conditions within your app. If you want to use the email id, type in @submitteremail or @currentUseremail. You can use either “current” or “submitter” to see all the attributes in the workplace.

Now, for example, if you’ve added a designation attribute in your workplace (by adding a new attribute), Clappia will generate a variable like {$submitter#designation} or {$currentUser#designation}. This can be used to show or hide specific blocks based on the user's role, such as making approval blocks visible only to managers.
These are particularly useful when showing or hiding blocks for different users without needing a separate MIS app dedicated for employee details.
Similarly, system-generated variables (other variables apart from the workplace) include:
And can also be used for setting conditions based on submissions or approval stage.
Example using statuses:
Let's say multiple statuses have been set up in the app, like "L1 Approved", "L2 Approved",etc. When a user submits the app for the first time, only the initial set of blocks is visible. Sections meant for upper-level teams remain hidden. Once a submission is made, it moves through different stages (it can go to L1 for approval and their section will be visible to them. Then it gets sent to L2 and they can see what the user filled in, what L1 filled and their section for L2, and so on).
To use display conditions for different approval levels:
For users submitting the first time, their sections must be visible to all levels. Therefore their sections need not have display conditions.
Next for L1, it needs to be seen by both L1 and L2 only, therefore the display formula is: OR({$status} = “L1 Approved”, {$status} = “L2 Approved”)
And finally for L2, only they need to be able to see their section, there the display formula is: {$status} = “L2 Approved”
Once you add a condition in Display this field if, an additional setting will appear called Retain value if hidden. It controls whether the values entered in a block are preserved if the block becomes hidden due to display conditions when the form is submitted. This option is not available for every block.
By default, this option is enabled for most blocks. It is generally recommended to keep it enabled, unless your use case specifically requires values to be cleared when the block is hidden.
If a block is hidden based on the condition, its value is removed when the form is submitted. But if this option is enabled, the value will be retained even when the block becomes hidden later.
Example: Suppose a team lead submits a request form where a set of blocks are visible. A manager later opens the same submission, but based on their designation, certain blocks may remain hidden. If those blocks had values entered earlier, enabling Retain value if hidden ensures that the original data remains intact even if the manager doesn't see those blocks. If it is disabled, those values will be erased when the form is re-submitted.
Note: Enabling this option is also helpful when the hidden block is used in calculations or workflows. If its value disappears due to being hidden and not retained, it can cause logic errors or incomplete data processing in connected parts of the app.
Most commonly used spreadsheet functions are supported. When you type in a function (like IF,AND,DATE,TODAY, etc.), a small guide appears below the text box showing the expected syntax. If nothing appears, that function is likely unsupported.
If your condition is not valid, an error will appear, and the block won’t behave as expected. Make sure your formula is correctly written.
If you're unsure how to structure a condition, you can always use tools like ChatGPT or another LLM to help you construct the formula. Or if you need customised help, you can raise a support request and Clappia’s solutions and support team will help you out.
L374, 1st Floor, 5th Main Rd, Sector 6, HSR Layout, Bengaluru, Karnataka 560102, India
3500 S DuPont Hwy, Dover,
Kent 19901, Delaware, USA


3500 S DuPont Hwy, Dover,
Kent 19901, Delaware, USA
L374, 1st Floor, 5th Main Rd, Sector 6, HSR Layout, Bengaluru, Karnataka 560102, India
.svg)
