
Still need help?

This article explains the AI Workflow Node, which can be configured as part of Workflows to perform AI-driven tasks, such as generating content, analyzing images, or performing calculations based on given instructions. Learn more about using workflows in Clappia here.

After you have added the AI workflow node to the app, you will be able to configure it. Once you have added the node or clicked on it, a right panel will appear where you can proceed to configure that node.

This is the name that appears in the Workflow on the left side (on the node). If there are multiple AI Workflow Nodes in the workflow, set different step names like AI Analysis for Defects or AI Text Generation.


Select the LLM provider to be used for the AI step. Currently available options include OpenAI, Claude, Gemini, Mistral, Grok, and Llama.
Each provider generates slightly different responses. You can experiment to see which one works best for your use case.
Once an LLM is selected, this dropdown shows the corresponding list of available models. Choose a model from the list to power your AI interaction. The different models available allow you to experiment and find the one that provides the most accurate or relevant responses for your task.
Note: The output may vary slightly depending on the model chosen, even if the instructions are the same. If needed, test your instructions on the provider’s platform before using them in the app to reduce unnecessary AI calls.

Some models are marked as Deprecated. These models have been removed by the LLM provider and are no longer supported. They are still shown in the UI only because some users may have previously configured their apps using these models. Removing them from the UI would break those existing configurations.
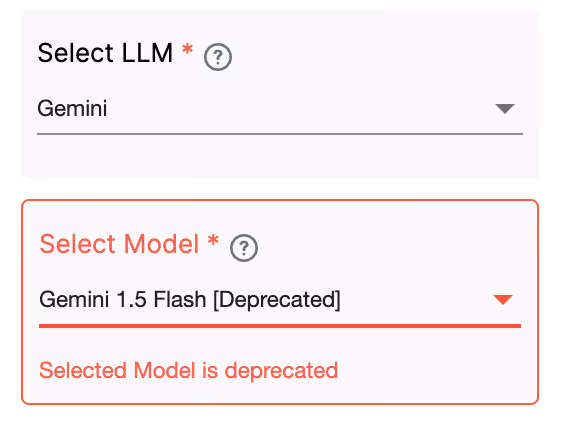
Deprecated models cannot be newly selected or saved when configuring the AI block. If an app was already configured using a deprecated model, the block will fail when it runs and return an error. In such cases, the admin must edit the block and switch to a supported model for the AI block to work again. This behaviour applies to Gemini as well as any other provider where models have been deprecated.
Type specific instructions here for the AI to follow. Type in the exact instructions to display the data that is needed and to remove any unwanted text generated by the AI. For example:
You can use field variables from the app to dynamically include data in the AI's instructions, enabling personalized and context-aware responses. To pull variables from the app, simply type in @ followed by the field name.
Note: Tweak your instructions to get the required results before distributing the app to users.
The AI Workflow Node supports analysing uploaded PDFs and images via field variables. For example, you can use variables from a Camera, Images & Files block to allow the AI to interpret the file contents.
Note: Claude can read PDFs of up to 100 pages. Only document file types are currently supported. More formats may be supported in future based on LLM capabilities.
Support for file analysis depends on the selected LLM and model. While the AI block allows PDFs and images to be uploaded, some LLMs and specific models do not support image analysis, document analysis, or both.
When such a model is selected, this limitation is shown clearly in the configuration panel using a warning message displayed in yellow, specifying whether the selected model does not support images, documents, or both. In these cases, any unsupported files are ignored, and the AI block processes only the text instructions and referenced fields.
For example, certain Gemini models are text-only and do not support image or document analysis, some Grok models support image analysis but do not support document analysis, and all currently available Llama models are text-only and do not support file analysis.

The parent step refers to the function that is directly above the AI Workflow Node in the workflow. This might be a Start node or another preceding workflow node.
This step is enabled by default. Disable this step to stop the AI Workflow Node and any nodes below it from executing.
Once the AI Workflow Node is saved, it generates a unique Variable Name for the node (e.g., ai). This variable stores the output generated by the AI, based on the instructions given. You can use this variable in subsequent workflow nodes to reference the AI-generated output directly, allowing for dynamic automation based on the AI results. Again, to pull up the variable for the workflow node, type in @ followed by the workflow node’s name.

The Variable Name created by the AI node can be integrated into other workflow nodes to automate actions. Here are some examples:
This variable-driven approach enhances flexibility, enabling you to apply the AI output dynamically across different parts of the workflow.
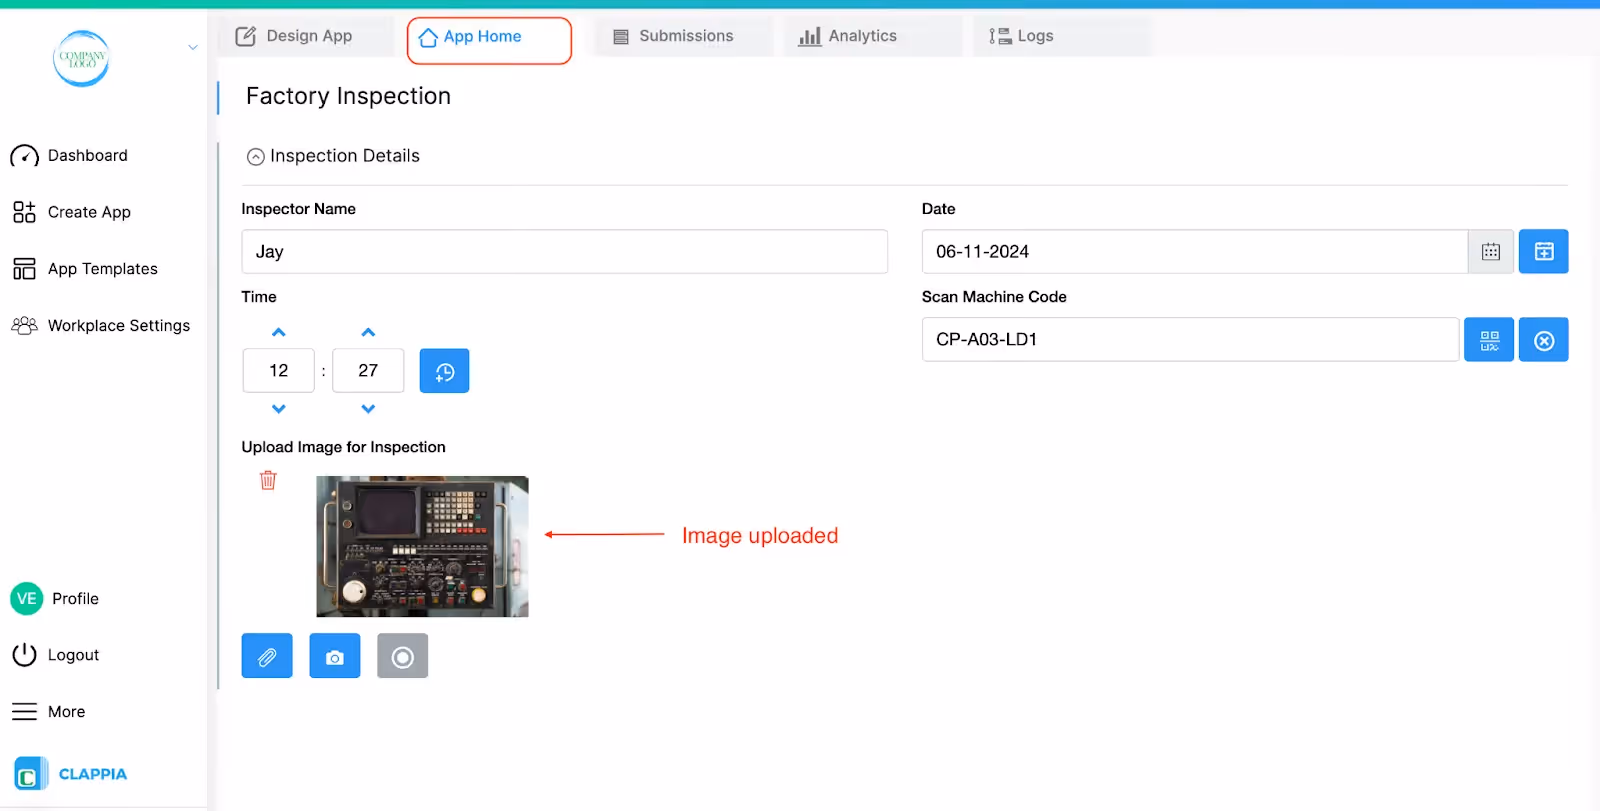
A manufacturing facility performs routine inspections on control panels for critical machinery to ensure ongoing functionality and safety compliance. Inspectors photograph the panel, and the AI Workflow Node analyzes the image to identify potential issues due to wear and tear.
AI Node
Step Name: AI
LLM: OpenAI
AI Model: gpt-4o
Instructions: Analyse the image in {upload_ima} to check for defects such as missing buttons, damaged displays, loose wiring, misaligned labels, Loose or Missing Screws and Rust or Corrosion. Generate a report that begins with 'Defect Detected' if issues are found, listing each defect. If no issues, return output as 'No Defects'.

In the instructions, the variable {upload_ima} has been used as there is a Camera, Images & Files block added to the app with that variable name.
If Node
Condition: LEFT({ai1}, 15) = "Defect Detected"
If Node
Condition: LEFT({ai1}, 15) = "No Defects"

Body: {ai1}
Rest of the configurations for this node as per user requirement. Check here to see how to configure the email node.

Once a submission is made with the image uploaded;
The workflow begins, and the AI node processes the image as per instruction. As per the workflow the email is received as seen in the image below;

The body of the email, instead of being manually written, dynamically takes the output generated by the ai which is a complete report as asked in the instruction of the AI node. Modify the instructions to get different results as per requirements.
Use Output Fields to store specific values extracted by the AI so they can be used later in the workflow.
For example, suppose users upload an invoice through a Camera block and your AI instructions ask the AI to extract the buyer's email address, invoice date, invoice number, and total amount.
In Output Fields, enter the name of each value you want to store, such as Email, Date, Invoice, and Total. Click Add another field to create additional output fields.
When the AI Workflow runs, the extracted values are stored in these output fields as workflow variables.
You can reference these variables in any workflow node that appears after the AI Workflow node. For example, if an Email workflow node is placed below the AI Workflow node, type @ followed by ai or the workflow name in the Email Address field and select ai#Email. The email will be sent to the email address extracted by the AI.
Similarly, you can use variables such as ai#Date, ai#Invoice, and ai#Total in the email body or anywhere else that supports workflow variables. This allows you to extract information once using AI and reuse it throughout the rest of the workflow.
The AI Workflow Node has a monthly usage limit of 100. It shares this limit with the AI Block used in the Design App.
To increase AI usage, you can go to Workplace Settings > Billings tab and select the add-on. Your AI usage can also be seen in the Billings tab.
If you already have your own API key for the AI provider you wish to use (such as OpenAI, Claude, Gemini, Mistral, or Grok), you can connect that key in Clappia and continue to use the AI workflow. This bypasses the usage limit in Clappia or the need for add-ons and you can continue to use the AI workflow.
To connect your own AI API key, open your app, go to Design App > Configurations > Third Party Integrations.
On the right panel, enter your API key for the selected AI provider and save.
Once connected, the AI Workflow Node will use your API key for processing requests.
When using your own API key:
This allows you to control AI usage limits and billing directly through your AI provider account.
Workflows in Clappia run on individual submissions, such as when a user submits or manually edits a record. However, when using Bulk Upload or Bulk Edit from the Submissions tab, workflows are not triggered, even though new submissions may be added or existing ones updated.
This is because workflows are designed to process one submission at a time. Triggering them for bulk operations can lead to incomplete or inconsistent results, especially for complex workflows.
If you need workflows to run after a bulk operation, currently you will need to open each submission manually and save it. This will count as an edit and trigger the workflow normally.
L374, 1st Floor, 5th Main Rd, Sector 6, HSR Layout, Bengaluru, Karnataka 560102, India
3500 S DuPont Hwy, Dover,
Kent 19901, Delaware, USA


3500 S DuPont Hwy, Dover,
Kent 19901, Delaware, USA
L374, 1st Floor, 5th Main Rd, Sector 6, HSR Layout, Bengaluru, Karnataka 560102, India
.svg)
